ABS Mercedes Rims Push The Limits Of 3D Printing

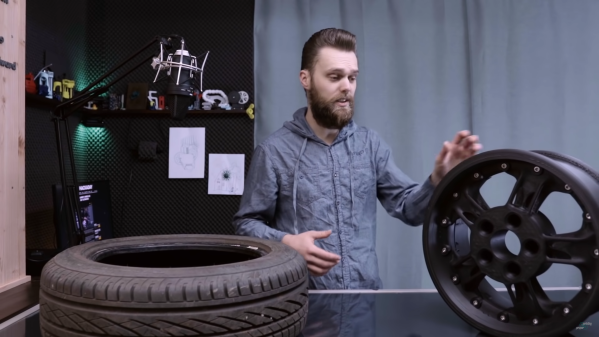
While we’re big believers in 3D printing here at Hackaday, there’s no denying that some things just aren’t meant to be printed. For example, most of us would agree that it’s not the first choice for making rims for a passenger car. We imagine that [Jón Schone] from Proper Printing probably feels the same way, but that didn’t stop him from trying to do it anyway.

A couple of months ago [Jón] got a test subject in the form of an older Mercedes with 19-inch rims. The first two challenges are bed size and warping, so he modified a Creality CR10 S5 with a heated chamber capable of reaching 70 °C to reduce warping with the ABS filament he intended to use. Another challenge is the amount of filament required for the print, especially since [Jón] wasn’t keen on babysitting the machine to replace the spool every so often. His attempt at building a filament joiner ultimately didn’t work out, so in the end he simply sourced the filament in bulk size rolls.

Bolts hold the two halves of the rim together.

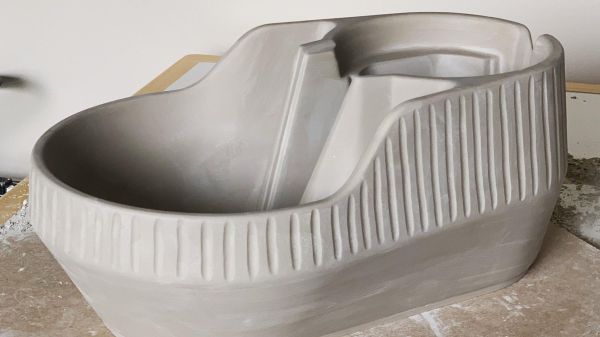
Eventually [Jón] managed to print a complete rim in two halves, bolted together around its circumference. Unfortunately, even with the heated chamber, the parts still warped all around the edges. This left a gap at the seam, but to fit a tubeless tire, the rim had to be airtight. So the entire inside surface was painted to close any small gaps, and the larger gaps were filled with sealant.

In the end it was still unable to hold pressure with a tire mounted, so it was test fitted to the car just to see if it would carry the weight. This test also failed, splitting on the thinnest part of the rim. [Jón] has headed back to the drawing board to try again in 2021. We probably would have moved on by now, but you have to admire his tenacity. We hope to see success in the new year.

Printing large parts brings its own set of challenges, but if you stick to good old PLA it’s not too difficult. [Ivan Miranda] has made a name for himself with massive 3D printed projects like a ride-able tank, and also built a supersized 3D printer for future projects.

Continue reading “ABS Mercedes Rims Push The Limits Of 3D Printing”

Uncommon Bárány Chair Gets Fixed Up

Ever heard of a Bárány chair? Neither had [Troy Denton] before he was asked to repair one, but that didn’t stop him from rolling up his sleeves and tying to get the non-functional device back in working order. As it didn’t come with a user guide, manual, schematic or any other information, he had to rely on his experience and acumen gathered over years of practical work. Luckily for us, he decided to document the whole process.

While it’s not well known outside of aviation circles, the Bárány chair is an important piece of equipment in training pilots to get used to spatial disorientation. The device is essentially a motorized revolving chair, the idea being to spin the subject to induce disorientation. Rotation speed and direction can be controlled via a handheld wireless remote terminal.

When [Troy] first powered it up, the error code on the remote indicated “no power to base unit”. That turned out to be a quick fix – he simply had to move the power connection from a switched socket that had been turned off to a different outlet. But while that cleared the error message, the chair still wouldn’t rotate for any of the knob settings.

Manually rotating the chair showed the RPM on the remote, so [Troy] narrowed down his search to the motor related sections. The motor was being driven by a servo type signal, but changing the speed and direction knob on the remote didn’t seem to alter the control signal when he checked it with his scope. Opening up the hand held remote immediately uncovered the failed part – the rotary encoder for setting the speed and direction had physically split in to two pieces.

Since there was a clean split in the encoder, he was able to temporarily hold it back together to confirm that the chair could spin up. The cause was most likely “User Error” – the last person to conduct the test probably turned the knob rather enthusiastically. A new part is on the way, and the chair should be getting back to making prospective pilots dizzy in no time.

We love a good repair story here at Hackaday. Whether it’s patiently rebuilding a snapped PCB with bodge wires or coming up with replacement parts that may well be better than the originals, we never get tired of seeing a broken piece of gear put back together.

Continue reading “Uncommon Bárány Chair Gets Fixed Up”

Hackaday Links Column Banner

Hackaday Links: January 3, 2021

Last week we featured a story on the new rules regarding drone identification going into effect in the US. If you missed the article, the short story is that almost all unmanned aircraft will soon need to transmit their position, altitude, speed, and serial number, as well as the position of its operator, likely via WiFi or Bluetooth. The FAA’s rule change isn’t sitting well with Wing, the drone-based delivery subsidiary of megacorporation Alphabet. In their view, local broadcast of flight particulars would be an invasion of privacy, since observers snooping in on Remote ID traffic could, say, infer that a drone going between a pharmacy and a neighbor’s home might mean that someone is sick. They have a point, but how a Google company managed to cut through the thick clouds of irony to complain about privacy concerns and the rise of the surveillance state is mind boggling.

Speaking of regulatory burdens, it appears that getting an amateur radio license is no longer quite the deal that it once was. The Federal Communications Commission has adopted a $35 fee for new amateur radio licenses, license renewals, and changes to existing licenses, like vanity call signs. While $35 isn’t cheap, it’s not the end of the world, and it’s better than the $50 fee that the FCC was originally proposing. Still, it seems a bit steep for something that’s largely automated. In any case, it looks like we’re still good to go with our “$50 Ham” series.

Staying on the topic of amateur radio for a minute, it looks like there will be a new digital mode to explore soon. The change will come when version 2.4.0 of WSJT-X, the program that forms the heart of digital modes like WSPR and FT8, is released. The newcomer is called Q65, and it’s basically a follow-on to the current QRA64 weak-signal mode. Q65 is optimized for weak, rapidly fading signals in the VHF bands and higher, so it’s likely to prove popular with Earth-Moon-Earth fans and those who like to do things like bounce their signals off of meteor trails. We’d think Q65 should enable airliner-bounce too. We’ll be keen to give it a try whenever it comes out.

Look, we know it’s hard to get used to writing the correct year once a new one rolls around, and that time has taken on a relative feeling in these pandemic times. But we’re pretty sure it isn’t April yet, which is the most reasonable explanation for an ad purporting the unholy coupling of a gaming PC and mass-market fried foods. We strongly suspect this is just a marketing stunt between Cooler Master and Yum! Brands, but taken at face value, the KFConsole — it’s not a gaming console, it’s at best a pre-built gaming PC — is supposed to use excess heat to keep your DoorDashed order of KFC warm while you play. In a year full of incredibly stupid things, this one is clearly in the top five.

And finally, it looks like we can all breathe a sigh of relief that our airline pilots, or at least a subset of them, aren’t seeing things. There has been a steady stream of reports from pilots flying in and out of Los Angeles lately of a person in a jetpack buzzing around. Well, someone finally captured video of the daredevil, and even though it’s shaky and unclear — as are seemingly all videos of cryptids — it sure seems to be a human-sized biped flying around in a standing position. The video description says this was shot by a flight instructor at 3,000 feet (914 meters) near Palos Verdes with Catalina Island in the background. That’s about 20 miles (32 km) from the mainland, so whatever this person is flying has amazing range. And, the pilot has incredible faith in the equipment — that’s a long way to fall in something with the same glide ratio as a brick.

Active Aero For A Radio Control Car

Motorsport became obsessed with aerodynamics in the middle of the 20th century. Moving on from simple streamlined shapes, designers aimed to generate downforce with wing elements in order to get more grip between the tyres and the track. This culminated in the development of active aero, where wing elements are controlled by actuators to adjust the downforce as needed for maximum grip and minimum drag. Recently, [Engineering After Hours] decided to implement the technology on his Traxxas RC car.

The system consists of a simple multi-element front wing, chosen for its good trade-off between downforce and drag. The wing is mounted to a servo, which varies the angle of attack as the car’s pitch changes, as detected by a gyroscope. As the car pitches up during acceleration, the angle of the wing is increased to generate more downforce, keeping the nose planted.

The basic concept is sound, though as always, significant issues present themselves in the implementation. Small bumps cause the system to over-react, folding the wing under the front wheels. Additionally, the greater front downforce caused over-steer, leading to the install of a rear wing as well for better aero balance.

Regardless of some hurdles along the way, it’s clear the system has potential. We look forward to the next build from [Engineering After Hours], which promises to mimic the fan cars of the 70s and 80s. If you’re looking to improve aero on your full-size car, we’ve got a guide to that too. Video after the break.

Continue reading “Active Aero For A Radio Control Car”

Vintage Meters Reborn As Steam Punk Clock

[Build Comics], purveyors of comic strips “where tools are heroes”, have saved another pair of old, vintage, analog meters from the junkyard by converting them into a Meter Clock. The real heroes of the story are their trusty tools – Mac X the knife, Mr. TS the table saw and his trusty band of clamps, G. Rinder the angle grinder, Weldy the welder, Sharp Eye the marker, rounded up by Sandy the Sander and Jiggy Saw. The Drake & Gorham (London) meters going under the knife appear similar to vintage hardware from just after the end of World War II, such as this Ferranti Ammeter found at the Science Museum Group, making them at least 75 years old.

A small cam is used to engage the DST switch.

As you might expect, the conversion process is reminiscent of their previous projects. The original moving-coil movements are discarded, and the pointer is attached to a servo which will act as the new movement. Fresh dials are prepared to replace the original ampere markings with hours and minutes. To retain some of the original charm, the new dials have discoloration and blemishes replicated from the old dials.

The set screw which was once used to align the pointer with the zero mark on the dial is now used to activate a micro switch that enables daylight savings time. Two additional buttons provide a convenient interface to adjust the time. Precision time signals are derived from a DS3231 RTC module connected to an Arduino. A pair of seven segment displays are connected to the Arduino to make it easier to set the time. A piece of oak plank, surrounded by a metal angled frame, is used as a base for mounting the two meters so that the clock can be hung up on the wall.

If you’d like to build some more vintage inspired instrumentation, [Build Comics] have you covered with a Classy Weather Display or a Plant Moisture Gauge.

Continue reading “Vintage Meters Reborn As Steam Punk Clock”

Dog Bowls Show The Versatility Of Ceramic Slip Casting

Here at Hackaday, we feature projects that are built of just about every material imaginable. Silicon-spangled fiber-reinforced epoxy resin is our primary medium, but we see plastic, wood, steel, aluminum, and even textiles from time to time. It’s not often we see slip-cast ceramic molding, though, and when it pops up, it’s always good to take a look at this versatile manufacturing method.

The back-story on this one is that [thoughtfulocean], a mechanical engineer idled by COVID lockdowns, wanted custom water bowls for his dogs, one of whom is clearly a grumpy Ewok. The design started with a 3D-print of the final vessel, printed in sections and glued together. These were used to create a two-piece plaster mold into which a watery slurry of clay, or slip, was poured. The plaster mold dehydrates the slip, leaving behind a semi-solid layer of clay of the desired thickness once the excess slip is poured off. The resulting casting is then fired in a kiln and glazed.

Of course, [thoughtfulocean] ran into a few problems along the way. The first mold was warped thanks to the mold box bowing under pressure from the plaster, so the whole molding process had to be revamped. The finished bowl also shrunk less than expected after firing, which led to some more revisions. But the finished bowl look really nice, and the included pump and filter keeps the Ewok’s water free from the yuck a dog’s face can introduce. As a bonus, it sounds like [thoughtfulocean] might have created a marketable product from all this. Take that, COVID!

Slip-casting ceramic may not be all that common around here, but ceramic as a material isn’t exactly a stranger. And who says slip casting is limited to ceramic? After all, we’ve seen a similar method used with plastic resin.

[via r/engineering]

An Arduino And A CD-ROM Drive Makes A CD Player

In an age of streaming media it’s easy to forget the audio CD, but they still remain as a physical format from the days when the “Play” button was not yet the “Pay” button. A CD player may no longer be the prized possession it once was, but it’s still possible to dabble in the world of 120 mm polycarbonate discs if you have a fancy for it. It’s something [Daniel1111] has done with his Arduino CD player, which uses the little microcontroller board to control a CD-ROM drive via its IDE bus.

The project draws heavily from the work of previous experimenters, notably ATAPIDUINO, but it extends them by taking its audio from the drive’s S/PDIF output. A port expander drives the IDE interface, while a Cirrus Logic WM8805 S/PDIF transceiver handles the digital audio and converts it to an I2S stream. That in turn is fed to a Texas Instruments PCM5102 DAC, which provides a line-level audio output. All the code and schematic can be found in a GitHub repository.

To anyone who worked in the CD-ROM business back in the 1990s this project presses quite a few buttons, though perhaps not enough to dig out all those CDs again. It would be interesting to see whether the I2S stream could be lifted from inside the drive directly, or even if the audio data could be received via the IDE bus. If you’d like to know a bit more about I2S , we have an article for you.