Raspberry Pi Tally Lights

Running a camera studio is a complicated affair from pretty much every angle. Not only is the camera gear expensive but the rest of the studio setup takes care and attention down to the lighting as well. When adding multiple cameras to the mix, like for a television studio, the level of complexity increases exponentially. It’s great to have a few things that simplify the experience of running all of this equipment too, without the solution itself causing more problems than it solves, like these network-operated Raspberry Pi-powered tally lights.

A tally light is the light on a camera that lets the person being recorded know which camera is currently in use. Networking them all together often requires complex wiring or at least some sort of networking solution, which is what this particular build uses. However, the lights are controlled directly over HTTP rather than using a separate application which might need a port open on a firewall or router, which not only simplifies their use but doesn’t decrease network security.

The HTTP interface, plus all of the software and schematics for this build, are available on the project’s GitHub page. We imagine the number of people operating a studio and who are in need of a tally light system to be fairly low, but the project is interesting from a networking point-of-view regardless of application. If you do have a studio like this and are looking for other ways to improve it, we do have a simple teleprompter hack that might be right up your alley.

Adidas Going Natural With Mycelium Leather

Whether you are vegan or just want to try something new in the shoe department, Adidas will soon have your feet covered. They are currently working on a leather alternative made of mycelium, which is the network of fungal filament material that produces mushrooms, toadstools, truffles, and more. Hopefully they’re not using live mycelium, otherwise your shoes will grow mushrooms when they get wet like this mycelium canoe we saw a few weeks ago.

Adidas have really rooted themselves in sustainability over the past few years. They claim to have made 15 million pairs of shoes in 2020 out of recycled plastic waste collected from beaches and coastlines, and they’re shooting for 17 million pairs in 2021. The company started offering these in 2017, and they feature thread in the laces and other places that was spun from ocean plastic waste. Adidas are also using a lot of recycled polyester and are developing a new type of recycled cotton, according to Business Insider.

No use for mushroom shoes, canoes, or coffins (translated)? Everyone could probably use more insulation in their home. Why not grow your own?

Thanks to [Charles] for the mycelium coffin tip.

Building A Website-Controlled Christmas Tree

Back in the day, Christmas lights were simple strings of filament bulbs, and if you really splashed out, you could get some that flashed. These days, we expect a lot more capability out of our blinking decorations. [JT] has put together a rather nifty website-controlled setup for his own tree.

The setup is a little different than builds you may be used to. The website runs on a cloud-hosted virtual machine on Digital Ocean, rather than running locally. This allows anyone on the web to visit the site, and use the interface to control the lights on the Christmas tree. An image of the tree is used as the interface, and allows users to set the color of each individual LED on the tree. The LEDs themselves are driven from an NodeMCU ESP8266, which uses its WiFi connection to query the website itself and grab the color data as needed. [JT] has also included a secondary interface, where the chat of the Youtube livestream can be used to control the LEDs, too.

It’s a build that’s a touch more complicated than most typical online LED blinkers, but one that teaches useful skills in interfacing on the web and using virtual machines. We’ve seen other builds in this genre too; even some that are reactive to “Christmas fever” itself. Video after the break.

Continue reading “Building A Website-Controlled Christmas Tree”

Low-Cost Head Mounted Display From FPV Gear

A common complaint we’ve seen on many of the recent cyberdeck builds is that they don’t offer any display technology more advanced than a tablet-sized IPS panel. The argument goes that to be a true deck in the Gibsonian sense, it’s got to have some kind of virtual reality interface or at least a head mounted display. Unfortunately such technology is expensive, and often not particularly hacker friendly.

But assuming you can settle for a somewhat low-tech alternative, the simple head mounted display that [Jordan Brandes] has been fiddling with is certainly a viable option. By mounting a five inch 800×480 TFT LCD to the front of a pair of goggles designed for first person view (FPV) flying, you can throw together a workable rig for around $30 USD. Add in some headphones, and you’ve got a fairly immersive experience for not a lot.

Naturally the display will show whatever HDMI signal you give it, but in his case, [Jordan] has mounted a Raspberry Pi to the back of it to make it a complete wearable computer. With a Bluetooth travel keyboard in the mix, he’s even able to get some legitimate work done with this setup. If he ends up combining this with the ultrasonic keyboard he was working on earlier in the year, he’ll be getting pretty close to jacking into cyberspace for real.

Hackers have been chasing cheap head mounted displays for years now. Back in 2007 the best you could do for this kind of money was a 300×240 black and white monocle. Getting our hands on the good stuff is still harder than we’d like, but at least we’re moving in the right direction.

Continue reading “Low-Cost Head Mounted Display From FPV Gear”

Simple AC Current Detector Built On A 9 Volt

When working around mains voltages, it can be useful to know whether a given circuit is live or not. While this can be done by direct connection with a multimeter, non-contact methods are available too. A great example is this simple wireless AC current detector from [NEW PEW].

The circuit is a simple one, and a classic. The spring from a ballpoint pen is soldered to the base of a BC547 transistor, and when held close enough to a conductor carrying AC power, a current is induced in the spring which is sufficient to turn the transistor on. The transistor then switches on a second BC547, which lights an LED. The whole circuit is built on top of a battery clip so it can be run straight from the top of a standard 9 volt battery.

It’s a circuit you’ll find all over the place, even built into many modern multimeters. It can be particularly useful to help avoid drilling through mains wires embedded in the walls of your home. Of course, if you’d like even more information about what’s lurking within your walls, consider this capacitive imaging hack. Video after the break.

Continue reading “Simple AC Current Detector Built On A 9 Volt”

How To Get Into Cars: Drifting Mods

Drifting is a hugely popular motorsport unlike any other, focusing on style and getting sideways rather than the pursuit of the fastest time between two points. It’s a challenge that places great demands on car and driver, and proper attention to setup to truly succeed. Here’s a guide to get your first drift build coming together.

Getting Sideways (And Back Again)

Drift cars are specialised beasts, and like any motorsport discipline, the demands of the sport shape the vehicle to suit. If you’re looking to drift, you’ll want to choose a project car with a front-engined, rear-wheel drive layout. While it’s somewhat possible to drift with other layouts, the act of kicking out the tail and holding a slide at speed is best achieved with the handling characteristics of such a vehicle. It all comes down to weight transfer and breaking traction at will. Of course, over the years, certain cars have become expensive on the second-hand market due to their drift prowess, so you may have to get creative if your first choice isn’t available at your budget. It pays to talk to the drifters down at your local track to get an idea of which cars in your area are the best bet for a drift build. Once you’ve got yourself a car, you can get down to installing mods!

Continue reading “How To Get Into Cars: Drifting Mods”

Xolography: A Method To Improve The Accuracy Of Volumetric 3D Printing

Over the past years, additive manufacturing (AM) has become a common tool for hackers and makers, with first FDM and now SLA 3D printers becoming affordable for the masses. While these machines are incredibly useful, they utilize a slow layer-by-layer approach to produce objects. A relatively new technology called Volumetric Additive Manufacturing (VAM) promises to change all that by printing the entire object in one go, and according to a recent article in Nature, it just got a big resolution boost.

The concept is similar to SLA printing, but instead of curing the resin by projecting a 2D image of the current layer into the container, VAM uses multiple lasers to create intersecting points within the liquid. After exposing the resin to this projection for several seconds, the 3D model is built all at once. Not only is this far faster, but it removes the need for support materials and even a traditional build plate is unnecessary.

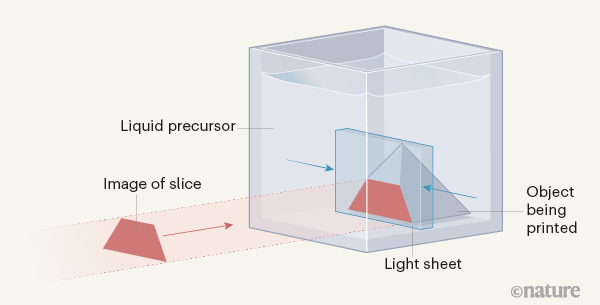
Visualization of the dual-color printing process as used by Regehly et al. (Credit: Nature)

Up till now the resolution and maximum object size of VAM has left a lot to be desired, but in this new research by Regehly et al. claim to have accomplished a feature resolution of ‘up to 25 micrometers’ and a solidification rate of ‘up to 55 cm3/s’. They used two crossing laser beams of different wavelengths, one to form the ‘light sheet’ (blue in the graphic) and a second beam (in red) to project the slide onto this light sheet. They refer to this technique as ‘xolography’, as a mesh-up of ‘holo’ (Greek for ‘whole’) and the ‘X’ shape formed by the crossing laser beams.

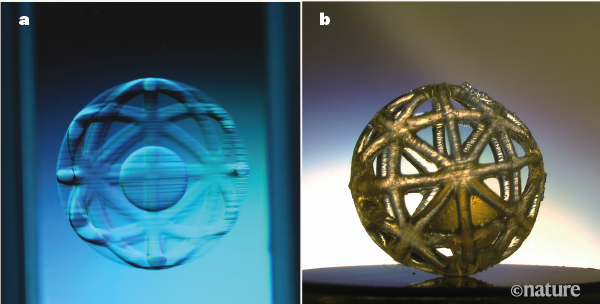
Key to making this work is the chemistry of the resin: the first wavelength excites the molecules called DCPI (Dual-Color Photo Initiators) that are dissolved in the resin. The second wavelength when hitting the same molecules initiates the resin polymerization process. The object pictured at the top of the page was a test print; producing such a design on a traditional 3D printer would have required a considerable amount of difficult to remove support material.

While this is obviously not a technology hobbyists will be using to replace their FDM and SLA printers with any time soon, there are still many companies and institutes working on various VAM technologies and approaches. As more and more of the complexities and challenges are dealt with, who knows when VAM may become a viable replacement for at least some SLA applications?

Thanks to [Qes] for the tip.