Share Screen To RGB Panel With Pi Pico W

RGB LEDs are great for adding a bit of color to your life, and it’s even more satisfying to use a matrix of them as a graphic display. [bitluni] built an RGB LED display with Pi Pico to which you can share a pixelated version of your PC’s screen.

[bitluni] wanted to gain some experience with MicroPython on the Raspbery Pi Pico W, and had previously used WebSockets to transmit display data over WiFi. Unfortunately, the available MicroPython WebSockets implementation didn’t leave enough RAM for the rest of the code. Instead, he set up a simple HTTP server on the Pico that receives the pixel data as a POST request. This makes for a slow refresh rate but still looks great, especially with the 3D printed rear-projection frame.

To send display data from the computer, [bitluni] uses a simple locally hosted HTML page that takes the Pico’s IP address, and prompts you to select the display or window you want to share. It uses JavaScript to grab the display data, generate the required low-res pixel values, and send the POST request.

This looks like a fun weekend project to add to your lab or home and only costs about $20 in parts. It’s basically a scaled-down version of his giant ping pong ball wall display.

Continue reading “Share Screen To RGB Panel With Pi Pico W”

Hackaday Links Column Banner

Hackaday Links: August 28, 2022

The countdown for the first step on humanity’s return to the Moon has begun. The countdown for Artemis 1 started on Saturday morning, and if all goes well, the un-crewed Orion spacecraft atop the giant Space Launch Systems (SLS) booster will liftoff from the storied Pad 39B at Cape Canaveral on Monday, August 29, at 8:33 AM EDT (1233 GMT). The mission is slated to last for about 42 days, which seems longish considering the longest manned Apollo missions only lasted around 12 days. But, without the constraint of storing enough consumables for a crew, Artemis is free to take the scenic route to the Moon, as it were. No matter what your position is on manned space exploration, it’s hard to deny that launching a rocket as big as the SLS is something to get excited about. After all, it’s been 50 years since anything remotely as powerful as the SLS has headed to space, and it’s an event that’s expected to draw 100,000 people to watch it in person. We’ll have to stick to the NASA live stream ourselves; having seen a Space Shuttle launch in person in 1990, we can’t express how much we envy anyone who gets to experience this launch up close.
Continue reading “Hackaday Links: August 28, 2022”

Hackaday Prize 2022: Compact Solar Tracking System Doesn’t Break The Bank

If you need to squeeze every available watt out of a solar panel, you’ll probably want to look into a solar tracking system. Unfortunately, they are usually quite large, heavy, and expensive. As an alternative, [JP Gleyzes] has put together a DIY solar tracking system that aims to address these issues.

Starting with a 100 W flexible solar panel purchased during a Black Friday sale, [JP] first created a simple frame using 20 mm PVC tubing and a few 3D printed brackets. It mounts on a wooden base with a printed worm gear rotation mechanism, powered by a stepper motor. The tilt is a handled by a lead screw made from a threaded rod, connected between the wooden base and the top of the solar panel, and is also driven by a stepper motor.

For even more efficiency, [JP] also created an MPPT charge controller with companion app using an ESP32, modified 20 A buck converter, and current sensor module. The ESP32 also controls the stepper motors. The optimum angle for the solar panel determined using the date, time, and the system’s GPS position. [JP] had also created a simple Android app to calibrate the panels’ start position.

This project is a finalist in the Planet-Friendly Power challenge of the 2022 Hackaday Prize, and all the details to build your own are available on your project page. Looking at the size of the system, we suspect future iterations could be even smaller.

Continue reading “Hackaday Prize 2022: Compact Solar Tracking System Doesn’t Break The Bank”

Automate Your Desk With The Upsy Desky

It might be surprising for some, but humans actually evolved to be long-distance runners. We aren’t very fast comparatively, but no other animal can run for as long or as far as a human can. Sitting at a desk, on the other hand, is definitely not something that we’re adapted to do, so it’s important to take some measures to avoid many of the problems that arise for those that sit at a desk or computer most of the day. This build takes it to the extreme, not only implementing a standing desk but also a ton of automation for that desk as well.

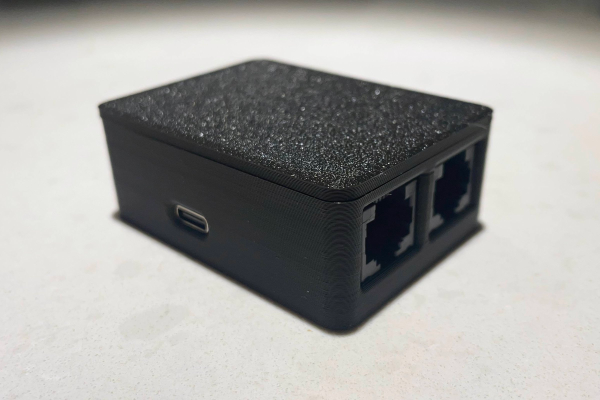
This project is an improvement on a prior build by [TJ Horner] called the WiFi Standing Desk Controller. This new version has a catchier name, and uses an ESP32 to run the show. The enclosure is 3D printed and the control board includes USB-C and a hardware UART to interface with the controller. The real perks of this device are the automation, though. The desk can automatically lift if the user has been sitting too long, and could also automatically lift if it detects no one is home (to help keep a cat off of the desk, for example). It also includes presets for different users, and can export data to other software to help analyze sitting and standing patterns.

The controller design is open source and could be adapted to work on a wide-array of powered desks. As we’ve seen in the past, with the addition of a motor, even hand-crank standing desks can be upgraded. If you haven’t gotten into the standing desk trend yet, we hope that you are at least occasionally going for a run.

Sleep Posture Monitor Warns You Away From Dangerous Positions

Age, we’re told, is just a number, but that number seems to be the ever-increasing count of injuries of a ridiculous nature. Where once the younger version of us could jump from a moving car or fall out of a tree with just a few scrapes to show for the effort, add a few dozen trips around the sun and you find that just “sleeping funny” can put you out of service for a week.

Keen to avoid such woes, [Elite Worm] came up with this sleep posture alarm to watch for nocturnal transgressions, having noticed that switching to a face-down sleeping position puts a kink in his neck. He first considered using simple mechanical tilt switches to detect unconscious excursions from supine to prone. But rather than be locked into a single posture, he decided to go with an accelerometer instead. The IMU and an ATtiny85 live on a custom PCB along with a small vibrating motor, which allows for more discrete alerts than a buzzer or beeper would.

Placed in a 3D printed enclosure and clipped to his shorts, the wearable is ready to go. The microcontroller wakes up every eight seconds to check his position, sounding the alarm if he’s drifting into painful territory. [Elite] did some power analysis on the device, and while there’s room for improvement, the current estimated 18 days between charging isn’t too shabby. The video below has all the details; hopefully, design files and code will show up on his GitHub soon.

Considering that most of us spend a third of our life sleeping, it’s little wonder hackers have attacked sleep problems with gusto. From watching your brainwaves to AI-generated nonsense ASMR, there’s plenty of hacking fodder once your head hits the pillow.

Continue reading “Sleep Posture Monitor Warns You Away From Dangerous Positions”

A clock displaying a micro QR code

LED Clock Uses Micro QR Codes To Show The Time

As you probably know, we love our clocks here at Hackaday. Odd display technologies are always interesting to see, as are unusual encoding techniques such as binary, ternary or higher-radix number systems. Still, clocks are typically meant to be human-readable, even if their encoding might be a little eccentric.

[Kitchi] however built an LED-based clock that is not human-readable, at least not without quite a bit of training. This is because it displays the time by generating a QR code, which only becomes readable to most humans through the use of a smartphone app. Of course, this negates the need for a clock since your smartphone will already have one anyway — but whoever said a clock needs to be useful?

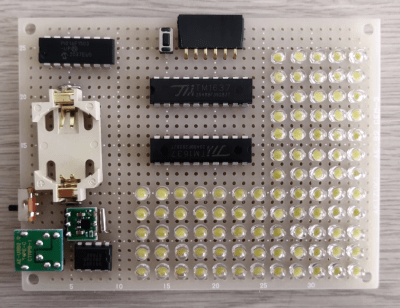
To be fair, the display could conceivably be read by a determined human, since the QR format used is the tiny Micro QR M2 version that measures only 13×13 pixels. It’s capable of storing ten decimal digits, just enough to hold the date and time in mmddhhmmss format. The fixed part of the QR code is made of paper, while the variable part is formed through a grid of 90 white LEDs. The LEDs are mounted on a piece of prototype board along with a PIC 16F1504 microcontroller, two TM1637 LED drivers and a DS1307 real-time clock with battery backup.

If decoding QR codes is not your thing, or you simply haven’t got your smartphone on you, then the QR clock can also be set to a more human-readable format by adding a jumper. The time will then scroll across the LED screen in ordinary decimal format.

The video in the link is in Japanese, with no automatic translation available, but the build process is clearly shown and should be understandable even if you can’t follow the cheerful robotic narrator. We’ve seen a couple of QR-code based clocks before, some with an LCD screen and some with retro styling, but all of those use the larger standard QR code which definitely no human can decode visually. Or can you? Let us know in the comments!

Thanks for the tip, [J. Peterson]!

High Speed RC Jet Car Is A Harsh Teacher

Making machines go fast has always been a seemingly unavoidable impulse for humans. With the advent of radio control, it’s possible to get a taste of the rush without putting your life and too much money on the line. In the spirit of speed, [James Whomsley] strapped a jet turbine engine to an RC car, and learned some hard lessons along the way.

The car started as a four-wheel drive electric race car, but [James] removed most of the drive train components and mounted the jet turbine engine on a pair of 3D printed struts. Originally intended for large-scale RC planes, the little jet engine produces about 120 N of thrust. To allow the car to stop, [James] kept the drive shafts and connected them to a centrally mounted disk brake unit.

For the first high-speed test runs, James added a vacuum-formed shell and a pair of large vertical stabilizers for high-speed stability. On the 3rd test run at a local racetrack, the car got up to 190 km/h (118 MPH) before it veered off the track and crashed. Fortunately, the chassis and engine only sustained minor damage and were easy to repair.

James rebuilt the car with a lower engine to reduce the center of gravity and added an electronic gyro in an attempt to stabilize the car at high speed. Time ran out, and he wasn’t able to test the car before taking it to a high-speed RC event held on a runway. This led to another crash when the car again veered off the track after badly oscillating. After checking the onboard footage, [James] discovered the receiver had experienced a loss of signal, and an incorrect fail-safe setting made the engine go full throttle. After more tests, James also found that excessive play in the steering mechanism had caused the gyro to induce oscillations.

Although this car failed in the end, [James] intends to take the lessons learned into a new high-speed car build. [rctestflight] also did some testing with an EDF-powered RC car recently, and used a drone flight controller for high speed stability. This is not [James]’ first foray into speed machines, having previously experimented with a rocket plane.

Continue reading “High Speed RC Jet Car Is A Harsh Teacher”