An image describing parts of a Tesla modem board

LTE Modem Transplant For A Tesla Imported Into Europe

When modern connected cars cross continents, novel compatibility problems crop up. [Oleg Kutkov], being an experienced engineer, didn’t fret when an USA-tailored LTE modem worked poorly on his Tesla fresh off its USA-Europe import journey, and walks us through his journey of replacing the modem with another Tesla modem module that’s compatible with European LTE bands.

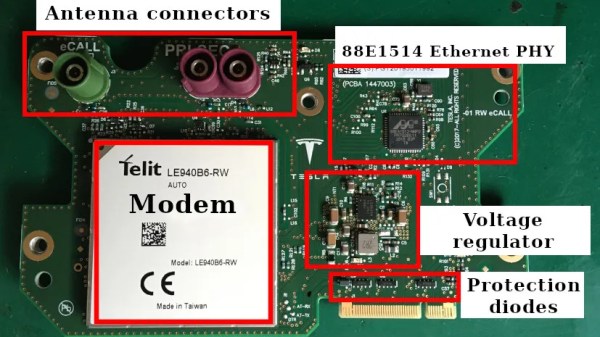
[Oleg]’s post goes through different parts on the board and shows you how they’re needed in the bigger picture of the Tesla’s Media Computer Unit (MCU), even removing the LTE modem’s shield to describe the ICs underneath it, iFixit teardown diagram style! A notable highlight would be an SIM-on-chip, essentially, a SIM card in an oh-so-popular DFN package, and thankfully, replacing it with a socket for a regular SIM card on some extender wires has proven fruitful. The resulting Tesla can now enjoy Internet connectivity at speeds beyond those provided by EDGE. The write-up should be a great guide for others Tesla owners facing the same problem, but it also helps us make electric cars be less alike black boxes in our collective awareness.

Not all consequences of Tesla design decisions are this minor; for instance, this year, we’ve described a popular eMMC failure mode of Tesla cars and how Tesla failed to address it. Thankfully, Tesla cars are becoming more of a hacker community target, whether it’s building a computer-vision-assisted robot to plug in a charging cable, getting it repaired for a fraction of the dealership cost, or even assembling your own Tesla from salvage parts!

Image of an imagined DIY onewheel

Open Source Openwheel

The story is one we’ve all lived: We see a piece of commercial technology and we want it, but the price tag makes us wonder if it isn’t made with gold pressed latinum. The object of [Zach]’s desire? A single wheel powered skateboard sold by a company called Onewheel. But as you can see in the video below the break, and his excellent website, Zach took the wallet-light but time-heavy approach and built his own prototype he calls the Openwheel.

Starting with a single powered wheel, [Zach] used aluminum, very large 3D printed pieces, and a really slick off the shelf controller package to control the Openwheel. Balance is handled by the controller, while a massive 48 V LiPo battery is fed through a beefy electronic speed controller that allows advanced features like regenerative braking.

We won’t spoil the results, but [Zach]’s Openwheel came out very nice, even exceeding some specifications of the commercial unit. You’ll want to watch his YouTube series about the build to get an idea of all the work that goes into such a device even as a prototype.

If tank track tread is more your jam, check out this tank track skateboard that we featured some time back!

Continue reading “Open Source Openwheel”

The Benefits Of Critiquing Your Own PCB Designs

In a recent retrospective video, [Phil] from Phil’s Lab goes through a number of his early PCB designs, to critique and comment on what he likes and doesn’t like in these designs. Even though it’s only been a few a few years, he founds plenty that’s wrong. From poor and inconsistent formatting in the schematic, to sloppy and outright broken PCB layouts. It’s a fascinating look at years of lessons learned.

[Phil] comments on the importance of clear labeling and organization of sections and pages in the schematic to make it obvious what the function of a block is. Other lessons include the labeling of nets to make PCB routing a lot easier, making good use of PCB planes, getting all relevant information on components and layout in the schematic as a comment, and connecting decoupling capacitors to their relevant pins.

Although we tend to forget about older projects, it can be very interesting to take a look at them now and then, to see (hopefully) our progress over the years. In the case of [Phil] it’s fascinating to see the transition from a basic two-sided board with THT components to multi-layer boards with STM32 MCUs.

Continue reading “The Benefits Of Critiquing Your Own PCB Designs”

Metal mechanoid security patrol ride-on made from scrap

Homemade Scrapyard Security Mech Gives Uncle Super Powers

[Handy Geng] is back again with another bonkers build, that we just can’t not cover. His Uncle came to visit the workshop one day and said he’d love to go there every day, and could even watch over it when [Handy Geng] was away. But being an older chap and needing a stick to get around, he would not be much use if ‘bad guys’ decided to pay a visit. The obvious solution was to build a ride-on security mech which Uncle could ride on, (video, embedded below) and use to defend the shop from bandits.

The build starts with him unloading a large pair of tracked wheel units from his truck, which caused a chuckle around these parts when we tried to imagine the scrap yard he’d just visited! The build video is more of a spot-weld-come-assembly log, with the less interesting sub assembly construction omitted. If he’d included all the details, this video would have been hours long. Though, we’d probably watch that anyway.

Features of the final construction include, but not limited to, dual motors for on-the-spot turns, night-time patrol lights, dual pneumatic fists for attack mode, dual water cannons for a more gentle approach and rear facing speakers blasting out Chinese opera for the ultimate deterrent. Practical touches include an integrated glasses case for the ready-readers, and a walking cane holder, so the mech was Uncle-ready. He seemed impressed from the grin on his face!

Continue reading “Homemade Scrapyard Security Mech Gives Uncle Super Powers”

Matrix Digital Rain On The IBM PC With A High Persistence Monitor

Unless you’ve been hiding under a rock for the last 20-odd years, you will have come across The Matrix series of movies, and the cool green ‘digital rain’ effect used frequently. This inspired [Oli Wright] to wonder what it would look like if instead of running the animation on a modern display, using a digitally produced phosphor persistence effect, it was implemented on some retro PC hardware, using an actual high-persistence phosphor Green Monochrome monitor. (Video embedded, below) As luck would have it, [Oli] owns a 40-year-old IBM PC 5150 as well as the matching IBM 5151 monitor, so it was a simple matter to implement the effect in 8088 assembler to create falling sequences of characters. The final binary is less than 256 bytes!

The IBM 5151’s long display persistence was intended to reduce the visibility of display flicker due to the low scan rate, but has the unfortunate side effect of smearing horribly when the image changes. This is exactly what [Oli] needed to implement this effect and we think it looks jolly fine.

[Oli] made use of the excellent PCjs browser-based emulator written by [Jeff Parsons] to demonstrate what the software is doing, without the effect being evident. If you like, you can try it out for yourselves, as the assembly listing is available on the project GitHub.

Of course, we’ve covered the digital rain effect many. many times before, for example, with this Arduino Library, and here’s a custom PC case side panel from way back in December 2021, if you can remember those days.

Continue reading “Matrix Digital Rain On The IBM PC With A High Persistence Monitor”

TFT35 Dual Mode 3D Print Control – Hands On

I was rebuilding one of my 3D printers — again — and decided I needed a display upgrade. A color screen is nice, but there are some limitations. I also found there are ways around these limitations, so I wanted to share my thoughts on a dual-mode color touch screen LCD controller for your 3D printer. The screen in question is a TFT35 from BigTree Tech. It is similar to an MKS screen, but it can operate in two different modes, as you will see.

A few years ago, I picked up an Anet A8 which was very inexpensive, especially on sale. Not the best printer, though, because it has that cheap acrylic frame. No problem. A box full of aluminum extrusion later, the printer was reborn. Over time, I’ve completely reworked the extrusion system and the Y-axis, leaving only the motors, bearings, and the controller/display as the original.

That last part was what bothered me. The Anet board is actually pretty capable for a small cheap board. But it is just what the printer needs and nothing more. If you wanted to hack the printer there was very little memory left and only one spare pin for I/O. So it was time to replace the board and why not the controller, too?

Continue reading “TFT35 Dual Mode 3D Print Control – Hands On”

Another Homebrew Linux Board Success Story

It’s truly incredible what the hobbyist is now capable of. While it would have seemed all but impossible a few years ago, we’re happy to report that yet another dedicated hardware hacker has managed to spin up their own custom Linux single-board computer. Creator [Ian Kilgore] tells us the only goal when developing CATFOOD (yes, that’s the name) was to gain confidence with at-home board production, so it looks like a success to us.

To those who’ve been keeping an eye on this sort of thing, it will probably come as no surprise to hear [Ian] was inspired by the work of [Jay Carlson], who arguably kicked off this whole trend when he put together a bevy of homebrew Linux boards in an effort to compare different System-in-Package ICs. His incredibly detailed write-up of the experience and lessons learned along the way has emboldened other brave souls to take up the challenge.

The USB-C powered board uses an ARM i.MX 6ULL processor and features DDR3, NAND flash, and an Ethernet interface. That last one was the biggest deviation from the reference design, which meant it took a little fiddling to get right. For anyone playing along at home, [Ian] collected up the lessons learned while developing CATFOOD, bringing the whole learning experience full circle.

If you’re interested in more homebrew Linux SBCs, we’d highly recommend reading up on the WiFiWart developed by [Walker]. Over the course of about six months, we got to watch the open hardware board go from concept to a diminutive first prototype.