Tiny Thin Client Is Small But Compatible

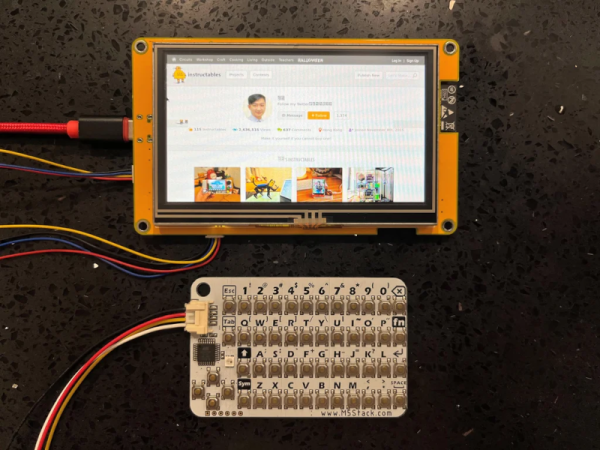
We were impressed with [moononournation’s] tiny thin client project. It claims to use an Arduino, but as you might guess it is using the Arduino software along with a network-enabled microcontroller like an ESP32. The impressive part is that it is standards-compliant and implements VNC’s RFB protocol.

The original coding for RFB on Arduino is from [Links2004] and armed with that, the thin client is probably easier to create than you would guess. However, this project wanted to use a larger screen and found that it led to certain problems. In particular, the original code had a 320×240 display. This project was to use an 800×480 display, but with the limits on the ESP32, the frame rate possible would be under 7 frames per second. The answer was to combine a 16-bit parallel interface with better compression back to the VNC server.

The little keyboard is probably not very practical, but it is compact. That would be another easy thing to modify. Currently, the keyboard uses I2C, but it would be straightforward to change things up. This would be a worthy base to build a bigger project on top. A 3D printed enclosure would be nice, too.

We’ve seen a number of projects built around commercial thin clients. Some from defunct businesses are good sources for obscure parts, too.

Continue reading “Tiny Thin Client Is Small But Compatible”

3D Printed Sorter Separates Spare Hex Nuts With A Shake

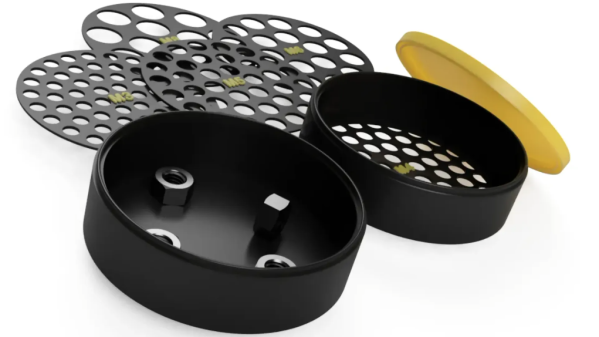
Got a pile of mixed hex nuts? Sort them in no time by printing [jonafriendj]’s nut sorter, which has options for pretty much any nut size you’d be after (it’s labeled metric, but actually includes Imperial sizes as well.)

Something to admire about the design is the handy little raised labels on each of the sieves, and the fact that all the parts print entirely without supports. Designing a part to play to a manufacturing method’s strengths (and avoid its weaknesses) is good DFM, or Design for Manufacturing.

With 3D printing being the boon that it is to workshops and hobbyists everywhere, it certainly pays to strive for good DFM, especially for designs meant to be shared with others. Sometimes good DFM takes a page from other manufacturing methods like injection molding, and we end up with things like using crush ribs on printed parts.

Want to see a demonstration of [jonafriendj]’s nut sorting design? Check out the short video embedded below the page break. If that leaves you wanting, take a look at a motorized, automated DIY solution.

Continue reading “3D Printed Sorter Separates Spare Hex Nuts With A Shake”

USB Power Isolator Keeps Smoke In

Anyone who’s done an electronics project knows the most important part of any good design is making sure to keep the magic smoke inside of all of the components. There are a lot of ways to make sure the smoke stays in there, but one of the most important is making sure that the power supply is isolated. If you’re using a USB port on a computer as your power source, though, it can be a little more complicated to isolate it from the computer.

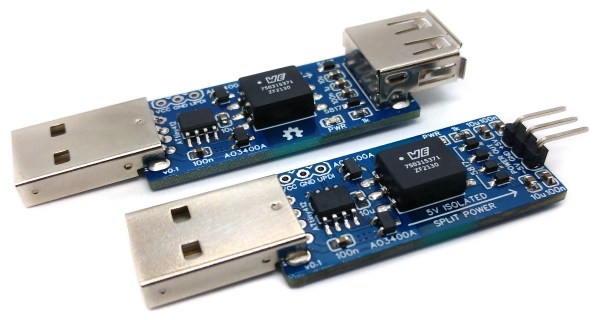
The power supply is based around a small transformer with a set of diodes to act as a rectifier. Of course, while a transformer is great at isolating power supplies, it isn’t much good at DC. That’s what the ATtiny microcontroller is for. It handles the high-speed switching of the MOSFETs, which drive the transformer and handle some power regulation. There are two different power supplies created as part of this project as well — the first generates +5V much like a normal USB plug would have, and the other creates both +5V and -5V. It will be important not to mix these two up, or that tricky blue smoke may escape.

The project page goes into extensive details on the operation of the device, so if electrical theory is of interest, this will definitely be worth a read. Isolating a valuable computer from a prototype circuit is certainly important, but if you’re looking for a way to isolate a complete USB connection, look at this build which includes isolation for a USB to FTDI adapter.

Watermelon CNC Uses Lazy Susan

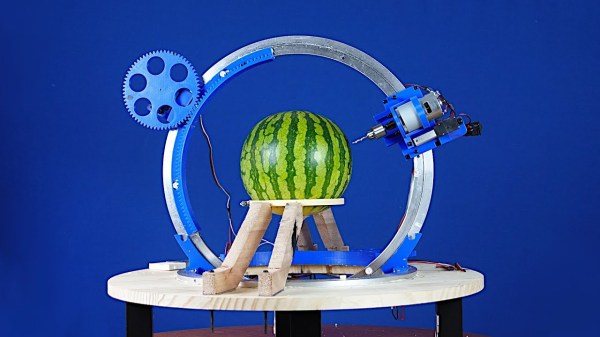
It is the time of year when a lot of people in certain parts of the world carve pumpkins. [Gonkee] is carving a watermelon, which we assume is similar. He decided to make a CNC machine to do the carving for him. The unusual part is the use of two lazy Susans to make a rotary carving machine. You can see the result in the video below.

The hardware is clever and there is software that lets you do drawings, although we were hoping for something that would process gcode or slice STL. That would be a worthy add-on project. There were a few iterations required before the Melon Carver 3000 worked satisfactorily. Seeing a carving tool operating on two circles gives us a lot of ideas. We aren’t sure how sturdy the mounts are, so don’t plan on carving aluminum without some changes, but we suspect it is possible.

Then again, a laser head mounted on the frame would have probably made short work of the melon, and wouldn’t require much mechanical stiffness. It would, however, take a little effort to keep it in focus. So many ideas to try!

Watermelon is a popular hacking medium, apparently. There’s even one that holds a GameBoy.

Toilet Paper Tube Pulls Dissolved Resin From IPA, Cures It For Disposal

SLA 3D printing with resin typically means rinsing parts with IPA (isopropyl alcohol). That process results in cloudy, used IPA containing a high concentration of dissolved resin. The dual goals of cleaning and reusing IPA are important ones, and we have to say, [Jan Mrázek]’s unusual experiment involving a UV source and slowly-rotating paper tube to extract and cure dissolved resin might look odd, but the results are definitely intriguing.

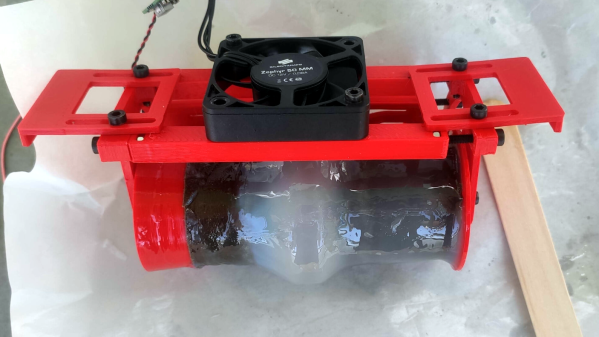
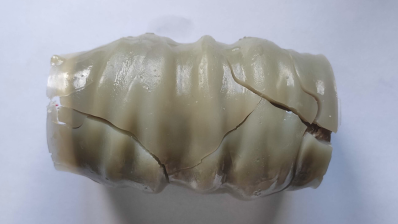
Dissolved resin successfully pulled from IPA and cured onto a cardboard roll. This particular one rotated a bit too quickly, trapping IPA in the curing process and yielding a slightly rubbery wad instead of a hard solid.

The best way to dispose of liquid resin is to cure it into a solid, therefore making it safe to throw away. But what about resin that has been dissolved into a cleaning liquid like IPA? [Jan] felt that there was surely a way to extract the dissolved resin somehow, which would also leave the IPA clean for re-use. His solution? The device shown here, which uses a cardboard tube to pull dissolved resin from an IPA bath and a UV source to cure it onto the tube.

Here’s how it works: the tube’s bottom third sits in dirty IPA, and UV LEDs shine on the top of the tube. The IPA is agitated with a magnetic stirrer for best results. A motor slowly rotates the cardboard tube; dissolved resin gets on the tube at the bottom, UV cures it at the top, and the whole thing repeats. Thin layers of cured resin slowly build up, and after long enough, the roll of cured resin can be thrown away and the IPA should be clean enough for reuse.

So far it’s a pretty successful test of a concept, but [Jan] points out that there are still some rough edges. Results depend on turning the tube at a good rate; turning it too quickly results in IPA trapped with the cured residue. On the plus side, the UV source doesn’t need to be particularly powerful. [Jan] says that Ideally this would be a device one could run in a sealed container, cleaning it over one or two days.

Resin printing is great, but it’s a messy process, so anything that makes it less wasteful is worth checking out. Got any ideas for improving or building on this concept? If so, don’t keep ’em to yourself! Let us know in the comments.

Enjoy The Beauty Of Corona Discharge With This Kirlian Photography Setup

In our age of pervasive digital media, “pics or it didn’t happen” is a common enough cry that most of us will gladly snap a picture of pretty near anything to post online. So if you’re going to take a picture, it may as well be as stunning as these corona discharge photographs made with a homebrew Kirlian photography rig.

We know, Kirlian photography has a whole “woo-woo” vibe to it, associated as it has been with paranormal investigations and the like. But [Hyperspace Pirate] isn’t flogging any of that; in fact, he seems way more interested in the electronics of the setup than anything else. The idea with Kirlian photography is basically to capacitively couple a high-voltage charge across a dielectric, which induces an electrostatic discharge to a grounded object. The result is a beautiful purple discharge, thanks to atmospheric nitrogen, that outlines the object being photographed.

[Pirate]’s first attempt at a Kirlian rig used acrylic as a dielectric, which proved to be susceptible to melting. We found this surprising since we’ve seen [Jay Bowles] successfully use acrylic for his Kirlian setup. Version 2 used glass as a dielectric — right up until he tried to drill a fill port into the glass. (Important safety tip: don’t try to drill holes in tempered glass.) Version 3 used regular glass and a 3D-printed frame to make the Kirlian chamber; filled with saltwater and charged up with a homebrew Tesla coil, the corona discharge proved enough to char fingertips and ignite paper. It also gave some beautiful results, which can be seen starting at around the 7:40 mark in the video below.

We loved the photos, of course, but also appreciated the insights into the effects of inductance on the performance of this setup. And that first homebrew flyback transformer [Hyperspace Pirate] built was pretty cool, too.

Continue reading “Enjoy The Beauty Of Corona Discharge With This Kirlian Photography Setup”

A three picture sequence, with the first picture being a woman in a blue lit up prom dress touching a wand to her hand, the second picture being a woman in a pink lit up dress touching a wand to her hand and the third picture being the same woman in a lit up pink prom dress holding a blue glowing star wand over her head

Be The Star Of The Evening With This Light Up Prom Dress

[Kellechu] went full parent beast mode by creating a prom dress for her daughter. This incredible build is a tour-de-force of DIY crafting, combining sewing, electronics, 3D printing and programming.

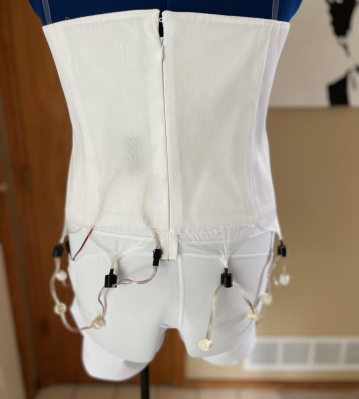
The dress skirt is made of tulle that allows for the LED strip underneath to diffuse through. The top bodice is made of fiber optic fabric sewn between the fabric form with the dangling fiber optic threads grouped into bundles. The dangling fiber optic bundles were then inserted and glued into “out caps” that forced the strands to sit next to a NeoPixel LED. A 20 NeoPixel “Dots Strand” strip was strung around the waist line, affixing 12 of the NeoPixels with an “out cap” to light up the fiber optic bodice. The remaining NeoPixels were outfitted with a diffuser cap and hung lower to light up the tulle skirt portion of the dress.

A bodice of a prom dress hanging on a form with fiber optic fabric bundles dangling underneath with some of them installed into a NeoPixel "Dots Strand" strip installed along the waist line

A wand was 3D printed and housed with an RFM69HCW Packet Radio M0 Feather, a NeoPixel LED color ring and a TCS34725 Flora color sensor powered by a 2.2 Ah 3.7 V LiPo battery. Another RFM69HCW Packet Radio M0 Feather was placed in the dress to be able to receive messages from the wand so that the sensed color could be transmitted and the LED strip could be updated with the sensed color. The dress portion was powered by a 10 Ah 3.7 V LiPo, with the battery and electronics fitting snugly into yoga bike shorts with side pockets.

[Kellechu]’s Instructable is full of details about the process and is worth checking out. For example, [Kellechu] goes into detail about the troubles and care taken when dealing with the different media, making sure to avoid ironing the fiber optics so as not to melt the lines and experimenting with different sewing needles to limit the amount of dead fibers as collateral damage from the sewing process.

Dresses with LEDs and other lights are a big hit, as can be seen from our feature on an LED wedding dress.

Continue reading “Be The Star Of The Evening With This Light Up Prom Dress”