This Spherical Lamp’s Pieces Ship Flat, Thanks To Math

[Nervous System] sells a variety of unique products, and we really appreciate the effort they put into sharing elements of their design and manufacturing processes. This time, it’s details of the work that went into designing a luxury lamp shade that caught our eye.

Top: Finished lamp. Bottom: Partially-assembled.

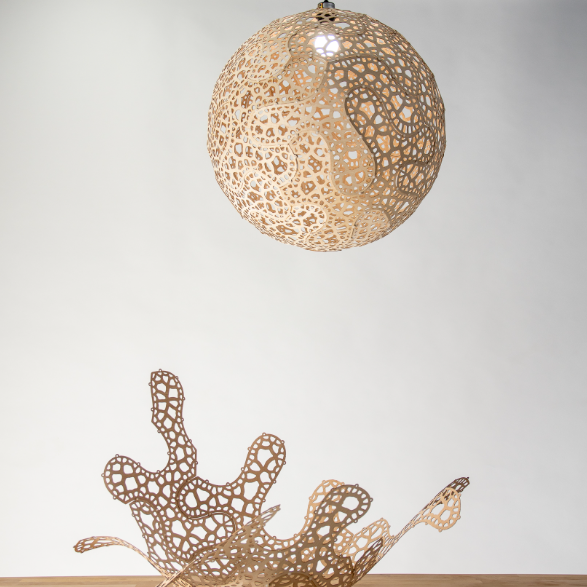
The finished lamp shade is spherical, but is made entirely from flat-packed pieces of laser-cut wood that have been specifically designed to minimize distortion when assembled into a curved shape. The pieces themselves are reminiscent of puzzle cells; complex, interlocking cellular shapes found in many plants.

As usual, [Nervous System] applied a hefty dose of math and computational design to arrive at a solution. Each unique panel of the lamp is the result of a process that in part implements a technique called variation surface cutting for the shape of the pieces. They also provide a couple of nifty animations that illustrate generating both the piece boundaries as well as the hole patterns in each of the 18 unique pieces that make up each lamp.

As for making the pieces themselves, they are laser-cut from wood veneer, and assembly by the end user takes an hour or two. Watch a video overview, embedded just below under the page break.

We’re glad [Nervous System] takes the time to share details like this, just like the time they figured out the very best type of wood for laser-cutting their unique puzzles and didn’t keep it to themselves.

Continue reading “This Spherical Lamp’s Pieces Ship Flat, Thanks To Math”

Bee Motion Combines ESP32 With PIR Sensor And USB-C

There’s no shortage of ESP32 development boards out there, with many of them offering some “killer app” feature which may or may not align with whatever it is you’re trying to do. But if you’ve got a project that could benefit from the pairing of a powerful WiFi-enabled microcontroller and a passive infrared (PIR) motion sensor, the Bee Motion created by [Paul Price] is certainly worth a close look.

This breadboard compatible package combines an ESP32-S2 module with a top-mounted PIR sensor, making it a turn key solution for all sorts of motion sensing projects. In addition to the expected onboard voltage regulation, there’s also a LiPo charge controller and status LEDs for mobile or battery-backed operation.

While there’s far too many variables involved for [Paul] to give a specific runtime for the Bee Motion, he’s run some numbers and found that a 1500 mAH cell could potentially keep the board running for over a year if you’re taking advantage of the MCU’s deep sleep capabilities. When it’s time to recharge, whenever that may be, the board’s USB-C connector means you won’t be searching around for the proper cable.

Schematics and CAD files are available in the Bee Motion GitHub repo, and [Paul] is also selling assembled boards on Tindie. All you need now is to get inspired by some of the slick PIR projects we’ve covered in the past.

Continue reading “Bee Motion Combines ESP32 With PIR Sensor And USB-C”

APPLE2IDIOT Expansion Card Lets Your Apple II (Sort Of) Access The Internet

[Nathanial Hendler]’s Apple2Idiot expansion card for the Apple II family of computers is a nifty mix of modern and vintage, and provides a clever means of allowing the host computer to (indirectly) access the internet over WiFi while keeping things simple from the host computer’s perspective.

The PCB has plenty of space on which to silkscreen reference data. Click to enlarge.

It does this by embedding an ESP32 module and a dual-port RAM chip onto an expansion card. The Apple2Idiot, when installed into a host machine, presents as a memory location which the host machine can access. The ESP32 then takes care of all the WiFi communications and tasks requiring internet access, and the host computer directs these tasks (and reads their output) via PEEK and POKE commands.

This means that there are two pieces of software for any given task: one running on the ESP32 doing the actual work, and one running on the Apple II that communicates with the ESP32 on the card by reading and writing to memory. It’s a simple system, and one that [Nathanial] thinks works quite well for specific tasks.

Example programs include things like scanning and selecting a WiFi network, fetching weather data, and sending a message to Slack. Making new applications does mean having to write software on two ends, but the simplicity of the system also means flexibility, because anything the ESP32 does can have its complexity abstracted away by the time its data is presented to the host machine. Not that the Apple II is incapable of dealing with the modern internet more directly; we’ve seen a basic Apple II web server written in BASIC.

Learning Obsolete Technology

Tom Nardi and I were talking about his trip to the Vintage Computer Festival on the podcast, and he admitted to not having been a retrocomputer aficionado before his first trip. But he ended up keying some binary machine code into some collection of archaic silicon, and he got it. In the same episode, the sound of the week was a Strowger switch — the old electromechanical “brain” of telephone switching centers of old. The sample I used was from Sam of Look Mum No Computer on YouTube, who got one for his museum and thinks it’s just awesome.

Why do people like this kind of old (obsolete?) tech? It’s certainly not because it’s overwhelmingly capable — the giant old switch is replaced easily by a stack of silicon, and don’t even get me started on the old blinkenlights computer that Tom was keying on. In both of these cases, the people are significantly younger than the tech they’re playing around with, so that rules out nostalgia. What’s left?

I think it’s that sometimes the older technology is more immediate, more understandable, more tangible, and that resonates with people. In a time when we all have wonder devices that can do anything, programmed in languages that are pleasant, using libraries that are nothing short of magical in terms of making difficult things easy, understanding how things work down to the ground is a rare commodity.

But it’s a strange position to find ourselves in, technologically, where there’s almost necessarily a trade-off between the usefulness and functionality of a device with the ability to understand fundamentally how it works.

Mods Make A Stock Keyboard Your Own

Trust me, you don’t have to build your own keyboard from the deskpad up to be happy or feel like one of the cool kids. Sure, it doesn’t hurt, but not everyone is able to or even wants to start from next to nothing. Take [Roger] for example. [Roger] started with a stock mechanical keeb — the Ultimate Hacking Keyboard (UHK) — which can be outfitted with magnetic add-on modules such as a thumb key cluster, trackball, trackpoint, and touch pad, and made it his own.

While the stock board that you choose may not be so option-laden, there are plenty of other things one can do to customize things, and [Roger] did basically all of them. The Kailh browns that the UHK came with were too loud, so [Roger] swapped them out for Zilent V2 Silent tactiles and dampened the case with plenty of neoprene foam.

[Roger] frequently switches between two keyboard layouts, which got confusing at times. But instead of boring blank keycaps, he scrounged around until he found a cool set. (We do like the way they look with the wood wrist rests.) Speaking of those wrist rests, the right one is carved out and hiding a 10,000 mAh power bank, because [Roger] also made the UHK wireless using one of those often-out-of-stock BT-500 Bluetooth adapters. This allows him to switch between two PCs with a keyboard shortcut.

Think you want to go split, but not sure about key wells and column stagger and all that jazz? Something like the UHK is a good place to start, because it takes the familiar brick wall layout and breaks it into two pieces. No idea what you want? Check out the split keyboard finder.

Re-imagining The Resistor Color Code Cheat Sheet

Some people look at a venerable resource like resistor color code charts and see something tried and true, but to [Andrew Jeddeloh], there’s room for improvement. A search for a more intuitive way is what led to his alternate cheat sheet for resistor color codes.

Color code references typically have a reader think of a 560 kΩ resistor as 56 * 10 kΩ, but to [Andrew], that’s not as simple as it could be. He suggests that it makes more sense for a user to start with looking up the colors to make 5.6 (green-blue), then simply look up that a following yellow band means resistance in the 100 kΩ range (assuming a four-band resistor); therefore 560 kΩ is green-blue-yellow.

The big difference is that the user is asked to approach 560 kΩ not as 56 * 10 kΩ, but as 5.6 * 100 kΩ. [Andrew] shares a prototype of a new kind of chart in his post, so if you have a few minutes, take it for a spin and see what you think.

Is his proposed method more intuitive, or less? We think [Andrew] makes a pretty good case, but you be the judge. After all, just because something has always been so doesn’t mean there isn’t room for improvement. This happens to apply nicely to resistors themselves, in fact. It may seem like through-hole resistors have always had color bands, but that is not the case.

Flexures Make This Six-DOF Positioner Accurate To The Micron Level

It’s no secret that we think flexures are pretty cool, and we’ve featured a number of projects that leverage these compliant mechanisms to great effect. But when we saw flexures used in a six-DOF positioner with micron accuracy, we just had to dig a little deeper.

The device is known as the Hexblade, and it comes to us from the lab of [Jonathan Hopkins] at UCLA. We have to admit that at times, the video below feels a little like the “Turbo Encabulator” schtick — “three identical decoupled actuation limbs arranged in an axisymmetric configuration” may be perfectly descriptive, but it does not flow trippingly from the tongue. Hats off to [Professor Hopkins] for nailing the narration, though, and really, once you get a handle on the jargon, it all makes perfect sense. The platform is supported by a total of six flexures, which look like bent pieces of sheet metal but are actually cut from a solid block of material using wire EDM. Three of the flexures are oriented in the plane of the platform, while the other three are perpendicular to it. The far end of each flexure is connected to a voice-coil actuator that is surrounded by another flexure, this one in a parallelogram arrangement. The six actuators can move the platform smoothly through three linear translations (X, Y, and Z) and three rotations (roll, pitch, and yaw).
The platform’s range of motion is limited, but the advantages of using flexures as bearings are clear — there’s no backlash or hysteresis, and the voice coils can control the position of the stage to micron accuracy. Something like the Hexblade would be an ideal positioner for microscopy, and we can imagine an even smaller version, perhaps even a MEMS-fabricated one for nanomanufacturing applications. The original concept of the Hexblade serving as the print head for a fabrication robot for space applications is pretty cool, too, and we’d venture to say that a homebrew version of this probably isn’t out of reach either.

Continue reading “Flexures Make This Six-DOF Positioner Accurate To The Micron Level”