Vintage Digital Frequency Meter Teardown

You think of digital displays as modern, but the idea isn’t that new. We had clocks, for example, with wheels and flip digits for years. The Racal frequency counter that [Thomas Scherrer] is playing with in the video below has columns of digits with lamps behind them. You just need the right plastic and ten lightbulbs per digit, and you are in business. Easy enough to accomplish in 1962.

Inside the box was surprising. The stack of PC boards looks more like a minicomputer than a piece of test gear. There were a few novel items inside, too, ranging from a glass-encapsulated crystal to an interesting method of selecting the line voltage.

Continue reading “Vintage Digital Frequency Meter Teardown”

Solenoid Keyboard Sounds Very Much Like A Typewriter

Mechanical keyboards are muchly adored things. For many of us, they take us back to that loud clickity-clack that was so common before consumer keyboards went to membrane switches. For others, it’s just for the pure joy of the finger-powered symphony. The solenoid edition of the Red Herring keyboard from [Ming-Gih Lam] understands the beauty of this sound intimately. It can be nearly silent if you so desire, or it can clack away with the best of them (via Hackster.io).

It all comes down to the switches used in the design. [Lam] selected the Silent Alpacas from Durock, noted for their quiet operation, particularly when lubricated. You get just a faint slide-and-click noise from the keyboard under regular use.

The joy of the solenoid edition is in, you guessed it, the solenoid. It fires away with every keypress when enabled, creating a sound more akin to a real typewriter than any mechanical keyboard we’ve ever heard. Click-clack fans will love it, while those with sensitive ears will scream at any cube neighbours that dare to buy one and switch it on.

Files are available on Github for the curious. We’ve seen some other great keyboards over the years, like this nifty split-board design. Video after the break.

Continue reading “Solenoid Keyboard Sounds Very Much Like A Typewriter”

3D Printer Recognizes Third-Party Build Plates, Just Make Your Own ID Codes

The Bambu X1C 3D printer is a machine known for its speed, and it has a number of useful features like automatic build platform recognition. Factory build platforms are marked with an identifier code, and thanks to [elumspe] it’s now possible to make your own identifiers to stick onto third-party platforms and have the printer recognize them as though they were factory offerings. There’s even a super handy 3D-printable alignment tool that ensures the identifier goes in the correct spot, which is a nice touch.

These codes aren’t DRM so much as they are used by the printer to automatically verify that the installed build plate matches the slicer settings before a job begins. Printing one and sticking it in the right place is an easy way to get third-party plates recognized the same as factory offerings.

The identifier codes aren’t DRM so much as they are a way for the printer to verify that the installed build platform matches the slicer settings before a print begins, and throw up a warning if it doesn’t. The printer is perfectly happy to use third-party build surfaces, but since they lack an identifier, the printer will throw a warning each time. One solution is to simply disable checking the build platform before a print, but for those who would prefer to have the printer see what it expects to see, printing a small 2D barcode to stick on is an easy way to do it.

We see these sometimes called QR codes, but they look more like AprilTags. Both are types of 2D barcode, but while QR codes can encode a variety of information types, AprilTags are simpler and usually represent identifiers. In this case, they’re an appropriate way to let a camera-enabled printer know what kind of build plate is installed.

AprilTags are common in computer vision applications, and even relatively modest hardware can detect and decode them almost in real time. AprilTags are convenient and easy to use, as this gate access system demonstrates.

Breaking Land Speed Records With An RC Car

Building and running a land speed record car is an expensive business that requires incredibly wealthy benefactors. Doing it on a smaller scale with a radio control car is still pricy, but more within the reach of the individual. [ProjectAir] has been working on just that, and recently set out to break records with a car of his own design.

The car runs a Jetcat 220 engine capable of delivering 220 newtons of thrust, built into a custom aluminium chassis with streamlined bodywork. Early runs saw it reach 112 km/h, but the goal was to push it beyond 150 km/h to break the standing Guinness World Record.

With an RC event running on a local runway, [ProjectAir] had the venue and opportunity to make an attempt. It was tough going, with the car throwing off its nosecose in one run, while rough weather brought further struggles. Strong crosswinds played a role in a violent crash on the car’s fastest pass, which ripped the car apart and destroyed the engine. However, in the end, it had done enough to secure a record at over 152 km/h, even if its later faster efforts didn’t officially count.

It’s clear that the car has come a long way since [ProjectAir’s] initial efforts in 2022, and we can’t wait to see where the project goes next. Video after the break.

Continue reading “Breaking Land Speed Records With An RC Car”

Building The Cheapest MIDI Home Studio From 1988

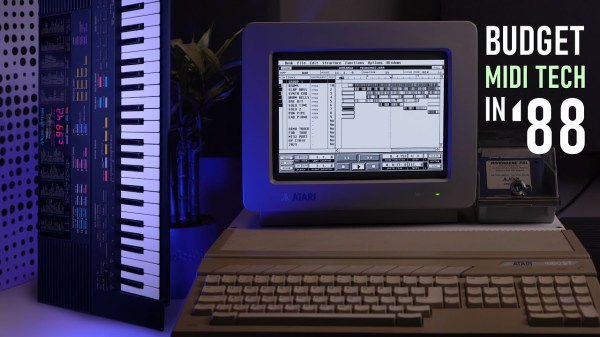
These days, there is a plethora of cheap hardware and software which you can use to make digital music. Back in the 1980s, though, this was still a nascent field, with new gear changing the game for musicians. In his latest video, [cTrix] puts together a guide to building a budget MIDI home studio like it’s 1988.

The original Atari ST is the star of the show, which sold for around £300 back then. Unlike most contemporary computers, it came with MIDI ports built-in, and it quickly became a popular platform for music sequencing and controlling external synth hardware. It was often spotted in posh studios being used by big-time musicians, but [cTrix] wanted to look at how it was used by more humble users.

While the Atari ST could output some passable chiptunes, it was most powerful when paired with off-board gear. Industry magazines would readily talk up “DIY” setups worth thousands, but [cTrix] aimed for a budget in the low hundreds. In 1988, that might get you something like the 16-channel Yamaha PSS-580, which rocked full MIDI support and a ton of sounds and drumkits built in. It ran an OPL soundchip, and could play multiple instruments at once under MIDI control from software like Dr. T’s MIDI Recording Studio.

Of course, if you’ve ever played a keyboard like the PSS-580, you’ll have noted that the sound output can be more than a little chintzy. A cheap way to level up was to get yourself something like the Roland MT-32, which rocked a far higher-quality sound module. Everything from slap bass to solid electric pianos could be blasted out from the Roland, which also included a decent reverb unit, too. [cTrix] also dives into other budget heroes, like the rich and expansive Kawai K1 and the Yamaha EMT-10.

If you want to make music like it’s 1988 and you’re hunting for your first gold record, you’ll learn a lot here. We can’t wait for Part 2, that explores the next level of sophistication in this era. His previous lessons on how to make 90s dance bangers on the Amiga are a treat, too.

Continue reading “Building The Cheapest MIDI Home Studio From 1988”

Hackaday Prize 2023: Meet The Assistive Tech Finalists

If you’re still toiling away at your entry for the Gearing Up Challenge of the 2023 Hackaday Prize, don’t panic! No, you haven’t lost track of time — due to some technical difficulties we had to delay the final judging for the Assistive Tech Challenge that ended May 30th.

Today we’re pleased to announce that all the votes are in, and we’re ready to unveil the ten projects that our panel of judges felt best captured the spirit of this very important challenge. Each of these projects will take home $500 and move on to the final round of judging. There are few more noble pursuits than using your talents to help improve the lives of others, so although we could only pick ten finalists, we’d like to say a special thanks to everyone who entered this round.

Continue reading “Hackaday Prize 2023: Meet The Assistive Tech Finalists”

Shake, Rattle, Roll, With Your Own Seismograph

We always love to see projects where you can build your own lab equipment so [CompactDIY’s] homemade seismograph caught our eye. The design uses an Arduino with an accelerometer and builds on one of their earlier projects. You can see a video of the device below.

The principle is simple. A hobby servo controls a pen and a stepper motor rolls paper, creating a makeshift strip recorder. Its software uses the Visuino system, which is a flowchart-like system, but it outputs Arduino code. Honestly, we would probably have just plotted the data on a PC, but there’s a certain charm to the strip recorder and the idea would work for other types of data recording projects, too. We thought if you rearranged the stepper motor and cut a paper disk out, you could also have a circular chart recorder easily, which wouldn’t need to friction transport the paper. A clock motor would make it even less dependent on software, too.

If this project interests you, try a Raspberry shake, which isn’t as delicious as it sounds. Or, keep an eye on the entire globe, if you prefer.

Continue reading “Shake, Rattle, Roll, With Your Own Seismograph”