3D Printing A Nifty Sphere Without Supports

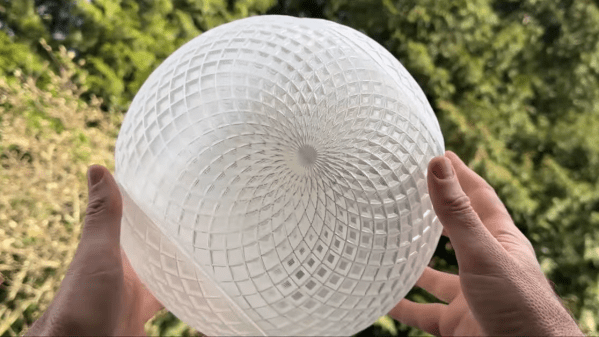
[DaveMakesStuff] demonstrates a great technique for 3D printing a sphere; a troublesome shape for filament-based printers to handle. As a bonus, it uses a minimum of filament. His ideas can be applied to your own designs, but his Giant Spiralized Sphere would also just happen to make a fine ornament this holiday season.

Printing two interlocking parts and using vase mode ensures a support-free print that uses a minimum of filament.

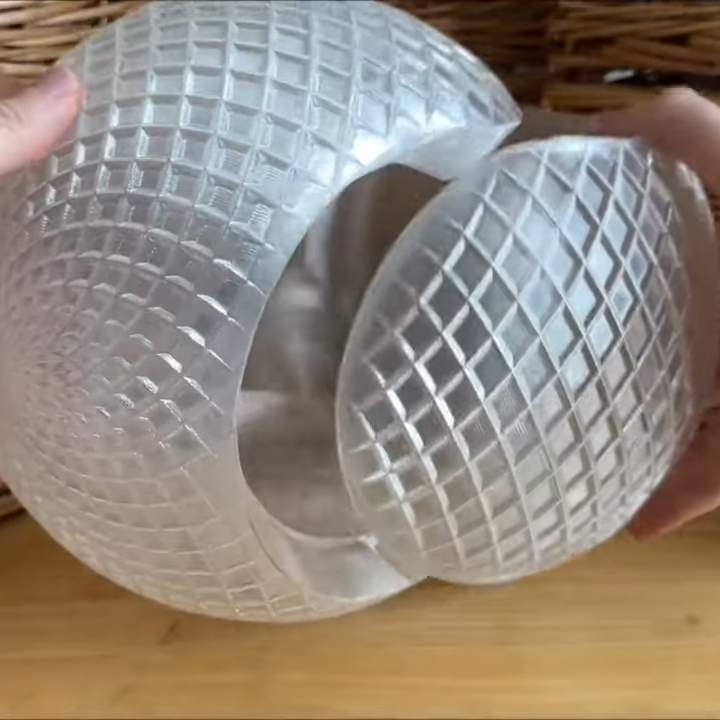
The trick is mainly to print the sphere in two parts, but rather than just split the sphere right down the middle, [Dave] makes two hollow C-shaped sections, like a tennis ball. This structure allows the halves to be printed in vase mode, which minimizes filament use while also printing support-free.

Vase (or spiral) mode prints an object using a single, unbroken line of extruded filament. The resulting object has only one wall and zero infill, but it’s still plenty strong for an ornament. Despite its size, [Dave]’s giant ball uses only 220 grams of filament.

A video (also embedded below) shows the design in better detail. If you’d like to experiment, we’ve previously covered how PETG’s transparency is best preserved when 3D printing by using vase mode, slightly overextruding, and printing at a higher temperature to ensure solid bonding between each layer. Continue reading “3D Printing A Nifty Sphere Without Supports”

Robot Goes To Summer Camp

There are a lot of hobby and educational robots that have a similar form factor: a low, wide body with either wheels or tracks for locomotion. When [Alexander Kirilov] wanted to teach a summer robot camp, he looked at several different commercial offerings and found all of them somewhat lacking. His wish list was a neat-looking compact robot that was easy to extend, had various sensors, and would work with Python. Finding nothing to his liking, he set out to make his own, and Yozh robot was born.

The robot certainly looks neat. There is a color TFT display, seven reflective sensors pointing down, two laser time-of-flight sensors facing forward, an IMU, and some LEDs. There are plenty of expansion ports, too. You can check out the code that runs it, too.

Continue reading “Robot Goes To Summer Camp”

Come For The PCB Holder, Stay For The Tour Of FreeCAD

PCB holders are great tools. Not only is the PCB Solder Fren from [PistonPin] a nice DIY design, it offers some insight into the parts design process with FreeCAD.

This design nicely demonstrates FreeCAD’s workflow for designing parts.

The PCB holder uses 3D-printed parts, M5 hardware, a length of 2020 aluminum extrusion, and one spring to create a handy and adjustable design that accommodates a variety of PCB sizes and shapes. If the ends of the extrusion are threaded, the end caps can be screwed in. Otherwise, a little glue ought to do the trick.

Want a little more insight into what making a part like this involves? [Jo Hinchliffe] at FreeCAD reached out to [PistonPin] for more detail and has a blog post explaining the workflow and steps involved in this part. As a bonus, STEP files and the FreeCAD project file are all included!

Not only is FreeCAD simple to use, but it’s also flexible enough to accommodate custom, niche extensions like a Rocketry workbench, so be sure to give it a look for your open-source CAD needs.

Airloom’s Whacky Wind Clothesline Turbine Idea

What if you don’t put airfoils on a central, spinning axis, but instead have them careen around a circular track? If you’re a company called Airloom, you’d say that it’s a very cheap, very efficient and highly desirable way to install wind-based generators that can do away with those unsightly and massive 100+ meter tall wind turbines, whether on- or offshore. Although grand claims are made, and venture capital firms have poured in some money, hard data is tough to find on their exact design, or the operating details of their one and only claimed kW-level prototype.

Transpower's 'flying clothesline' wind turbine setup.
Transpower’s ‘flying clothesline’ wind turbine setup.

Despite the claims made by Airloom, they’re not the first to have this idea, with Transpower in the 1980s making itself famous with their ‘flying clothesline’ that featured a continuous loop of sails tensioned between two ropes. These ran around a pole on either end with each having a generator for a claimed total of 200 kW. Ultimately Transpower seems to have gone under along with many other wind power pioneers of the era as they couldn’t make their idea economically feasible. Something which is a definite trend in the field.

Some parts about Airloom’s design are definitely concerning, with the available images showing each airfoil running along a central rail on a number of wheels and with their ‘Power Takeoff’ (i.e. generator) not defined in any meaningful manner. Here is where [Robert Murray-Smith] had a bit of fun in a recent video, creating his own dual-chain version that somewhat resembles a mixture between the Transpower and Airloom designs. He also put the design up on Thingiverse for others to 3D print and tinker with, requiring a handful of bearings for smooth running.

For the power takeoff, [Robert] suggests that in his design the cogs around which the chain moves could be attached to a generator (like in the Transpower design), but he could see no indication of how Airloom intends to do this. Feel free to put your own speculations in the comments. And if you’re from Airloom, show us the details!

Continue reading “Airloom’s Whacky Wind Clothesline Turbine Idea”

Retrotechtacular: Studio Camera Operation, The BBC Way

If you ever thought that being a television camera operator was a simple job, this BBC training film on studio camera operations will quickly disabuse you of that notion.

The first thing that strikes you upon watching this 1982 gem is just how physical a job it is to stand behind a studio camera. Part of the physicality came from the sheer size of the gear being used. Not only were cameras of that vintage still largely tube-based and therefore huge — the EMI-2001 shown has four plumbicon image tubes along with tube amplifiers and weighed in at over 100 kg — but the pedestal upon which it sat was a beast as well. All told, a camera rig like that could come in at over 300 kg, and dragging something like that around a studio floor all day under hot lights had to be hard. It was a full-body workout, too; one needed a lot of upper-body strength to move the camera up and down against the hydropneumatic pedestal cylinder, and every day was leg day when you had to overcome all that inertia and get the camera moving to your next mark.

Operating a beast like this was not just about the bull work, though. There was a lot of fine motor control needed too, especially with focus pulling. The video goes into a lot of detail on maintaining a smooth focus while zooming or dollying, and shows just how bad it can look when the operator is inexperienced or not paying attention. Luckily, our hero Allan is killing it, and the results will look familiar to anyone who’s ever seen any BBC from the era, from Dr. Who to I, Claudius. Shows like these all had a distinctive “Beeb-ish” look to them, due in large part to the training their camera operators received with productions like this.

There’s a lot on offer here aside from the mechanical skills of camera operation, of course. Framing and composing shots are emphasized, as are the tricks to making it all look smooth and professional. There are a lot of technical details buried in the video too, particularly about the pedestal and how it works. There are also two follow-up training videos, one that focuses on the camera skills needed to shoot an interview program, and one that adds in the complications that arise when the on-air talent is actually moving. Watch all three and you’ll be well on your way to running a camera for the BBC — at least in 1982.

Continue reading “Retrotechtacular: Studio Camera Operation, The BBC Way”

Walking Desk Is More Annoying Than A Standing Desk

We’re often told that sitting is bad for our backs, for our necks, and even our general health. The standing desk aims to solve this by keeping us in a more vertical position while we work. [Joel Creates] took this a step further by creating a walking desk that’s motorized and keeps him on the move.

[Joel’s] build started with a standing desk. He then pulled off the desk’s standard wheels, and replaced them with motors sourced from cheap second-hand hoverboards and a couple of casters. The hoverboard wheels and casters were upgraded with pneumatic tires for the sake of a smoother ride, and control is via a thumbstick mounted on a mouse. Power is via a large bank of lithium-polymer batteries which are responsible for running the motors and the computer hardware which [Joel] uses to work on the go. A solar panel canopy helps top off the batteries when he’s out and about.

As you might imagine, a guy walking around trails with an entire computer desk draws a lot of attention. It’s probably not the best way to be productive, but it’s a neat way to integrate exercise into your routine if you’re always working at a computer. Somehow we suspect these might not catch on. Video after the break.

Continue reading “Walking Desk Is More Annoying Than A Standing Desk”

In New Doctor’s Office, Stethoscope Wears You

The medical professional wearing a stethoscope is a familiar image, but Northwestern University wants to change that. Instead of someone hanging an ancient device around their neck to listen inside of you, they want to put sticky sensors on patients to continuously monitor sounds from hearts, lungs, and the GI tract.

The tiny devices stick to your skin and wirelessly beam audio to clinicians for analysis. They’ve tested the devices on people ranging from people with chronic lung disease to premature babies. In fact, you can hear breath sounds (and crying) from a microphone attached to a baby in the video below. The device uses noise suppression to remove the crying sounds effectively.

Continue reading “In New Doctor’s Office, Stethoscope Wears You”