Homebrew Retro Console Runs On PIC32

[Chad Burrow] decided to take on a noble task—building a “retro” style computer and video game console. Only, this one is built using somewhat modern hardware—relying on the grunt of the PIC32MZ2048EFH144 to get the job done. Meet the Acolyte Hand PIC’d 32.

It’s name might be a mouthful, but that chip can pull off some great feats! With a clock speed of 200 MHz, it’s not  short on processing power, though RAM and flash storage are somewhat limited at just 512 KB and 2MB respectively. [Chad] was able to leverage those constraints to get a VGA output working at a resolutions up to 800 x 600, with up to 65,000 colors—though 256 colors is more practical due to memory concerns. The Acolyte Hand also rocks two 8-bit audio channels. It has a pair of Genesis-compatible controller ports as well as PS/2 and USB for keyboards and mice, along with more modern Xbox 360 controllers.

[Chad] cooked up some software to put it through its paces, too. It’s got a Tetris clone on board, and can also run Game Boy games at full speed via the Peanut-GB emulator. That provides for a pretty rich game library, though [Chad] notes he plans to develop more native video games for his system to demo at his local college. Design files are on Github for the curious.

This project is a great example of just how powerful modern microcontrollers have become. Once upon a time, just driving a simple black-and-white graphical LCD might have taken some real effort, but today, there are pixels and clock cycles to spare in projects like these. Truly a wonderous world we live in!

Selectively Magnetizing An Anti-Ferromagnet With Terahertz Laser

It’s a well-known fact that anti-ferromagnetic materials are called that way because they cannot be magnetized, not even in the presence of a very strong external magnetic field. The randomized spin state is also linked with any vibrations (phonons) of the material, ensuring that there’s a very strong resistance to perturbations. Even so, it might be possible to at least briefly magnetize small areas through the use of THz-range lasers, as they disrupt the phonon-spin balance sufficiently to cause a number of atoms to ‘flip’, resulting in a localized magnetic structure.

The research by [Baatyr Ilyas] and colleagues was published in Nature, describing the way the 4.8 THz pulses managed to achieve this feat in FePS3 anti-ferromagnetic material. The change in spin was verified afterwards using differently polarized laser pulses, confirming that the local structures remained intact for at least 2.5 milliseconds, confirming the concept of using an external pulse to induce phonon excitation. Additional details can be found in the supplemental information PDF for the (sadly paywalled with no ArXiv version) paper.

As promising as this sounds, the FePS3 sample had to be cooled to 118K and kept in a vacuum chamber. The brief magnetization also doesn’t offer any immediate applications, but as a proof of concept it succinctly demonstrates the possibility of using anti-ferromagnetic materials for magnetic storage. Major benefit if such storage can be made more permanent is that it might be more stable and less susceptible to outside influences than traditional magnetic storage. Whether it can be brought out of the PoC stage into at least a viable prototype remains to be seen.

Fluid Simulation Pendant Teaches Lessons In Miniaturization

Some projects seem to take on a life of their own. You get an idea, design and prototype it, finally build the thing and — it’s good, but it’s not quite right. Back to the drawing board, version 2, still not perfect, lather, rinse, repeat. Pretty soon you look around to discover that you’ve built ten of them. Oops.

That seems to be the arc followed by [mitxela] with this very cool fluid simulation pendant. The idea is simple enough; create a piece of jewelry with a matrix of tiny LEDs that act like the pendant is full of liquid, sloshing about with the slightest movement. In practice, though, this project was filled with challenges. Surprisingly, [mitxela] doesn’t seem to number getting a fluid dynamics simulation running on a microcontroller among those problems, at least not to a great degree. Rather, the LED matrix seemed to cause the most problems, both in terms of laying it out on the 25-mm diameter PCB and how to address the LEDs with relatively limited GPIO on the STM32 microcontroller. The solution to both was diagonal charlieplexing, which reduces the number of vias needed for the 216-LED matrix and allows the 0402 to be densely packed, along with providing some tolerance for solder bridging.

And then there’s the metalworking heroics, which no [mitxela] project would be complete without. This seems to be where a lot of the revisions come from, as the gold-plated brass case kept not quite living up to expectations. The final version is a brass cup containing the LiR2450 rechargeable battery, a magnetic charging connector, and the main PCB, all sealed by a watch crystal. The fluid simulation is quite realistic and very responsive to the pendant’s position. The video below shows it in action along with a summary of the build.

If you want to catch up on [mitxela]’s back catalog of miniaturized builds, start with his amazing industrial ear adornments or these tiny matrix earrings. We’re also fond of his incredible shrinking MIDI builds. Continue reading “Fluid Simulation Pendant Teaches Lessons In Miniaturization”

Electromechanical 7-Segment Display Is High Contrast Brilliance

The seven-segment display is most well known in LED form, but the concept isn’t tied to that format. You can build a seven-segment display out of moving parts, too. [tin-foil-hat] has achieved just that with a remarkably elegant design.

As you might expect, the build relies heavily on 3D-printed components—produced in white and black plastic to create a high-contrast display. It’s a simple choice that makes the display easy to read in a wide variety of lighting conditions, and far less fussy than toying with LEDs and diffusers and all that.

Actuation of each display segment is achieved electromagnetically. Effectively, each segment behaves like a flip dot, with the orientation controlled by energizing one of two electromagnets per segment. Controlling the electromagnets is an ESP32, which is hooked up to the various segments via a Darlington transistor array, with multiplexing used to minimize the number of IO pins required. A shift register was also employed to let the microcontroller easily drive four of these electromechanical digits.

It’s a simple build, well explained—and the final result is aesthetically pleasing. We’ve seen a few builds along these lines before, albeit using altogether different techniques. Lots of different techniques, in fact! Video after the break.

Continue reading “Electromechanical 7-Segment Display Is High Contrast Brilliance”

Clever PCBs Straighten Out The Supercon SAO Badge

When we decided that Simple Add-Ons (SAOs) would be the focus of Supercon 2024, it was clear the badge would need to feature more than just one or two of the requisite connectors. We finally settled on six ports, but figuring out the geometry of getting all those ports on the badge in such a way that the SAOs wouldn’t hit each other was a bit tricky. In early concept drawings the badge was just a big rectangle with the ports along the top, but it was too ugly.

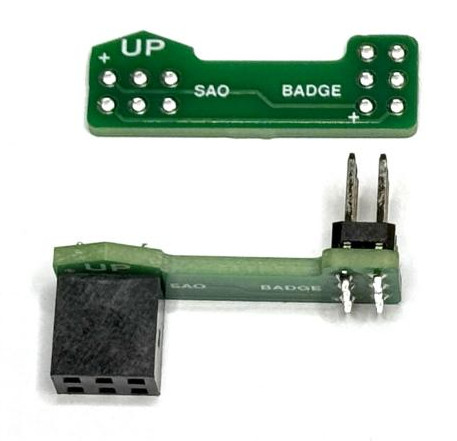
In the end we went with a somewhat organic design — an electronic “flower” with the radially arranged SAOs forming the petals, but this meant that that none of the SAOs were in the traditional vertical orientation. Luckily, [Adrian Studer] designed a couple of PCBs that not only resolve this issue, but add a seventh SAO port for good measure.

In the project repository you’ll find two PCB designs. The first, “SAO Up” is essentially a little arm that turns the SAO port 90 degrees. This doesn’t exactly get them vertical, in fact, whether or not the new orientation is actually an improvement for the top two SAOs is perhaps debatable. But it definitely helps on the lower SAOs, which are essentially upside down in their original configuration.

The real star of the show is “SAO Bridge”, a wavy board that connects across the two midline SAO ports on the Supercon badge and turns it into a set of three (nearly) horizontal connectors across the front. The center port is particularly helpful in that it gives you a place to put unusually wide SAOs.

As a reminder the Supercon SAO badge, and the winners of the 2024 SAO Contest, will be making the trip across the pond for Hackaday Europe in just a few months. That means you’ve still got plenty of time to have a few of these CERN-OHL-P licensed boards made up.

Raspberry Pi Hack Chat With Eben Upton

Join us on Wednesday, January 15 at noon Pacific for the Raspberry Pi Hack Chat with Eben Upton!

join-hack-chatThe Hack Chat has been on an extended hiatus, but we’re back for 2025 and coming strong out of the gate! We’ve been trying to get Raspberry Pi co-founder and CEO Eben Upton on the chat for a while, but there was that whole thing of taking the company public that probably distracted him a wee bit. That’s fine though, because we know he loves getting in the trenches with the hacker community and talking about the things we all love to talk about. It’s not often that you get a chance for a one-on-one like this, so make sure you join us with all your Pi-related questions.

Our Hack Chats are live community events in the Hackaday.io Hack Chat group messaging. This week we’ll be sitting down on Wednesday, January 15 at 12:00 PM Pacific time. If time zones have you tied up, we have a handy time zone converter.

[Image credit: Sniper Zeta, CC BY-SA 4.0]

How Nyan Cat Was Ported To UEFI

The Unified Extensible Firmware Interface (UEFI) took over from the classical BIOS some years into the new millenium. It’s typically used for running a computer at the basic pre-OS level, and most of us don’t even notice it past boot time. However, you can do some neat things in this space—you can even port over Nyan Cat if you’re talented like [Cornelius].

That’s fun. Set your friend’s computer to boot into this instead of their OS by default and see how long it takes them to figure it out.

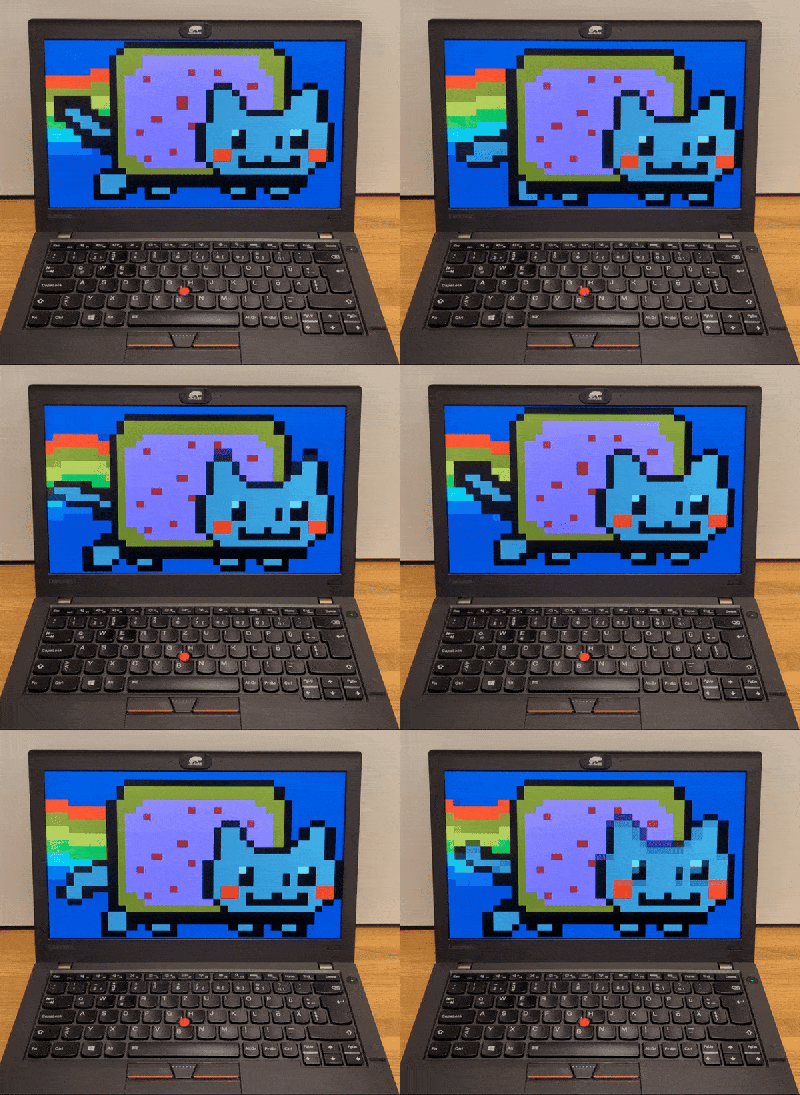
Yes, Nyan Cat is now available as a UEFI application, running via the EFI Simple Text Output Protocol. [Cornelius] approached this creation by first learning Rust, before progressing to the Hello World stage. Before long, the computer was booting up to display a simple text message with no OS required.

From there, creating the Nyan Cat animation required figuring out how to display it as a bunch of dancing characters, which is where the Simple Text Output Protocol came in. Nyan Cat was really the perfect animation for the UEFI environment, since its simple pixel art style was easily recreated with text. With a bit of work, the animation came together, with a remarkable resemblance to the original artwork.

All that’s missing is a routine to play the music over a PC speaker; only, those are hardly a thing anymore. A pity! In any case, if you’ve been cooking up your own nifty UEFI hacks, don’t hesitate to drop us a line!