Starlink terminal being injected with 12V from an external PSU

Bypass PoE And Power Your Starlink Terminal Directly

Sometimes, you will want to power a device in a way it wasn’t designed for, and you might find that the device in question is way too tailored to the original power source. Today, [Oleg Kutkov] is here to give us a master class on excising unnecessary power conversion out of your devices, with the Starlink terminal as an example. This device can only be officially powered from 48V PoE, but can technically work from about 12V – and, turns out, many people want to mount a Starlink terminal to their cars.

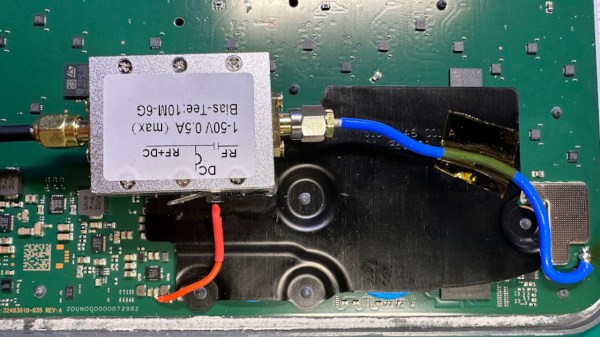
[Oleg] shows us the power circuit of the Starlink terminal, explaining which component is responsible for what, and gives us a block diagram. Then, he shows you the 12V rail that all internal components actually draw power from, and where to feed power into it. Plus, he warns you about possible caveats, like having to disable the builtin 12V regulator to prevent it from backfeeding-induced damage. If you’re looking to modify a similar device, this tutorial gives you heaps of insight on what you might need on your foray.

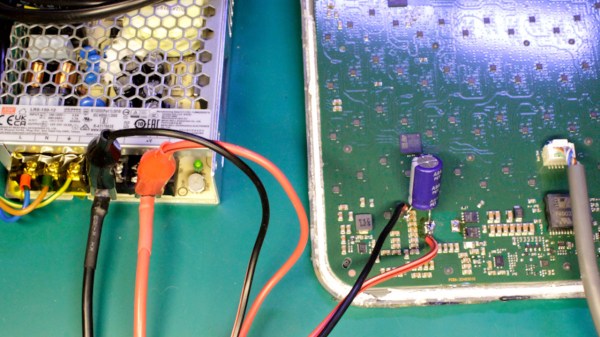
Thinking to modify your own Starlink terminal, perhaps, and wondering about the power consumption? [Oleg] has current consumption graphs for you, collected with a data logger for Uni-T UT800 of his own design, providing detailed figures on just how much energy you ought to supply to power the terminal from 12V, and where to (not) get it. After all, even a seemingly suitable power supply might not do.

A bias tee module added inside the Starlink terminal, connected to the pads where a GPS antenna used to be wired

GPS Antenna Mods Make Starlink Terminal Immune To Jammers

The Starlink receivers need positioning and precise timing information to function, and currently the best way to get that information is to use a global navigation satellite system (GNSS) such as GPS. Unfortunately, the antenna used for this secondary satellite connection leaves something to be desired. Of course, when it comes to solving Starlink problems, there’s no one best than [Oleg Kutkov], whose duty is to fix and improve upon Starlink terminals used in Ukraine — and when the specific problem is GPS bands getting jammed by the invading military, you better believe that a fix is due.

[Oleg] sets the scene, walking us through the evolution of GPS circuitry on the Starlink terminals. Then he shows us the simplest mods you can do, like soldering an improved passive antenna in place of the chip antenna currently being used. Then, he takes it up a notch, and shows us how you could attach an active antenna by using a bias tee module, a mod that would surely work wonders on more than just this device! Then, he brings out the test result tables — and the differences are impressive, in that the Starlink terminals with active antenna mods were able to get GPS signal in areas with active jamming going on, while the unmodified ones could not.

The post is exceptionally accessible, and a must read for anyone wondering about GPS antenna reception problems in customer-accessible devices. This is not the only Starlink hardware mod we’ve seen [Oleg] make, we’ve just covered his Starlink Ethernet port restoration journey that meticulously fixes Ethernet connectivity oversights in the newer models, and the blog also has an article about powering Starlink terminals without the need for PoE, so, do check it out if you’re looking for more!

Check Out This PDP-11 Running Unix With A Teletype Terminal

If you’ve spent a few years around Hackaday, you’ve probably seen or heard of the DEC PDP-11 before. It was one of the great machines of the minicomputer era, back when machines like the Apple ][ and the Commodore 64 weren’t even a gleam in their creator’s eyes. You’ve also probably heard of Unix, given that so many of us use Linux on the regular. Well, now you can see them both in action, as [HappyComputerGuy] fires up real Unix on a real PDP-11/73… with a real Teletype Model 33 to boot!

It’s a fascinating dive into the tech of yesteryear, with a rich dose of history to boot. It’s mindboggling to think that video terminals were once prohibitively expensive and that teletype printers were the norm for interacting with computers. The idea of interacting with a live machine via a printed page is alien, but it’s how things were done! We’re also treated to a lesson on how to boot the PDP-11 with 2.11BSD which is a hilariously manual process. It also takes a very long time. [HappyComputerGuy] then shows off the Teletype Model 33 rocking the banner command to great effect.

It’s awesome to see this hardware as it would really have been used back in its heyday. Computing really was different before the microcomputer format became mainstream. It’s not the only PDP-11 we’ve seen lately, either! Video after the break.

Continue reading “Check Out This PDP-11 Running Unix With A Teletype Terminal”

Terminal-Based Image Viewer, and Multi-OS Binary, and Under 100kb

[Justine Tunney]’s printimage.com is a program capable of splatting full-color images to text mode terminal sessions, but that’s not even its neatest trick. It’s also a small binary executable capable of running on six different operating systems: Linux, Windows, MacOS, FreeBSD, OpenBSD, and NetBSD. All without having to be installed or otherwise compiled first. On top of it all, it’s less than 100 kb.

How is this possible? It’s thanks to [Justine]’s αcτµαlly pδrταblε εxεcµταblε format, implemented by a project called Cosmopolitan which aims to turn C into a build-once-run-anywhere language. The printimage.com source code is included within the Cosmopolitan project.

If the name sounds a bit familiar, it’s probably because the Cosmopolitan project is a key piece of a tool we recently covered: llamafile, which allows people to package up an LLM (large language model) as a single-file, multi-OS executable.

As printimage.com shows, terminal windows are capable of more than just text. Still, plain ASCII has its appeal. Check out the ASCII art STL file viewer which might just make your next sick ASCII art banner a bit easier to generate.

Wio Terminal Makes Passable Oscilloscope

There was a time when getting a good oscilloscope not only involved a large outlay of capital, but also required substantial real estate on a workbench. The situation has improved considerably for the hobbyist, but a “real” scope can still cost more than what a beginner is looking to spend. Luckily, plenty of modern microcontrollers are capable of acting as a basic oscilloscope in a pinch, provided there’s a display available to interface with it. Combined with the right software, the Wio Terminal looks like a promising option.

The Wio Terminal is a platform gaining some popularity due to its fairly capable SAMD51 microcontroller and also its integration with a display and a number of input buttons. On the hardware side, [mircemk] mounted the Terminal in a convenient vertical orientation and broke out a pair of connectors for the inputs.

But it’s the software that really makes this project work. [Play With Microcontroller] originally developed the firmware for the PIC24 back in 2017, but ported the code over to the Wio Terminal a couple years back. Noting that the microcontroller is not particularly fast, the project doesn’t exactly match the specifications or capabilities of a commercial unit. But still, it does an impressive job of recreating the experience of using a modern digital scope

The Wio Terminal is a device we’ve seen around here for a few unique projects, among them a device for preventing repetitive strain injuries while using a computer mouse and another that is a guide for game development in MicroPython. And if you’re just itching to port oscilloscope software to accessible but under-powered microcontrollers, be sure to check out [mircemk]’s other oscilloscope projects like this one built around the STM32 microcontroller.

Continue reading “Wio Terminal Makes Passable Oscilloscope”

Diving Into Starlink’s User Terminal Firmware

The average Starlink user probably doesn’t spend a lot of time thinking about their hardware after getting the dish aligned and wiring run. To security researchers, however, it’s another fascinating device to tinker with as they reverse-engineer the firmware and try to both find out what makes it tick, as well as how to break it. This is essentially the subject of [Carlo Ramponi]’s article over at Quarkslab as he digs into the firmware architecture and potential weaknesses in its internal communication.

The user terminal hardware itself is a quite standard AArch64 ARM-based SoC, along with the proprietary communication interface, all of which is controlled by the Linux-based firmware. Dumping the firmware itself was made easy thanks to existing work by researchers at the KU Leuven, involving dumping the contents of the onboard eMMC storage. After this the firmware architecture could be analyzed, which turned out to consist out of mostly C++-based binaries, but with a single big binary for the user front-end written in Go.

Communication between these processes is handled through a custom inter-process protocol called ‘Slate Sharing’, all of which is coordinated via the core User Terminal Control process. It are these Slate IPC messages which form the most likely attack surface for a fuzzing attack, with the SoftwareUpdateRequest command being an interesting target as it would seem to not require authentication since it doesn’t address a specific user. This work is part of [Carlo]’s master’s thesis, and should form the basis of further research on the Starlink User Terminal firmware.

2023 Cyberdeck Challenge: KOAT0 Portable Terminal

We’ve had cyberdecks as part of the scenery for long enough now that there are a series of common elements that appear across many different builds. The Raspberry Pi, for instance, or the mechanical keyboard, with a 3D printed body. [RobsonCuto]’s KOAT0 Portable Terminal has some of those in a particularly slim and neat design. The orange and grey color scheme is great really pops. Where this deck really shines though, is the display.  He’s eschewed LCDs or OLEDs, even CRTs, and gone for an unusual choice in a dot-matrix VFD.

The VFD in question is commonly available on AliExpress where it appears to be used for displaying Chinese characters. It’s not an obvious choice for a cyberdeck, so once the tidy-looking case is complete the real challenge in this project becomes how to drive it from the Pi. To that end, he appears to have some kind of text output working but still needs to complete a framebuffer driver. We applaud the effort and we really like the display.  We’re curious as to how its meager resolution might best be used in a Linux device.

All in all, this is a ‘deck we’d be happy to use ourselves if it were an option. We particularly like the on-the-arm style of use, and we’re pretty sure it’s the first time we’ve seen one of these displays on these pages.