Hacklet 51 – Crowdfunding Projects

Ah crowdfunding. You might say we have a love/hate relationship with it here at Hackaday. We’ve seen some great projects funded through sites like Kickstarter, IndieGoGo, and the like. We’ve also seen projects where the creators were promising more than they could deliver. While the missed deliveries and outright scams do get a lot of press, we believe that crowdfunding in general is a viable platform for getting a project funded.

Closer to home, Hackaday.io hosts thousands of projects. It’s no surprise that some of these have had crowdfunding campaigns. This week’s Hacklet focuses on those projects which have taken the leap into the crowdfunding arena.
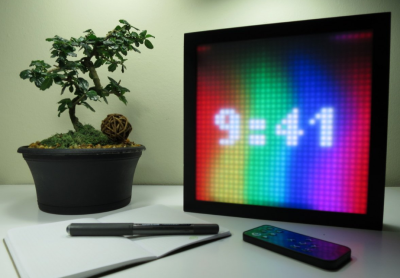
matrixWe start with [Louis Beaudoin] and SmartMatrix. [Louis] has created an awesome Teensy 3.1 based system for displaying images, animated graphics, and random patterns on a 32×32 RGB LED panel. The LED panel is the same type used in commercial LED billboards. SmartMatrix is open source, and includes extra pins for hacking. Our own [Mike Szczys] hacked the SmartMatrix to create a 1-pixel PacMan clone. [Louis’] Kickstarter is almost over, and needs a huge boost for fully-assembled SmartMatrix to make its goal. Even if the campaign isn’t successful, we think its a great project and you can always get a solder-it-yourself kit from The Hackaday Store!
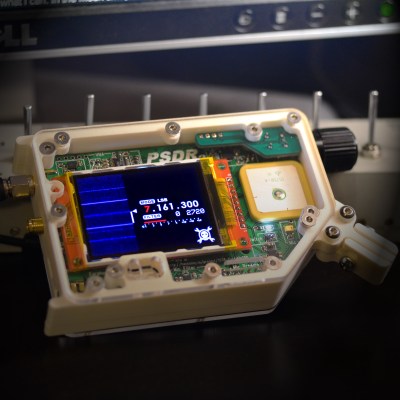
psdrNext up is [Michael R Colton] with PortableSDR. PortableSDR was one of the five finalists in The 2014 Hackaday Prize. This pocket-sized software defined radio transceiver started as a ham radio project: a radio system which would be easy for hams to take with them on backpacking trips. It’s grown into so much more now, with software defined radio reception and transmission, vector network analysis, antenna analysis, GPS, and a host of other features. [Michael] raised a whopping $66,197 in his Kickstarter campaign, and he’s already delivered the hand assembled prototypes to their respective backers! Even the lower level rewards are awesome – [Michael’s] PSDR key chains are actually PCBs which can be turned into maple compatible ARM devboards with just about $10 of additional parts.

chip whisperNext we have The ChipWhisperer, [Colin Flynn’s] embedded security testing system, which won second place in the 2014 Hackaday Prize. We’ve covered both [Colin] and the ChipWhisperer  several times on the Blog. You can always buy the full ChipWhisperer from [Colin’s] company, NewAE Technology Inc. At $1500 USD, the ChipWhisperer is incredibly affordable for a hardware security tool. That price is still a bit high for the average hacker though. [Colin] created a Kickstarter campaign for a light version of the ChipWhisperer. This version is a great platform for learning hardware security, as well as an instrument for testing embedded systems. The campaign was a huge success, raising $72,079.
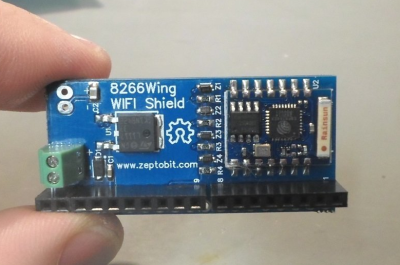
wingboardNot every crowdfunding project has to be a massive megabuck effort though. [ZeptoBit] just wanted to solve a problem, he needed a WiFi shield for Arduino using an ESP8266 module. ESP8266 WiFi modules have been all the rage for months now, but they can be a bit of a pain to wire up to an Arduino Uno. The dual row .100 headers are not bread board friendly. The ESP8266’s 3.3 V power and interface requirements mean that a regulator and level shifters are needed to get the two boards working together. [ZeptoBit] put all that and more on his wingboard. It worked so well that he launched a Kickstarter campaign for a small run of boards – his initial goal was kr3,500, or $425 USD. He ended up raising kr13,705, or $1665 USD. Not bad at all for a hobby project!

If this isn’t enough crowdfunding goodness for you, check out our Crowdfunding list! That’s it for this week’s Hacklet, As always, see you next week. Same hack time, same hack channel, bringing you the best of Hackaday.io!

Caption CERN Contest – Safe Science Is No Accident

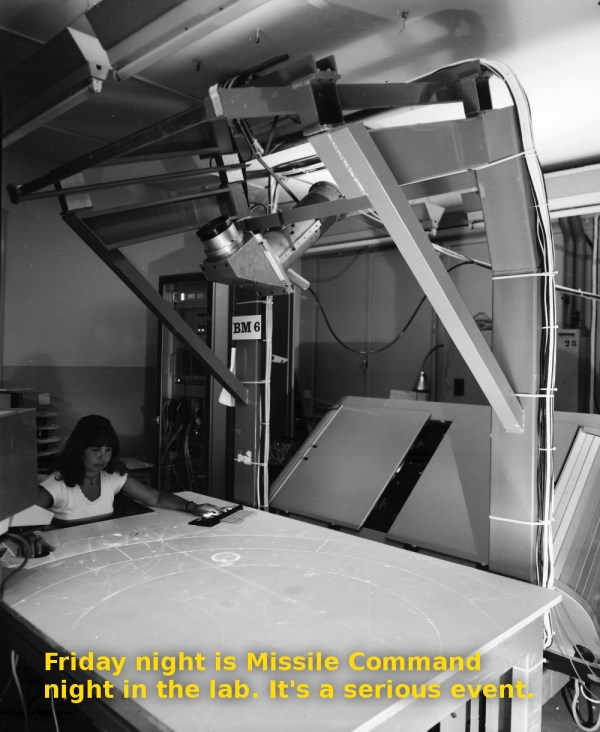
Week 18 has faded into history, but not before you wrote some great captions! A hearty thanks to all the entrants. Astute reader [jlbrian7] has done it again! He’s uncovered the story behind this image. The woman in this photo is manually analyzing photographs of charged particles taken in a bubble chamber. He linked to an article from Fermilab, and to a 1971 film about Gargamelle, CERN’s largest bubble chamber at the time. The film is well worth a watch. It’s aimed at the layman, explaining the design, construction, and operation of bubble chambers. The photo scanning section starts at 14:40. The video has plenty of “1970’s-isms”, such as referring to the women analyzing the photographs as “scanning girls”. The filmmaker even bookend the section with an actual scanned girl – a possibly NSFW (by today’s standards) ASCII art printout of a nude pin-up model, as printed by a Control Data Corporation supercomputer.

The Funnies:

  • “Tabatha, the dungeon master, plots tonight’s dungeon and dragons game inside the exploded atom.”- [LloydTCannonIII]
  • “CERN, the only place you can watch Netflix on the same table that you eat lunch and plot global domination. Muwahahaha!” – [Joshua]
  • “They take Kerbal Space Program very serious at CERN. Here you can see the first interactive real time orbital view display.” – [haxtormoogle]

This week’s winner is [Jarrett] with “Friday night is Missile Command night in the lab. It’s a serious event”

We’re giving away two prizes this week – one to [jlbrian7] for his research on this and other CERN images, and one to [Jarrett] for his winning caption! Congrats to both of you. Enjoy your Logic Pirates From The Hackaday Store!

Week 19

cern-19-smJust about every workplace has to worry about safety. Many companies have a safety team that is trained to handle emergencies and help patients until proper medical technicians arrive. In a typical office environment this training is pretty easy, but what if you’re working on the bleeding edge of science? CERN’s safety team trains for everything, including badly burned hands and partially removed eyeballs. Don’t worry, these are just simulated injuries, which is probably why this CERN scientist is so calm, even smiling for the photo! CERN’s medical room also appears to be well stocked – with a full skeleton, and no less than four different types of fire extinguishers.

So, even though we already have a pretty good idea of what is going on in this photo (and the accompanying album), we’re sure you’ll come up with some great captions. Have at it!

This week’s prize is a Lightblue Bean from The Hackaday Store. Add your humorous caption as a comment to this project log. Make sure you’re commenting on the contest log, not on the contest itself (or on this post).

As always, if you actually have information about the image or the people in it, let CERN know on the original image discussion page.

Good Luck!

Kids Electric Mini Goes Brushless, Pops Wheelies

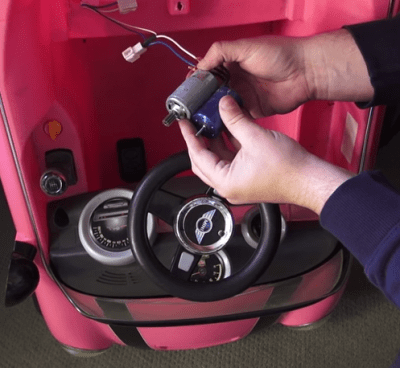
[ThatHpiGuy] had a problem. He wasn’t impressed with the performance from his kids’ electric-powered Mini. The 6 volt system was anemic at best, and was just begging for an upgrade. Pulling off the seat and checking the undercarriage, [ThatHpiGuy] realized the motor and gearbox were a perfect fit for the Turnigy 2300 Kv motor from his R/C short course truck. A couple of screws later, car-docuand he had the fastest ride-on toy on the block. Since this was a quick hack, [ThatHpiGuy] kept the truck’s R/C receiver, electronic speed control, and 2 cell LiPo power setup intact. The result is a cooperative system where he controls the throttle via R/C, and his kids control the steering.

That steering is still a bit of an issue though. Like many kid toys, the Mini only has one drive wheel, in this case the right rear. If [ThatHpiGuy] pours on the power a bit too quickly, the single wheel either spins or forces the car into a hard left turn. Aside from that, it looks like both [ThatHpiGuy] and his children are having a ball with this hack. The car will even pop a wheelie from a standing start! You’ve got to see it after the break.

Continue reading “Kids Electric Mini Goes Brushless, Pops Wheelies”

Hacklet 50 – Hydroponic Projects

Growing plants without soil has been has been amazing people for centuries. First written about in the 1600’s, hydroponics has become an industry with numerous techniques for germinating and sustaining both plant and animal life. It comes as no surprise then that hackers, makers, engineers, and scientists have been working with and improving hydroponic systems for centuries. Hydroponic plant growth is a project you can really sink your teeth into, as there’s nothing sweeter than eating the fruits and vegetables of your labor. This week’s Hacklet is all about the best hydroponic projects on Hackaday.io!

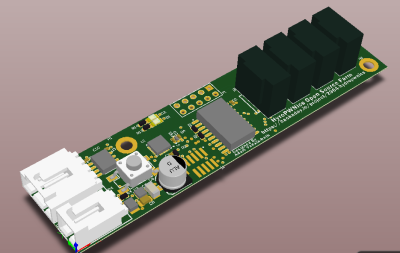
hydropwnWe start with HydroPWNics, [Adam Vadala-Roth’s] entry in The 2015 Hackaday Prize. [Adam] is creating a universal system with will work with both hydroponic and soil based grow systems. The hydroponic setup will consist of plants in a PVC gutter system. Water will be pumped to the top gutter, and flow down via gravity through the plant roots and back to the reservoir. The system will be monitored and controlled by a DyIO controller. Props to [mad.hephaestus] for creating DyIO, a project seeing reuse in the Hackaday.io community!


hydro2Next up is [Justin] with AAGriculture, an Automated Aquaponic Garden. AAGriculture is aquaponic system, which means it uses a symbiotic relationship between plants and fish to make more food for humans to eat. The fish in this case are bluegill and bullhead. A Raspberry Pi controls the system, while A Teensy-LC is used to help out with some of the real-time duties, like monitoring a PH probe. [Justin] is even using CO2 tanks to keep dissolved gasses in check. He must be doing something right, as his tomatoes are now over 23″ tall!


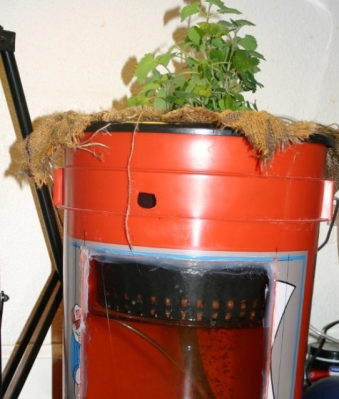
homer[Em] brings us 5g Aquaponics. 5g aquaponics isn’t a next generation cellular system, nor a 5.8 GHz WiFi setup, it’s an aquaponic system in a 5 Gallon bucket. Anyone from the US  will recognize the orange “Homer Bucket” from Home Depot. 5g Aquaponics includes a window, allowing the underwater workings to be monitored. Speaking of monitoring, 5g aquaponics is a manual affair – [Em] hasn’t used any electronics here. The idea is to create a system that is easy to get up and running for those who are new to Hydro/Aquaponic setups. [Em] is using a dual zone root system. The plant grows in dirt within a burlap fabric. The fabric then sits in a water bath which also houses the fish. Air pumped through an airstone keeps everything circulating. [Em’s] initial version of the project worked a bit too well. The tomato plant grew so large that the roots strangled the fish! Hopefully both flora and fauna are happy with this new rev 2.0!


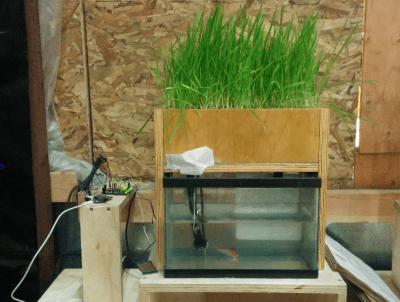
smartAquaFinally we have [Kijani grows] with Smart Aquaponics, which was [Kijani’s] entry in The 2014 Hackaday Prize. One wouldn’t expect fish, plants and Linux to mix, but that is exactly what is going on here. Linux runs on the popular Wr703n router, while a custom ATmega328 Arduino compatible board keeps track of the sensors.  The second version of the system will run on an ATmega2560 and an AR9331 module, all housed on one board. The system does work, and it’s been expanded from a single fish tank to a large flood/drain table complete with grow lights, all kept at [Kijani’s] office. The biggest problems [Kijani] has run into are little things like misplaced resistors masquerading as kernel bugs.

Still haven’t eaten your veggies? Want to see more hydroponic projects? Check out our new hydroponic projects list! That’s it for this week’s Hacklet, As always, see you next week. Same hack time, same hack channel, bringing you the best of Hackaday.io!

Caption CERN Contest – Tabletop Projection

Week 17 of the Caption Cern Contest on Hackaday.io is now a polished sheet metal memory, but the captions live on! Thanks to everyone who entered. We may never know exactly what these scientists and their ladder holding friend were up to. We do know a bit more about some of the equipment in that photo though! Astute reader [Pierlu] dropped a photo comment here on the Blog showing some interesting lawn ornaments over at CERN. The device to the right looks quite a bit like the device on the right side of our original image. We don’t have a close-up to be sure, but chances are this is part of a Cockcroft–Walton generator.

The Funnies:

  • “…and six cute little kittens, too. I wonder how she got in here? Hey, hold that ladder steady, Schrödinger!” – [sbi.gaijin]
  • “Good news: the shrink ray worked. Bad news: we have to escape the janitor’s vacuum cleaner” – [Cody]
  • “Archeology Professor Ammit Duat from the University of Cairo, assisting CERN engineer Jack Orsiris in changing the locks on the door to the Egyptian underworld” – [carbonfiber]

This week’s winner is [alj5432] with “Sticking with CERN’s usual “Go Big or Go Home” theme,
scientists make adjustments to LHC’s massive “Press To Start” Button.” We’re sure [alj5432] will enjoy probing digital circuits with his new Logic Pirate From The Hackaday Store! Congratulations [alj5432]!

Week 18

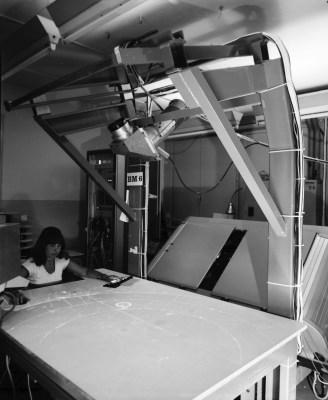
CEcern-18-smRN is no stranger to innovative display systems. That should be no surprise, considering CERN staff are trying to work with massive amounts of data collected by thousands of scientists. Here we see one of those systems, a projection table of some sort.


Today video projectors are relatively cheap and easy to make, thanks to advances in LCD and MEMS technology. Back when this image was shot in 1979 though, video projectors were expensive and rare commodities. What was this scientist doing?

You tell us!

Once again, we’re giving away a Logic Pirate from The Hackaday Store.

Add your humorous caption as a comment to this project log. Make sure you’re commenting on the contest log, not on the contest itself.

As always, if you actually have information about the image or the people in it, let CERN know on the original image discussion page.

Good Luck!

From Scrap To Sword: Casting Pewter

[TheBackyardScientist] has been living up to his name, this time by casting a pewter sword in his yard. Pewter is a soft alloy of mostly (85–99%) tin along with copper, antimony and bismuth. Older pewter castings often used lead as well. The great thing about pewter is its low melting point of 170–230 °C. At such low temperatures, pewter can be melted down on a common hot plate. Think of it as an easy way to get into the world of metal casting – no forge required. Of course, anyone who has been splashed with solder will tell you that hot molten metal always deserves a lot of respect.

[BackyardScientist] obtained his metal by hunting the local thrift stores. He used the “lost foam” method of casting, by carving a sword out of styrofoam. The sword was embedded in a 5 gallon bucket of sand with a riser to allow the mold to be filled. The pewter was melted on a cheap hot plate, and poured into the mold. The hot metal melts the foam on contact, simultaneously filling up the cavity left over in the sand mold. [BackyardScientist] was left with a solid pewter sword. It won’t hold an edge, but it is a great illustration of the technique.

Click past the break to see [TheBackyardScientist’s] video.

Continue reading “From Scrap To Sword: Casting Pewter”

Hacklet 49 – Weather Display Projects

Everyone wants to know what the weather is, and what it is going to be. Today’s internet enabled forecasts give us continuous streams of current weather data and predictions from any of several computer models. Couple that with data from an on-site station, and you’ve got a lot of information to display! It makes sense that weather display projects would be popular with hackers, makers and engineers. What do you do after you build the worlds most awesome clock? Build the worlds most awesome weather display (and then incorporate a clock in there as well!).

Last week on The Hacklet I mentioned that there are two basic types  of weather projects on Hackaday.io: Sensing and Display projects. There was a bit of foreshadowing there, as this week’s Hacklet covers some of the best weather display projects on Hackaday.io!

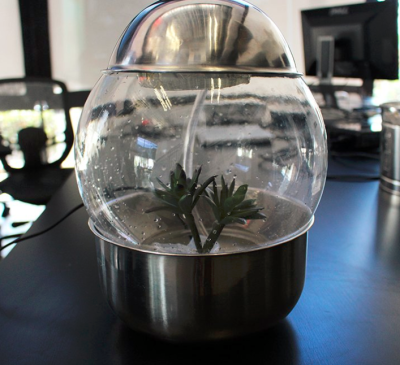
geoWe start with [Ashley Hennefer] and G.E.O, a project which is out of this world – literally. Geological Environment Observer, or G.E.O was created for NASA’s Space Apps Challenge. G.E.O’s mission is to keep astronauts on long-distance space flight missions connected with their home city (and planet). An astronaut programs the device with their home city and G.E.O takes it from there. Inside a glass globe, G.E.O creates weather patterns mirroring the programmed city. It does this with Adafruit NeoPixel LEDs, a water pump, a mist generator, and a wave shield. An Intel Edison controls the system. For now, weather data and programming are completed using a web interface. Once G.E.O launches though, data will be streamed via NASA’s deep space network.

flaps[Sephen DeVos] keeps track of the weather with a glance at his Internet Split Flap Weather Clock. Lots of weather apps use simple icons to display the current conditions. [Sephen] placed those icons on a mechanical split flap display which lets him know the conditions outside. The project’s case came from a donor clock given to [Sephen] by his parents. He then 3D printed an entire split flap mechanism, including the gears! Each 50 mm x 100 mm flap forms half an image.  A small stepper drives the flaps, while an IR detector lets the system know when it has reached a home position. Control is handled by an Arduino Nano and companion Ethernet shield. The Arduino checks the weather every 30 minutes. If conditions have changed, it flips to the right icon. Genius!

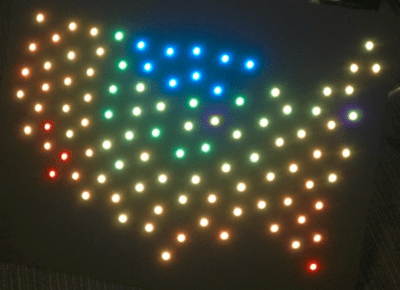
usmap[Dan Fein] is keeping track of the temperature across the entire USA with Weather Map. [Dan] works for Weather Underground, so it’s no surprise that he uses their API (accessed via a node.js script) for weather data. The data is fed into a spark core which then drives a string of 100 WS2812 LEDs. Each LED is mapped to a specific point in the continental USA. Color indicates the current temperature at that location. [Dan] does caution that you’ll have to slow down access to Weather Underground  if you’re using a free API key. Even with slower updates, this is still an awesome project!

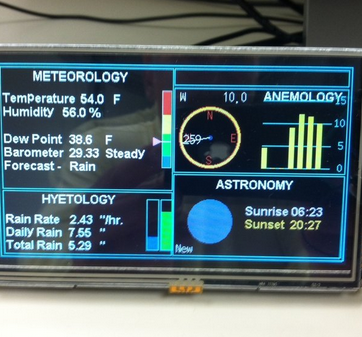
yaws[Jeff Thomas] went the traditional route with YAWS – (Yet Another Weather Station). YAWS uses a 5 inch TFT LCD to display weather data from a number of sensors. [Jeff] got his display and the driver board from buydisplay.com. The driver board uses the venerable RA8875 display driver chip. The RA8875 handles all the hard parts of driving an LCD, like video RAM, refresh, and clocks. This allows a relatively slow Arduino to drive all those pixels. [Jeff] created a very handsome interface to display all his data, but he has a small problem – a memory leak causes the system to freeze up every 18 hours! We’re hoping [Jeff] will share his source code so the Hackaday.io community can help him find that pesky bug!

If you want to see more projects like these, check the Weather Display Projects list on Hackaday.io. That’s it for this week’s Hacklet, As always, see you next week. Same hack time, same hack channel, bringing you the best of Hackaday.io!