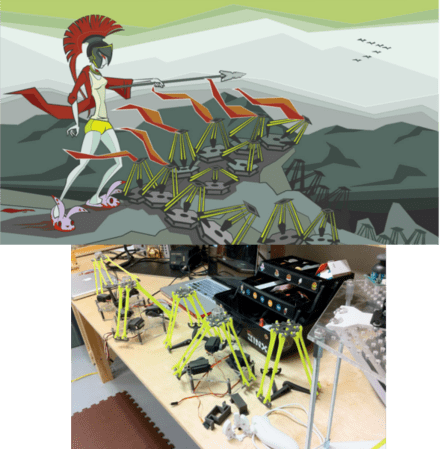
Something WiFi This Way Comes; Wicked Device Unveils Wildfire

WildFire-v2

Wicked Device has released the WildFire board to the world. WildFire is a an Arduino compatible processor board with a Texas instruments CC3000. WildFire adds a few interesting features to the typical ‘Duino clone. Instead of the ATMega328 used in the Arduino Uno, the WildFire uses an ATMega1284p, which gives 16K of SRAM and 128K of Flash ROM (as compared to 2K RAM and 32K Flash in an Uno). A micro SD card slot is also on-board for data logging functions.

In the name of full disclosure, we should mention that [Adam] has known [Victor and Ken] over at Wicked Device for a few years now, and got his hands on a pre-release version of the board to play with. As with any non-standard Arduino board, the WildFire does require some modification to the Arduino IDE. This took a bit of time with the pre-release board. Wicked Device has streamlined the process since then. Everything is contained in a zip file on their product page. Once the IDE is up and running, its easy to get the WildFire’s CC3000 connected to your local access point. From there the internet is your playground. For those of you already asking “So, Hack?”, watch this space – Adam is working on a hack using the WildFire board which will show up in a few days. 

Update: SD Card Locker Now Supports Password Protect

sdlocker2_1

[Karl Lunt] has updated his Secure Digital Card locker to support password based locking. [Karl’s] original design only supported write locking via the TMP_WRITE_PROTECT  bit. The new design gives the user an option: TMP_WRITE_PROTECT, or password protection. [Karl] goes into further detail this time around about the bit fields used with CMD42, and how they are set. The passwords in this case are up to 16 bytes. The bytes don’t necessarily have to be printable characters – any binary value can be used. Unfortunately, [Karl’s] locker doesn’t utilize a user interface beyond the buttons, so any password must be “baked in” to the SD Card locker firmware. We would love to see the option of even a basic serial interface for entering a password (most likely in hex).

[Karl] tried his device out with several different cards, and several computers. While not an exhaustive test, he did find that the computers always behaved the same: A locked SD card would not show up. In the case of windows, no beep, no drive, nothing. He goes into the security possibilities of using password locking: Financial data could be stored and physically transferred via SD or microSD, with the password sent separately (say in an email or SMS). Any unenlightened data thief attempting to use the card would think they have a broken device on their hands.

We don’t know how secure the password lock feature is – brute forcing a variable length 16 byte binary password would take some time. It all comes down to how quickly each password attempt takes. Some cursory web searching didn’t bring up any information about successful SD card password cracking. Sounds like a challenge for our readers!

Raspberry Pi Emulates An Amiga 500 Floppy Drive

[Maurizio] loves using his Amiga 500. His classic piece of hardware has been serving him well for years, except for the floppy drive, which recently gave out on him. No problem for [Maurizio], he just cracked his case open and added a Raspberry Pi as a real-time floppy emulator. [Maurizio] didn’t want to make any permanent changes to his A500 case, and more importantly he wanted to use the Amiga’s original floppy drive interface. The latter placed some rather stringent timing requirements on his design.

The interface hardware is relatively simple. Most of the circuit is dedicated to level shifting from the 5v Amiga 500 to the 3.3V Raspberry Pi. A 74LS06 Hex inverter converts the signals to the open collector outputs the A500 requires. [Maurizio] powered his Raspberry Pi from the floppy power connector of the Amiga. His model A Raspberry Pi works fine, but a model B would pull a bit more power (700ma) than the Amiga floppy power supply is capable of providing (550ma). The user interface side of the equation is simple: Two buttons, one used to switch disks, and one to “Write to SD”. Live disk images are stored in the Raspberry Pi’s ram, so the user needs to hit the “Write to SD” button to store any changes to disk before swapping floppies.

The software is perhaps the most interesting portion of this build. [Maurizio] is emulating a floppy drive in real-time – this means emulating MFM encoding in real time. Calls have to be made with a timing accuracy of 2 microseconds. The Pi’s stock Linux Operating system was just not going to cut it. [Maurizio] coded his drive emulator “bare metal”, directly accessing the Arm Processor on the Raspberry Pi. This gave him access to the entire processor, and allowed him to meet the hard timing requirements of the floppy interface.

Continue reading “Raspberry Pi Emulates An Amiga 500 Floppy Drive”

Quadcopters Go Inverted By Reversing Their Motors

Inverted Quadcopter? That generally means a crash is soon to follow. Not so for a new crop of quadcopter fliers. These new quadcopters are capable of sustained inverted flight. We’ve seen inverted quadcopters before here on hackaday. However, previous inverted quadcopters always used collective pitch to control the thrust produced by the blades. Collective pitch on a quadcopter is much simpler than it is on the main rotor of a traditional helicopter. R/C and full-scale helicopters mix collective and cyclic pitch to articulate the main rotor blades. A quadcopter only needs the collective portion, which is similar to a traditional helicopters tail rotor mechanism, or a variable pitch prop on an airplane.

These new quadcopters are using a much simpler method of flying inverted: Spin the motors backwards. Quadcopters control their flight by quickly varying the speed of rotation of each motor. Why not completely reverse the motor then? Today’s brushless outrunner motors have more than enough power to quickly reverse direction. The problem becomes one of propellers. Standard propellers are designed to create thrust in one direction only. Every quadcopter uses two clockwise rotation and two counterclockwise rotation propellers. Propellers will generate reverse thrust if they are spun backwards, however they will not be as efficient as they would when spinning the direction they were designed for. The quad fliers have found a partial solution to this problem: Remove the curve from the blade. R/C propeller blades are sold by diameter and blade pitch. The pitch is a measure of the angle of attack of the blades. R/C blades also have an airfoil style curve molded into them. Removing this curve (but not changing the pitch) has helped the problem.

This final problem is control systems. Since quadcopters already are relying on computer control for basic flight, it’s simply a matter of loading custom firmware onto your flight board to support motor rotation reversal. Speed controls also have to be capable of reverse rotation, which means new firmware as well. We’re curious to see how the quadcopter community settles on the control systems for inverted flight. The R/C helicopter community went through several iterations of control systems over the years. At one point they were using “Invert switches” which reversed controls as well as handled the collective pitch changes. As time went on, these switches fell out of favor and are now known as “Crash switches” due to the result of accidentally hitting one while flying, or before engine start.

Continue reading “Quadcopters Go Inverted By Reversing Their Motors”

Amateur Radio Transmits 1000 Miles On Voice Power

Many of us tried the old “Two tin cans connected by a string” experiment as kids. [Michael Rainey, AA1TJ] never quite forgot it.  Back in 2009, he built “El Silbo”, a ham radio transmitter powered entirely by his voice. El Silbo is a Double Side Band (DSB) transmitter for 75 meters. While voice is used to excite the transmitter, it doesn’t actually transmit voice. El Silbo is a CW affair, so you should bone up on your Morse Code a bit before building one. Like many QRP transmitters El Silbo’s circuit is rather simple. A junk box loudspeaker is installed at the bottom of the can to convert voice power to electrical power. The signal is passed through a step up transformer, and used to excite a 75m crystal. Two NPN transistors (in this case MPS6521) pass the signal on through a second transformer. The signal is then routed through an LC network to the antenna.

Back in 2009, [Michael] brought El Silbo to the Maine coast in an attempt to make a transatlantic contact. This isn’t as far-fetched as it sounds – [Michael] has “crossed the pond” on less power. While the attempt wasn’t successful, [Michael] has made connections as far as 1486km, or 923 miles. That’s quite a distance for simply yelling into a tin can! One of [Michael’s] favorite El Silbo stories is a 109KM conversation (QSO) he had with W1PID. [Michael] found that the signal was so good, he didn’t have to yell at all. He reduced power by dropping to his normal speaking voice for the “dits and dahs”. The two were able to converse for 17 minutes with [Michael] only using his speaking voice for power. We think this is an amazing achievement, and once more proof that you don’t need a multi-thousand dollar shack to make contacts as a ham.

Continue reading “Amateur Radio Transmits 1000 Miles On Voice Power”

Building An LED Source For A Fiber Optic Ring Light

[Peter] has finished up his fiber optic microscope light source. When we last visited [Peter] he created a dimmer circuit for a 10 watt LED. That LED driver has now found its final home in [Peter’s] “Franken-ebay scope”, a stereo microscope built from parts he acquired over several years. Stereo microscopes scopes like these are invaluable for working on surface mount parts, or inspecting PCB problems. [Peter] had the fiber optic ring and whip, but no light source. The original source would have been a 150W Halogen lamp. The 10 watt led and driver circuit was a great replacement, but he needed way to interface the LED to the fiber whip. Keeping the entire system cool would be a good idea too.

This was no problem for [Peter], as he has access to a milling machine. He used an old CPU heat sink from his junk box as the base of the light source. The heat sink was drilled and tapped for the LED. The next problem was the actual fiber whip interface. For this, [Peter] milled a custom block from aluminum bar stock. The finished assembly holds the LED, driver, and the fiber whip. A sheet metal bracket allows the entire assembly to be mounted on the microscope’s post.  We have to admit, if we were in [Peter’s] place, we would have gone with a cheap LED ring light. However, the end result is a very clean setup that throws a ton of light onto whatever [Peter] needs magnified.

Continue reading “Building An LED Source For A Fiber Optic Ring Light”

Oscar Updates Your Grocery List From The Trash

grocerylist

[Dan] has come up with a novel solution to the age old problem of keeping your grocery list up to date. He’s added a bar code scanner and a Raspberry Pi under a kitchen cabinet. He calls the system “Oscar”, though we don’t see any grouchiness in his trash can. When [Dan] runs out of a product, he simply throws it away. Just above his garbage and recycling bin is a low cost barcode scanner. [Dan] holds the item until the scanner reads, then sends it on it’s way to recycling or the landfill. The decoded bar code is processed by a Raspberry Pi also hiding under the cabinet. The Raspberry Pi sends the data to Trello.comusing the Trello api.

If a product isn’t recognized by Trello’s database, trello dispatches a text message to [Dan’s] phone. He can then add the product information via a web interface. We think the user interface is what’s great here. Once products are in the database, the only thing that has to be done day to day is pause for a moment before throwing a package away. [Dan] has all his code up on github, and has also created a reddit thread for Oscar.

http://www.youtube.com/watch?v=9_MNOOgFDg4

[via reddit.com]