3D Printed Math Grenade

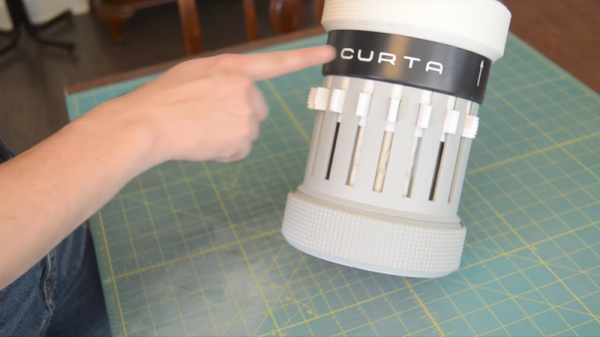
Calculator hacks are fun and educational and an awesome way to show-off how 1337 your skills are. [Marcus Wu] is a maker who likes 3D printing and his Jumbo Curta Mechanical Calculator is a project from a different era. For those who are unfamiliar with the Curta, it is a mechanical calculator that was the brainchild of Curt Herzstark of Austria from the 1930s. The most interesting things about the design were the compactness and the complexity which baffled its first owners.

The contraption has setting sliders for input digits on the side of the main cylindrical body. A crank at the top of the device allows for operations such as addition and subtraction with multiplication and division requiring a series of additional carriage shift operations. The result appears at the top of the device after each crank rotation that performs the desired mathematical operation. And though all this may seem cumbersome, the original device fit comfortably in one hand which consequently gave it the nick name ‘Math Grenade’.

[Marcus Wu] has shared all the 3D printable parts on Thingiverse for you to make your own and you should really take a look at the video below for a quick demo of the final device. There is also a detailed set of images (82 or so) here that present all the parts to be printed. This project will test your patience but the result is sure to impress your friends. For those looking to dip your toes in big printed machines, check out these Big Slew Bearings for some inspiration.

Hacking IBeacons For Automating Routines

Every self-respecting hacker has an automation hack somewhere in his/her bag of tricks. There are a lot of modern-day technologies that facilitate the functionality like GPS, scripting apps, and even IFTTT. In an interesting hack, [Nick Lee] has combined iBeacons and a reverse engineered Starbucks API to create an automated morning routine.

By creating a mobile app that scans for iBeacons, [Nick Lee] was able to reduce the effort made every morning while heading to his office. When the app encounters a relevant beacon, a NodeJS app sitting in the cloud is triggered. This consequently leads to desired actions like ordering an Uber ride and placing an order for an iced latte.

[Nick Lee] shares the code for the Starbucks application on GitHub for anyone who wants to order their favorite cup of joe automatically. This project can be easily expanded to work with GPS or even RFID tags and if you feel like adding IoT to a coffee machine, you could automate all of your beverage requirements in one go.

Make Some Noise With The Typewriter Keyboard

Are you an angry programmer? Do you get the frequent urge to smash the return key or space bar after finishing every single line of code? Well then [Konstantin Schauwecker]’s typewriter keyboard is just the thing for you. In his project, [Konstantin] hacked a German Olympia Monica typewriter into a USB keyboard.

The project uses no less than 50 photo interrupters mounted on a custom PCB that mounts directly under the typewriter itself. The circuit board is so designed that the hammer arms take a position in obstructing the opto-interrupters. Every time a key is pressed, the corresponding device sends a signal to an Arduino.

In order to enable the wiring of 50 signals to an Arduino Leonardo, multiplexers and decoders are employed. CD4515, 4×16 line decoders work to activate the optical signals and the CD4067, 16×4 multiplexers are used to return the scans. This forms the traditional scanning keyboard matrix and the whole thing is managed in the Arduino code (available as a zip file).

This project can be a great starting point for anyone who wants to hack their grandpa’s old typewriter or make one in order to annoy the guy sitting next to them. Check out the video below for a demo and teardown and if you prefer Raspberry Pis then check out this mechanical typewriter hack.

Hacking Touch Screens To Count Pulses

Heart rate sensors available for DIY use employ photoplethysmography which illuminates the skin and measures changes in light absorption. These sensors are cheap, however, the circuitry required to interface them to other devices is not. [Petteri Hyvärinen] is successfully investigating the use of capacitive touchscreens for heart rate sensing among other applications.

The capacitive sensor layer on modern-day devices has a grid of elements to detect touch. Typically there is an interfacing IC that translates the detected touches into filtered digital numbers that can be used by higher level applications. [optisimon] first figured out a way to obtain the raw data from a touch screen. [Petteri Hyvärinen] takes the next step by using a Python script to detect time variations in the data obtained. The refresh rate of the FT5x06 interface is adequate and the data is sent via an Arduino in 35-second chunks to the PC over a UART. The variations in the signal are very small, however, by averaging and then using the autocorrelation function, the signal was positively identified as a pulse.

A number of applications could benefit from this technique if the result can be replicated on other devices. Older devices could possibly be recycled to become low-cost medical equipment at a fraction of the cost. There is also the IoT side of things where the heart-rate response to media such as news, social media and videos could be used to classify content.

Check out our take on the original hack for capacitive touch imaging as well as using a piezoelectric sensor for the same application.

Hackaday Prize Entry: DIY DLP

The 3D printing revolution is upon us and the technologies associated with these machines is evolving every day. Stereolithography or SLA printers are becoming the go-to printer for high-resolution prints that just can’t be fabricated on a filament-based machine. ADAM DLP 3D printer project is [adambrx]’s entry into the Hackaday Prize and the first step in his quest for higher quality prints on a DIY budget.

[adambrx]’s current iteration employs a Raspberry Pi 3 and a UV DLP Projector, all enclosed in a custom frame assembly. The logs show the evolution of the printer from an Acer DLP to the current UV DLP Light Engine. The results are quite impressive for a DIY project, and [adambrx] has put up images of 50-micrometer pillars and some nifty other prints which show the amount of work that has been put into the project.

It is safe to say that [adambrax] has outspent the average entry to the Hackaday Prize with over €5000 spent in around 3 years. Can [adambrx] can keep this one true to its DIY roots is yet to be seen, however, it is clear that this project has potential. We would love to see a high-resolution SLA printer that does not cost and arm and a leg.

Wooden Laptop Enclosure: New Life For Old Thinkpad

Technology is designed to serve us and make our lives better. When a device gets outdated, it is either disposed of or is buried in a pile of junk never to be seen again. However, some individuals tend to develop a certain respect for their mechanical servants and make an effort to preserve them long after they have become redundant.

My relationship with my first laptop is a shining example of how to hold onto beloved hardware way too long. I converted that laptop into a desktop with a number of serious modifications which helped me learn about woodworking along the way. Maybe it’s more pragmatic to just buy new equipment. But you spend so much time each day using your devices. It is incredibly satisfying to have a personal connection that comes from pouring your own craftsmanship into them.

Why the Effort?

IBM Thinkpad R60 via Notebook Review

The laptop in question is an IBM R60 which I lugged around during the first three years after I graduated. It was my companion during some tough times and naturally, I developed a certain attachment to it. With time its peripherals failed including the keyboard which housed the power switch and it was decided that the cost of repair would outweigh its usefulness.

Then came the faithful day when I was inspired to make something with the scrap wood that had accumulated in my workshop. This would be my second woodworking project ever and I did not have the professional heavy machinery advertised in most YouTube videos. Yet I had two targets in mind with this project.

  1. Make the R60 useful again.
  2. Learn about woodworking for creating enclosures for future projects.

Armed with mostly hand tools, a drill and a grinder that was fitted with a saw blade, I started with the IBM R60 to all-in-one PC mod. Following is a log of things I did and those I regret not doing a.k.a. lessons learned. Read on.

Continue reading “Wooden Laptop Enclosure: New Life For Old Thinkpad”

12-Foot Guitar Takes The Stage

Musical festivals are fun and exciting. They are an opportunity for people to perform and show-off their art. The Boulevardia event held this June in Kansas City was one such event, where one of the interactive exhibits was a 12-foot guitar that could be played. [Chris Riebschlager] shares his experience making this instrument which was intended to welcome the visitors at the event.

The heart of this beautiful installation is a Bare Conductive board which is used to detect a touch on the strings. This information is sent over serial communication to a Raspberry Pi which then selects corresponding WAV files to be played. Additional arcade buttons enable the selection of playable chords from A through G, both major and minor and also give the option to put the guitar in either clean or dirty mode.

The simplicity of construction is amazing. The capacitive touch board is programmed using the Arduino IDE and the code is available as a Gist. The Raspberry Pi runs a Python script which makes the system behave like an actual guitar i.e. touching and holding the strings silences it while releasing the strings produces the relevant sound. The notes being played were exported guitar notes from Garage Band for better consistency.

The physical construction is composed of MDF and steel with the body and neck of the guitar milled on a CNC machine. Paint, finishing and custom decals give the finished project a rocking appearance. Check out the videos below for the fabrication process along with photos of the finished design.

This project is a great example of art enabled by technology and if you love guitars, then go ahead and check out Brian May’s Handmade Guitar. Continue reading “12-Foot Guitar Takes The Stage”