Interfacing A Retro Controller Using The USBASP

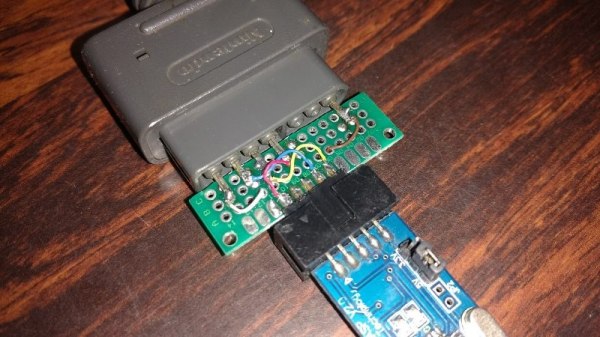
An ISP dongle is a very common piece of equipment on a maker’s bench. However, its potential as a hackable device is generally overlooked. The USBASP has an ATmeg8L at its heart and [Robson] decided that this humble USB device could be used as an interface between his PC and a SNES Joypad.

A SNES controller required three pins to communicate with a host: clock, data and latch. In his hack, [Robson]  connects the controller to the ISP interface using a small DIY adaptor and programs the AVR using the V-USB library. V-USB is a software USB library for small microcontrollers and comes in pretty handy in this instance.

[Robson] does a pretty good job of documenting the entire process of creating the interface which includes the USB HID code as well as the SNES joypad serial protocol. His hack works on both Windows and Linux alike and the code is available on GitHub for download.

Simple implementation like this project are a great starting point for anyone looking to dip their toes in the DIY USB device pool. Veterans may find a complete DIY joystick more up their alley and will be inspired by some plastic techniques as well.

DIY Shortcut Keyboard

Working with CAD programs involves focusing on the task at hand and keyboard shortcuts can be very handy. Most software packages allow the user to customize these shortcuts but eventually, certain complex key combination can become a distraction.

[awende] over at Sparkfun has created a Cherry MX Keyboard which incorporates all of the Autodesk Eagle Shortcuts to a single 4×4 matrix. The project exploits the Arduino Pro Mini’s ability to mimic an HID device over USB thereby enabling the DIY keyboard. Pushbuttons connected to the GPIOs are read by the Arduino and corresponding shortcut key presses are sent to the host machine.

Additional functionality is implemented using two rotary encoders and the Teensy encoder library. The first knob functions as a volume control with the push-button working as a mute button. The encoder is used to control the grid spacing and the embedded button is used to switch between imperial and metric units. The entire code, as well as the schematic, is available on GitHub for your hacking pleasure. It’s a polished project just ready for you to adapt.

The project can be extended to be used with other computer software such as Gimp and the keys may be replaced by capacitive touch sensors making it more sturdy. Bluetooth can be added to make things wireless and you can check out the Double Action Keyboard to extend functionality further. Continue reading “DIY Shortcut Keyboard”

Laser PCBs With LDGraphy

There are many, many ways to get a PCB design onto a board for etching. Even with practice however, the quality of the result varies with the process and equipment used. With QFN parts becoming the norm, the days of etch-resist transfers and a permanent marker are all but gone. Luckily, new and improved methods of Gerber transfer have be devised in recent years thanks to hackers across the world.

One such hacker, [Henner] is working on a project called LDGraphy in an attempt to bring high-resolution etching to the masses. LDGraphy is a laser lithography device that makes use of a laser and a Beaglebone green to etch the layout onto the board. The best part is that the entire BOM is claimed to cost under a $100 which makes it affordable to people on a budget.

The system is designed around a 500 mW laser and a polygon mirror scanner meant for a laser printer. The board with photoresist is linearly actuated in the X-axis using a stepper motor and the laser beam which is bounced off the rotating hexagonal mirror is responsible for the Y-axis. The time critical code for the Programmable Realtime Unit (PRU) of the AM335X processor is written in assembly for the fast laser switching. The enclosure is, naturally, a laser cut acrylic case and is made at [Henner]’s local hackerspace.

[Henner] has been hard at work calibrating his design and compensating for the inaccuracies of the components used. In the demo video below he presents a working version with a resolution of 6 mils which is wonderful considering the cost of the machine. He also shares his code on GitHub if you want to help out and you can track his updates on Google+. Continue reading “Laser PCBs With LDGraphy”

Music-Loving BeagleBone

Robotic control can get very complicated when multiple actuators need to work in coordination with each other. A simple robotic arm will require each joint to be controlled in sequence to attain a particular position. The BeagleBone Blue comes armed with motor drivers, sensor inputs, and wireless and is built for robotics.

[Andy] has prepared a musical robot called the BeagleBone Blue Electro-Mechanical Glockenspiel using the single board computer. The hardware consists of eight servo motors each with a mallet stick attached to them. The motors themselves are mounted on 3D-printed brackets allowing them to be mounted at the correct height. The servos connect to the main board for position control, however, an external supply had to be used to supply the necessary current to all the motors.

The software side has programs to translate notes into servo positions as well as connect to a web brower via MQTT and websockets. The basic user interface is simple and has buttons to connect to and send the keystrokes. The code, as well as the OpenSCAD designs, can be downloaded from GitHub. Check out the video below for a demo.

This project could be extended to an autonomous robot that plays tunes from the Internet. We are reminded of the rock throwing glockenspiel which was pretty cool and hope there are some permutations to come from both. Continue reading “Music-Loving BeagleBone”

Gas Heater Gets A Battery Backup

With the availability of cheap modules, it has become easy to hack/make stuff at home and home appliances see the most creative hacks of all. In one such hack, [Vadim] takes the DIY route to adding battery backup to his gas heater.

His existing unit operates on two D-type batteries which need to be replaced once they are depleted. [Vadim] wanted to implement a reversible method since he lives in a rented place. He replaced the original cells with battery adaptors and brought out the connections using two wires. He then proceeded to add two cellphone batteries with a TPS54233 regulator so as to supply the desired voltage to the gas heater. This is interesting since the module used is an official Texas Instruments EVM instead of the traditional eBay purchase.

The batteries in question are charged using modules based on the TP4056 which in turn are fed 5V from power supply modules. The DC voltage is coupled with a LM1117 to provide power to the heater from the mains and the switch over is accomplished using an SPDT relay. The enclosure is a humble box which resembles a plastic food container and is fitted with PG9 cable glands along with a fuse holder to boot. Take a look at the original post for a plethora of images and details of construction.

This an excellent example of a project that came together using available parts to solve a problem without the frills. The DIY fish feeder is another example of a project with functional design and is a great example of DIY.

Harrier-like Tilt Thrust In Multirotor Aircraft

A traditional quadcopter is designed to achieve 6 degrees of freedom — three translational and three rotational — and piloting these manually can prove to be a challenge for beginners. Hexacopters offer better stability and flight speed at a higher price but the flight controller gets a bit more complex.

Taking this to a whole new level, the teams at the Swiss Federal Institute of Technology (ETH Zürich) and Zurich University of the Arts (ZHDK) have come together to present a hexacopter with 6 individually tiltable axes. The 360-degree tilt in rotors allows for a whopping 12-degrees of freedom in flight and allows the UAV to fly in essentially any direction including parallel to walls.

In addition to the acrobatic capabilities of the design, the team has done some testing with autonomous control using external cameras. Their blog contains videos of their testing at various stages and it interesting to see the project evolve over a short span of nine months. Check out the video below of the prototype in action.

With Amazon delivering packages via drone and getting patents for parachute labels, UAV design is evolving faster now than ever. We can’t wait to see where this 12 DOF takes the state of the art. Continue reading “Harrier-like Tilt Thrust In Multirotor Aircraft”

Multifunction Raspberry Pi Chiptune Player

General Instrument’s AY-3-8910 is a chip associated with video game music and is popular with arcade games and pinball machines. The chip tunes produced by this IC are iconic and are reminiscent of a great era for electronics. [Deater] has done an amazing job at creating a harmony between the old and new with his Raspberry Pi AY-3-8910 project.

[Deater] already showed us an earlier version of the project on a breadboard however after having made some PCBs and an enclosure the result is even more impressive. The system consists of not one but two AY-3-8910 for stereo sound that feed a MAX98306 breakout for amplification. A Raspberry Pi 2 sends six channels worth of data via 74HC595 shift registers driven by SPI. There is a surplus of displays ranging from a matrix to bar graph and even 14-segment displays. The entire PCB is recognized as a hat courtesy an EEPROM which sits alongside a DS1307 RTC breakout board. The enclosure is simple but very effective at showing the internals as well as the PCB art.

The software that [Deater] provides, extends the functionality of the project beyond the chiptunes player. There is a program to use the devices as an alarm clock, CPU meter, electronic organ and even a playable version of Tetris as seen in the demo video below. The blog post is very informative and shows progress in a chronological fashion with pictures of the design at various stages of development. [Deater] provides a full set of instructions as well as the schematic along with code posted on GitHub.

If you have a soft spot for the Arduino you may want to check out the 8-bit version of a chip tune player and if you are craving some old hardware peripheral information, do check out the computer curiosities from the Iron Curtain periodContinue reading “Multifunction Raspberry Pi Chiptune Player”