Hackaday Prize Entry: A Better KVM Switch

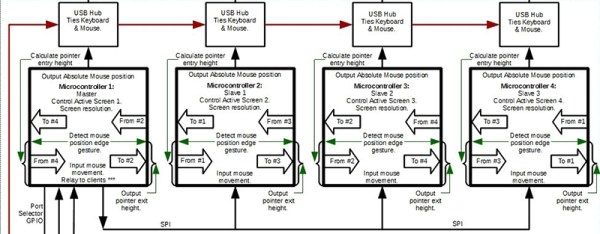
Now it’s not uncommon to have a desktop and a laptop at a battlestation with tablets waiting in the wings. Add in a few Raspis, consoles, and various cheap computers, and it’s pretty easy to have an enormous number of machines and monitors on a desk. Traditionally, a KVM switch would be the solution to this, sharing a keyboard, mouse, and monitor with many different boxes, but this is an ugly solution. [frankstripod] has a device that fixes that with some interesting software and a few USB hacks.

[frankstripod] is in love with a program called Synergy this program combines the keyboard, mouse, and display of several computers over a network so you’ll only ever have to use one keyboard and mouse; it’s as simple as dragging your mouse from one computer to the other. There are a few limitations, though: keyboards don’t work until the OS has loaded (no BIOS access, then), it doesn’t work if the network is down, and setup can be complicated. This project aims to replace the ‘server’ part of a Synergy setup with a small, networkable KVM.

Right now the plan is to use a small embedded board running Linux to read a USB keyboard and switch the output between several computers. A few scripts detect the mouse moving from one screen to another, and a microcontroller switches USB output between each computer. If it sounds weird, you’re right, but it does work: [frank]’s 2014 Hackaday Prize project was a mouse that worked with two computers at once.


The 2015 Hackaday Prize is sponsored by:

TechCrunch Disrupt: Charging A Phone With Its Own Transmitter

TechCrunch Disrupt is on this week, and that means we get to see which members of tech media don’t understand basic physics. So far, it’s writers from Engadget, The Mirror, Business Insider, TechCrunch, and four judges on the TC Disrupt stage. What is the consequence of not understanding the implications of the conservation of energy? Glowing support for a cell phone that can charge itself.

The offending Disrupt startup is Nikola Labs, and they’re gearing up to launch a Kickstarter for a very special iPhone 6 case. This case uses small, energy-harvesting antennas to gather RF energy from the cellphone tucked away in this case. This energy is then sent to a rectifier where it is converted into something the Apple Lightning connector can sip power from. According to Nikola Labs, this RF harvesting antenna takes energy from the transmissions of the iPhone 6 entombed in this case, converts it to about 5 Volts, and uses that to charge the iPhone battery.

I know that seems difficult to understand, so here’s a simple analogy: you have a flashlight with a battery and a solar cell. The solar cell recharges the battery. If this were a Nikola Labs flashlight, you would recharge it by shining the flashlight onto the solar cell.

That is the simplest explanation of what the Nikola Labs cellphone case does, and illuminates the limitations of what it can do. If the ‘energy harvesting circuit’ collects power from the device it is recharging, it will reduce the transmission power of whatever is transmitting. With the cellphone case, you’re spending transmission power (plus efficiency losses) to recharge the battery. That means poorer reception and fewer bars. In the solar-recharging flashlight analogy, the flashlight would either be dimmer, or you could only use it part of the time.

It’s also why Nikola Labs claims their case will only recover 30% of the battery life of an iPhone 6; the battery isn’t solely dedicated to a transmitter – there’s a display and a CPU to account for in the power budget.

To Nikola Labs’ credit, this is at least a novel application of the RF energy harvesting trope that has been making its way around Kickstarter and tech blogs for a few years. Nearly every other RF harvesting idea that has been pitched in recent memory decouples the transmitter (or ‘generator’, I guess) with the product or receiver. The square cube law is an evil mistress, and if you’re wondering why these devices don’t work, [ch00f], a guy with an actual engineering degree, has a great writeup of one of these products over on Drop Kicker.

The Nikola Labs cellphone case bucks this trend by looking at the shortcomings of these devices; an RF rechargeable Bluetooth tag won’t work if you place it a foot away from a WiFi router, but it just might if you tape it to the antenna. This is the idea behind Nikola Labs’ invention: harvest energy from a few millimeters away from the cell phone’s antenna. According to Nikola Labs, their engineer, [Chi-Chih Chen] has a patent in the works for this. This patent application has not been published yet.

In theory, the Nikola Labs cellphone case will actually recharge your battery, but at a price: you’d be wasting your transmission power on recharging the battery. It’s a false economy that you’ll be able to fund on Kickstarter next month for $100 USD. If you’re only looking for more battery life, walk into any gas station, buy a $10 USB power bank/battery, and have enough portable power to recharge your iPhone battery to 100%. That’s not a sexy solution, it doesn’t reference [Nikola Tesla], and it’s not snake oil that tech media is lapping up like dogs. Pity.

Trademarking Makerspace

UnternehmerTUMMakerSpaceGmbH, a tech accelerator in Munich, Germany, has just filed an application to trademark the word Makerspace. This has caused some contention in the German-speaking hackosphere, and if this trademark application is approved, the few spaces in Germany that identify as a makerspace may soon be changing the sign out front.

It must be noted this trademark application only covers the word ‘Makerspace’, and not “Hackerspace”. To most of the population, the word ‘hacker’ – in English and German – conjures up images of someone wearing a balaclava and using a laptop to steal bank accounts. To the uninitiated public, a hackerspace is distinct from a makerspace. In reality, they are remarkably similar: a hackerspace has a room filled with tools; a makerspace has a room filled with tools that allow people to control their language. Little difference, really, if you discount the [Frank Luntz]-level wordsmithing.

While this could go badly for any ~space in Germany with a ‘maker’ prefix, trademarking ‘makerspace’ isn’t really that much different from calling it a TechShop, and the trademark application is probably just a product of lawyers. In any event, it looks like  UnternehmerTUM MakerSpace GmbH has a pretty cool space; 1500m² (16000sq ft) of space, a water jet, and even some sewing equipment. We’d be happy to take a tour, so long as they don’t enforce the trademark.

Thanks [Moritz] for the tip.

Polar Coordinate Mapping And RGB LED Disks

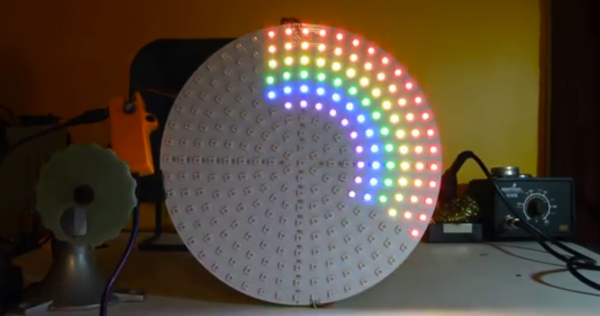
Last week, Adafruit released the DotStar RGB LED Disk, a 240mm diameter disk packed with 255 individually addressable RGB LEDs. Because blinkey glowey projects are the best projects, [Adam] had to have one. His tests open up some interesting possibilities in the world of blinkey LED stuff, including a polar coordinate display that would be perfect for low-res games and LED clocks.

[Adam] found the Disk sufficiently bright and glowey, but there were two problems. The first was the JST SM connector on the input of the DotStar Disk; with 255 LEDs on the disk, it has a maximum draw of over 10A, while the connector can only supply 7A without getting unreasonably warm. Secondly, there aren’t 60 LEDs around the outer edge of the disk, limiting its application as a clock.

There’s another thing wrong with the DotStar Disk, until you realize it’s effectively a polar coordinate display. RGB LED libraries are usually written for strips or matrices, not circles. The LEDs are sequentially arranged on the DotStar disk spiraling inwards, and after mucking about with some terrible code, [Adam] realized he could control a pixel with only its distance from center and angle from the connector. This makes plotting circles easier, but it also opens this display up to some interesting applications; circular Pong would be cool, and LED clocks are the bees knees.

Hackaday Prize Entry: A Low Cost, Open Source MRI

This low cost magnetic resonance imager isn’t [Peter]’s first attempt at medical imaging, and it isn’t his first project for the Hackaday Prize, either. He’s already built a CT scanner using a barium check source and a CCD marketed as a high-energy particle detector. His Hackaday Prize entry last year, an Open Source Science Tricorder with enough sensors to make [Spock] jealous, ended up winning fourth place.

[Peter]’s MRI scanner addresses some of the shortcomings of his Open Source CT scanner. While the CT scanner worked, it was exceptionally slow, taking hours to image a bell pepper. This was mostly due to the sensitivity of his particle detector and how hot a check source he could obtain. Unlike highly radioactive elements, you can just make high strength magnetic fields, making this MRI scanner potentially much more useful than a CT scanner.

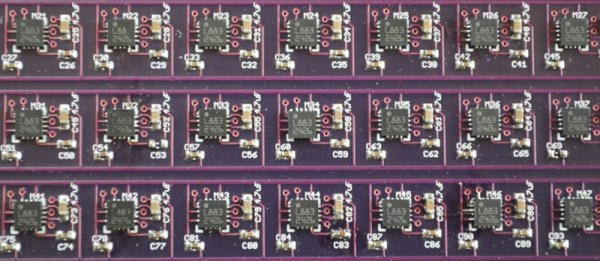
There are a few things that make a low-cost MRI machine possible, the first being a way to visualize magnetic fields. For this, [Peter] is using an array of Honeywell HMC5883L 3-axis magnetometers, the smallest sensors he could find with the largest range. These magnetometers are I2C devices, so with a few multiplexers it’s actually a relatively simple build.

Imaging with these magnetometers is not simple, and it’s going to take a lot of work to make a signal from all the noise this magnetic camera will see. The technique [Peter] will use isn’t that much different from another 2014 Hackaday Prize entry, A Proton Precession Magnetometer. When a proton in your body is exposed to a high strength magnetic field, it will orient towards the high strength field. When the large field is turned off, the proton will orient itself towards the next strongest magnetic field, in this case, the Earth. As a proton orients itself to the Earth’s magnetic field, it oscillates very slightly, and this decaying oscillation is what the magnetic camera actually detects.

With some techniques from one of [Peter]’s publication, these oscillations can be turned into images. It won’t have the same resolution as an MRI machine that fills an entire room, but it will work. Imagine, an MRI device that will sit on a desktop, made out of laser-cut plywood. You can’t have a cooler project than that.


The 2015 Hackaday Prize is sponsored by:

Building A Transistor Clock From Scrap

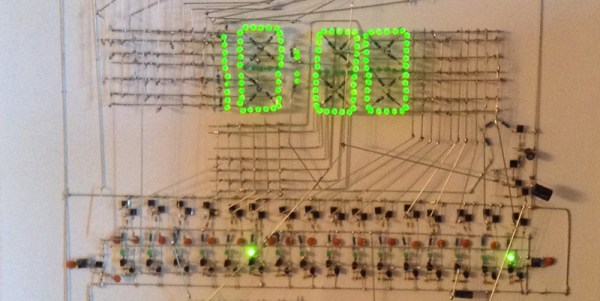
[Phil] has already built a few clocks with Nixies, VFDs, and LED matrices. When his son requested his own clock, he wanted to do something a little different. Inspired by the dead bug style of [Jim Williams]’ creations, [Phil] set out to build a clock made entirely out of discrete components. That includes the counters, driver circuits, and an array of LED.

There are a few inspiration pieces for [Phil]’s clock, starting with the Transistor Clock, a mains-powered clock that uses 194 transistors, 566 diodes, and exactly zero integrated circuits. Design patterns from a clock so beautiful it’s simply called The Clock are also seen, as is a Dekatron emulator from [VK2ZAY].

[Phil]’s creation has no PCB, and all the components are soldered onto tiny wires arranged into something resembling the clocks circuit. It’s a fantastic contraption, and while we’ll still have to give the design award to the clock, [Phil]’s creation shows off the functional circuits; great if he’ll ever need to debug anything.

Improving Active Loads

[Texane]’s job requires testing a few boards under a set of loads, and although the lab at work has some professional tools for this it seemed like a great opportunity to try out the Re:load 2. It’s a nifty little active load that’s available can of course be improved with an injection of solder and silicon.

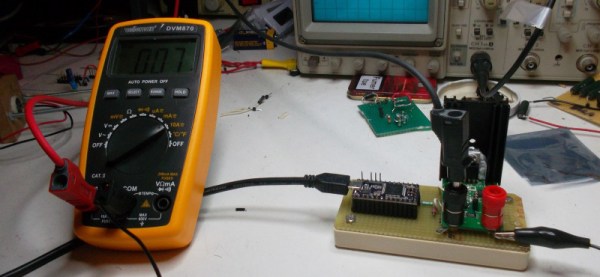
While the Re:load 2 is a nice, simple device that can turn up to 12 Watts directly into heat, it’s not programmable. The ability to create and save load profiles would be a handy feature to have, so [Texane] took a Teensy 3.1 microcontroller and installed a resistor divider in front of the Re:load’s amplifier. A simple script running on a computer allows [Texane] to set the amount of current dumped and automate ramps and timers.

There is a more fundamental problem with the Re:load; the lowest possible current that can be dumped into a heat sink is 90mA. [Texane] replace the amplifier with a zero-drift amp that brought that 90mA figure down to 7mA.

Of course the Re:load and Teensy 3.1 are sold in the Hackaday store, but if you’re looking for a ready-built solution for a computer-controlled active load you can always check out the Re:load Pro, a fancy-smanchy model that has an LCD. The Pro costs more, and [Texane] just told you how to get the same features with the less expensive model we’re selling, though…