Old Fluorescent Fixtures Turned Into Fill Lights

The Tymkrs are hard at work setting up their home studio, and since they’ll be shooting a few videos, they need some lights. The lights themselves aren’t very special; for YouTube videos, anything bright enough will work. The real challenge is making a mount and putting them in the right place, With a shop full of tools, making some video lights isn’t that hard and easily translates into a neat video project.

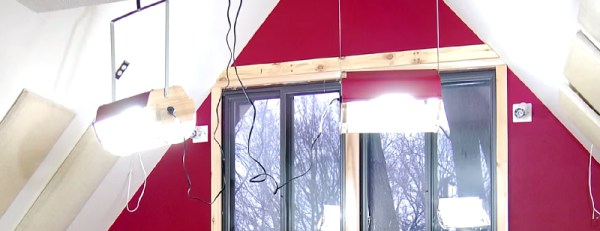
The lights began their lives as large fluorescent fixtures, the kind that would normally house long fluorescent tubes. The Tymkrs cut the metal reflector of this fixture in half, capped the ends with wood, and installed normal incandescent sockets in one end.

The inside of this reflector was coated with a reflective material, and a beautiful rice paper diffuser was glued on. The Tymkrs attached a metal bracket to these lights and screwed the bracket to the ceiling. There’s enough friction to keep the lights in one spot, but there’s also enough play in the joints to position them at just the right angle.

Continue reading “Old Fluorescent Fixtures Turned Into Fill Lights”
How To Reverse Engineer A PCB

For [Peter]’s entry for the 2015 Hackaday Prize, he’s attempting to improve the standard industrial process to fix atmospheric nitrogen. Why? Fertilizers. He’s come up with an interesting technique that uses acoustic transducers in a pressure vessel, and to power that transducer, he’s turned to the greatest scrap heap in the world: eBay. He found a cheap ultrasonic power supply, but didn’t know offhand if it would work with his experiments. That’s alright; it’s a great opportunity to demo some basic reverse engineering skills.

A few months ago, [Dave Jones] posted a great video where he reverse engineers the front end of the new Rigol Zed. The basic technique is to make a photocopy, get some transparency sheets, grab a meter, and go to town. [Peter]’s technique is similar, only he’s using digital image manipulation, Photoshop, and a meter.

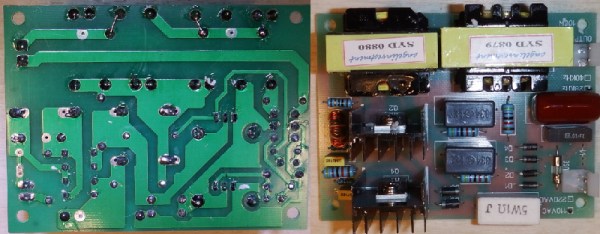
The process begins by taking pictures of both sides of the board, resizing them, flipping one side, and making an image with several layers. The traces on the bottom of the board were flooded and filled with the paint bucket tool, and components and traces carefully annotated.

With some effort, [Peter] was able to create a schematic of his board. He doesn’t know if this power supply will work with his experiments; there’s still some question of what some components actually do. Still, it’s a good effort, a great learning opportunity, and another log in [Peter]’s entry to The Hackaday Prize

An Open Source Pinewood Derby Track

There are a lot of reasons to consider reproducing. Tax breaks are near the top of the list, and a bizarre obligation to ensure the survival of the species following closely behind. The pinewood derby, though… Where else are you going to get a chance to spend hours polishing axles and weighing down bits of wood so they can roll faster?

The Lansing Makers Network has cub scouts around the shop, most likely goofing off while their fathers spend hours building their son’s pinewood derby racers. Where there’s a pinewood derby manufactory, there’s a need for a track to test these racers out.

blurry-scoreboard-gutsThe four-lane, 38-foot run was made out of five sections of cabinet plywood attached with 4″ lap joints. That’s the way to do it if you want a smooth running surface. The lanes are 1/4″ strips of maple plywood, and the last four feet of the track – after the finish line, of course – are a ramp that raises the lanes another 1/2″ above the ground. There’s very little need for a bunch of pillows or foam at the end of the track.

This is the 21st century, and no pinewood derby track would be complete without a few bits of electronics. The starting gate is activated with a push button. A solenoid keeps a quartet of pins in place until the race is started. When the start button is pressed, the solenoid releases, sending the cars on their way.

On their way down the ramp, the cars pass over an IR object sensor which records their starting time. Thanks to some more sensors at the finish line, the track records each car’s position in the race on a few seven-segment displays.

Peripherals Behind The Iron Curtain

The article Home Computers Behind the Iron Curtain sparked a lot of interest, which made me very happy. Therefore, I decided to introduce more computer curiosities from the Iron Curtain period, especially from the former Czechoslovakia (CSSR).

As I mentioned in the previous article, the lack of spare parts, literature and technology in Czechoslovakia forced geeks to solve it themselves: by improvisation and what we would today call “hacking.”  Hobbyist projects of one person or a small party was eventually taken over by a state-owned enterprise, which then began to manufacture and deliver to stores with some minor modifications. These projects most often involved a variety of peripherals that could only be found in the Czechoslovakia with great difficulty.

Much like the production of components, the production of peripherals was also distributed throughout the eastern block so that each country was specializing in certain types of peripherals. For example, East Germany produced matrix printers, and Bulgaria made floppy disks drives. This meant industrial enterprises had to wait for vital computer parts, because the production in another country was not sufficient to cover even the local requirements, let alone the home user.

Continue reading “Peripherals Behind The Iron Curtain”

Java Byte Code, Ahead Of Time Compilers, And A TI-99

Java famously runs on billions of devices, including workstations, desktops, tablets, supercomputers, and jewelry. Yes, jewelry. Look it up. [Michael] realized Java doesn’t run on Commodore 64s, TI-99s, and a whole bunch of other platforms. Not anymore.

Last year, [Michael] wrote Java Grinder, a Java byte-code compiler that compiles classes into assembly language instead of being part of a JVM. This effectively turns Java from a Just In Time compiled language to a normally compiled language, like C. He wrote this for the 6502/6510, the MSP430, and a Z80. The CPU in the TI-99/4A is a weird beast, though, and finally [Michael] turned this Java Grinder on that CPU, the TMS9900.

While most of the development was accomplished with the MESS emulator, [Michael] did manage to run Java on real hardware. His friend gave him a TI-99/4A a few years ago with a few cartridges. Cracking those cartridges open revealed one PCB that would hold an EEPROM. Writing his Java byte-code-derived assembly to a 28c64 EEPROM, he had a cartridge that would run compiled Java.

Right now, the demo is pretty simple with low-resolution graphics beeps and bloops of music, and generally not what you would expect from a TI/99. This is mostly due to the fact that the API for the TI-99 is extremely simple. You can check out the results of that programming endeavor below.

Continue reading “Java Byte Code, Ahead Of Time Compilers, And A TI-99”

Altair 8800 Front Panel For An 8080 Emulator

It appears a very important anniversary passed by recently without anyone realizing. The January 1975 issue of Popular Electronics featured the Altair 8800 on the cover, otherwise known as the blinky box that launched a revolution, the machine that made Microsoft a software powerhouse, and the progenitor of the S-100 bus. The 40-year anniversary of the Altair wasn’t forgotten by [dankar], who built a front panel emulator with the help of some much more modern components.

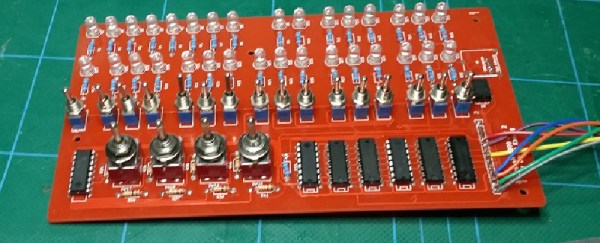
The build unofficially began with an Intel 8080 emulator written for an Arduino. The 8080 is the brains of the Altair, and while emulators are cool, they don’t have the nerd cred of a panel of switches and LEDs. The hardware began as a bunch of perfboard, but [dankar] wired himself into a corner and decided to make a real schematic and PCB in KiCAD.

Despite the banks of LEDs and switches, there really isn’t much to this front panel. Everything is controlled by shift registers, but there is a small amount of SRAM in the form of an SPI-capable 23LC1024. This comes in handy, because [dankar] is running CP/M 2.2 on this front panel emulator from disk images saved on an SD card. Everything you would want from a computer from 1975 is there; an OS, BASIC, and enough I/O to attach some peripherals.

Hackaday Links Column Banner

Hackaday Links: April 12, 2015

Everyone loves Top Gear, or as it’s more commonly known, The Short, The Slow, And The Ugly. Yeah, terrible shame [Clarkson] the BBC ruined it for the rest of us. Good News! A show featuring the Dacia Sandero drones will be filling the Top Gear timeslot. And on that bombshell…

More Arduino Drama! A few weeks ago, Arduino SRL (the new one) forked the Arduino IDE from Arduino LLC’s repo. The changes? The version number went up from 1.6.3 to 1.7. It’s been forked again, this time by [Mastro Gippo]. The changes? The version number went up to 2.0. We’re going to hold off until 2.1; major releases always have some bugs that take a few weeks to patch. Luckily the speed of the development cycle here means that patch should be out soon.

Need an ESP8266 connected to an Arduino. Arachnio has your back. Basically, it’s an Arduino Micro with an ESP8266 WiFi module. It also includes a Real Time Clock, a crypto module, and a solar battery charger. It’s available on Kickstarter, and we could think of a few sensor base station builds this would be useful for.

[Ben Heck] gave The Hacakday Prize a shoutout in this week’s episode. He says one of his life goals is to go to space. We’re giving that away to the project that makes the biggest difference for the world. We’re not sure how a [Bill Paxton] pinball machine fits into that category, but we also have a Best Product category for an opportunity to spend some time in a hackerspace… kind of like [Ben]’s 9 to 5 gig…

[Jim Tremblay] wrote a real time operating system for a bunch of different microcontrollers. There are a lot of examples for everything from an Arduino Mega to STM32 Discovery boards. Thanks [Alain] for the tip.

45s – the grammophone records that play at 45 RPM – are seven inches in diameter. Here’s one that’s 1.5 inches in diameter. Does it work? No one knows, because the creator can’t find a turntable to play it on.

Are we betting on the number of people who don’t get the joke in the second paragraph of this post? Decide in the comments.