One-Off Kapton Solder Masks

soldermask

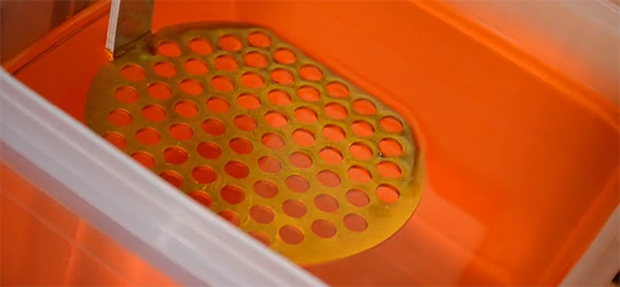
With the proliferation of desktop routers, and a number of easy methods to create PCBs at home, there’s no reason anyone should ever have to buy a pre-made breakout board ever again. The traditional techniques only give you a copper layer, however, and if you want a somewhat more durable PCB, you’ll have figure out some way to create a solder mask on your homebrew PCBs. [Chris] figured Kapton tape would make a reasonable soldermask, and documented the process of creating one with a laser cutter over on the Projects site.

The solder mask itself is cut from a piece of Kapton tape, something that should be found in any reasonably well-stocked tinkerer’s toolbox. The software for [Chris]’ laser cutter, a Universal Laser Systems model, already has a setting for mylar film that came in handy for the Kapton tape,

Of course, getting the correct shapes and dimensions for the laser to cut required a bit of fooling around in Eagle and Corel Draw. The area the laser should cut was taken from the tCream and tStop layers in Eagle with a 1 mil pullback from the edges of the pads. This was exported to an .EPS file, opened in Corel Draw, and turned into a line art drawing for the laser cutter.

The result is a fast and easy solder mask that should be very durable. While it’s probably not as durable as the UV curing paints used in real PCBs, Kapton will be more than sufficient for a few prototypes before spinning a real board.

Converting CTs And MRIs Into Printable Objects

People get CT and MRI scans every day, and when [Oliver] needed some medical diagnostic imaging done, he was sure to ask for the files so he could turn his skull into a printable 3D object.

[Oliver] is using three different pieces of software to turn the DICOM images he received from his radiologist into a proper 3D model. The first two, Seg3D and ImageVis3D, are developed by the University of Utah Center for Integrative Biomedical Computing. Seg3D stitches all of the 2D images from an MRI or CT scan into a proper 3D format. ImageVis3D allows [Oliver] to peel off layers of his flesh, allowing him to export a file of just his skull, or a section of his entire face. The third piece of software, MeshMixer, is just a mesh editor and could easily be replaced with MeshLab or Blender.

[Oliver] still has a lot of work to do on the model of his skull – cleaning up the meshes, removing his mandible, and possibly plugging the top of his spinal column if he would ever want to print a really, really awesome mug. All the data is there, though, ready for digital manipulation before sending it off to be printed.

Continue reading “Converting CTs And MRIs Into Printable Objects”

The Beginning Of The Age Of 3D Resin Printers

resin

For several years now, filament-based plastic printers have ruled the hobbyist market, with a new iteration on squirting plastic appearing on Kickstarter every week. SLA printers, with their higher resolution and historically higher price for raw materials, have sat in the background, waiting for their time to come.

Now, with the Sedgwick printer now available on Kickstarter, we may finally be seeing some resin printers make their way into hackerspaces and workshops the world over. Instead of other DLP projector-based resin printer where projector light shines up through the resin tank, the creator of the Sedgwick, [Ron Light] is doing things the old-fashioned way: shining the projector down onto the surface of the resin. He says it’s a simpler method, and given he’s able to ship a Sedgwick kit minus the projector for $600, he might be on to something.

There are a few other resin printers coming on the scene – the LittleSLA will soon see its own Kickstarter, the mUVe 1 is already shipping, and over on Hackaday Projects, the OpenExposer project is coming along nicely. All very good news for anyone who wants higher quality prints easily.

(Better) Full Motion Video On The First PC

Ladies

Ten years ago, [Trixter] created 8088 Corruption, a demo for the original PC, the IBM 5150, that displayed full motion video using a CGA card and a SoundBlaster. It was hailed as a marvel of the demoscene at the time, garnered tons of hits when it was eventually uploaded to Google Video, and was even picked up by the nascent Hackaday.Now, ten years later, and seven years after [Trixter] said full motion video using the graphics mode of a CGA adapter was impossible, he’s improved on his earlier work. Now, it’s possible to display video at 640×200 resolution at 30 frames per second on a 30-year-old computer.

[Trixter]’s earlier work used the text mode of the CGA adapter, only because the 40×25 character, 16 color mode was the only graphics mode that could be entirely updated every single frame. It’s still one of the high points of the PC demoscene, but from the original video, it’s easy to see the limitations.

A while back, [Trixter] said displaying video using his computer’s graphics mode was impossible. He’s had years to think about this statement, and eventually realized he was wrong. Like the developers of modern video codecs, [Trixter] realized you don’t need to change every pixel for every frame: you only need to change the pixels that are different from frame to frame. Obvious, if you think about it, and all [Trixter] needed to do was encode the video in a format that would only change dissimilar pixels from frame to frame, and manage the disk and memory bandwidth.

After reencoding the 10-year-old demo for graphics mode, [Trixter] turned toward his most ambitious demo to date: playing the ‘Bad Apple’ animation on an 8088. As you can see in the video below, it was a complete success.

Continue reading “(Better) Full Motion Video On The First PC”

Virtual Physical Reality With Kintinuous And An Oculus Rift

oculus

The Kinect has long been able to create realistic 3D models of real, physical spaces. Combining these Kinect-mapped spaces with an Oculus Rift is something brand new entirely.

[Thomas] and his fellow compatriots within the Kintinuous project are modeling an office space with the old XBox 360 Kinect’s RGB+D sensors. then using an Oculus Rift to inhabit that space. They’re not using the internal IMU in the Oculus to position the camera in the virtual space, either: they’re using live depth sensing from the Kinect to feed the Rift screens.

While Kintinuous is very, very good at mapping large-scale spaces, the software itself if locked up behind some copyright concerns the authors and devs don’t have control over. This doesn’t mean the techniques behind Kintinuous are locked up, however: anyone is free to read the papers (here’s one, and another, PDF of course) and re-implement Kintinuous as an open source project. That’s something that would be really cool, and we’d encourage anyone with a bit of experience with point clouds to give it a shot.

Video below.

Continue reading “Virtual Physical Reality With Kintinuous And An Oculus Rift”

The Ultimate Tiny Altimeter

altimeter

While traditionally a project geared more toward the model rocket crowd, a lot of people are flying quadcopters these days, and knowing the altitude your RC aircraft reached is a nice thing to know. [Will] came up with a very nice, very small, and very lightweight altimeter that’s perfect for strapping to microquads, their bigger brothers, and of course model rockets. As a nice bonus, it also looks really cool with an exceedingly retro HP bubble display.

The components used in this tiny altimeter include a MEMS altitude and pressure sensor, HP bubble display featuring four seven-segment LEDs, an Arduino Pro Mini, and a tiny 40 mAh LiPo capable of powering the whole contraption for hours.

In the video below, [Will] shows off the functions of his altimeter, sending it aloft on a quadcopter to about 100 ft. There are settings for displaying the minimum, maximum, and delta altitudes, all accessed with a single button.

While it’s not the most feature packed altimeter out there, it’s still much better than commercial offerings available for the model rocket crowd.

Continue reading “The Ultimate Tiny Altimeter”

BeagleBone Blacks Still Not Available, Here’s Blue Steel

zoolander

The BeagleBone Black has been featured in an improbable number of awesome project, ranging from driving thousands of LEDs for a video display, to 3D printer controller boards. There’s a lot you can do with a tiny Linux board that’s much more powerful than the Raspberry Pi – if you can find one, that is. The BeagleBone Black has been out of stock everywhere for months now, with little sign of when distributors will receive some new stock.

Luckily, the BeagleBone Black is open source. Anyone can make them. Finally, someone did. It’s called Blue Steel, and notwithstanding the inevitable Zoolander references, it’s pretty much the same as the BeagleBone Black we all know and love.

There are a few differences between Blue Steel and the BeagleBone Black: Blue Steel doesn’t have an HDMI output, and the 4GB of on-board Flash featured on the BeagleBone isn’t found on Blue Steel. Still, it has the same processor, same amount of RAM, and the same connectors found in the BeagleBone Black.

You can pre-order Blue Steel here, with the boards eventually shipping at the end of the month. It’s the same price as the BeagleBone Black, not ideal considering the missing HDMI port and Flash storage. Still, you can actually buy it now, something you can’t say about the BeagleBone.