
A man's arm is shown against a mountainous backdrop. The man is wearing a black watch with an orange segment on one side.

Restoring An Altimeter Watch To Former Heights

Finding inexpensive broken hardware for sale, buying it, and restoring it to working condition is a long-standing tradition for hackers on a limited budge. But there are some devices that are so difficult to repair that it’s usually not worth the trouble. [Vintage560] is braver than most, though, and restored an internally-damaged Casio AW-330-AT altimeter watch.

The exterior of the watch was in good condition, other than missing a readily-replaced strap, but the battery had leaked into the interior, and the watch didn’t respond in any way to new batteries. Cleaning out the guts with isopropyl alcohol, repositioning a plastic insulator, and bending some contacts back into shape at least got some segments of the LCD display to activate, while over two days of turning the crown smoothed out resistance in the analog train.

Actually getting the LCD to work properly required disassembling the watch, taking particular care with the altitude sensor. It wasn’t clear what was wrong with the LCD — the controller seemed to be working properly, and several rounds of cleaning and adjusting the ZEBRA connector didn’t make any difference.

Eventually, [Vintage560] simply purchased a new screen. On close inspection, it looked as though chemicals from the leaking battery might have dissolved some of the transparent indium tin oxide contacts on the old display. With the watch now working [Vintage560] tested it on a trip to the Alps, and with a few periodic calibrations, it remained quite accurate.

Usually when we see Casio watch hacks, the watch in question is the F91W, whether it’s being used for contactless payments, being retrofitted as a smartwatch, or going 5,000 meters underwater.

Bogey Six O’clock!: The AN/APS-13 Tail Warning Radar

Although we think of air-to-air radar as a relatively modern invention, it first made its appearance in WWII. Some late war fighters featured the AN/APS-13 Tail Warning Radar to alert the pilot when an enemy fighter was on his tail. In [WWII US Bombers]’ fascinating video we get a deep dive into this fascinating piece of tech that likely saved many allied pilots’ lives.

Fitted to aircraft like the P-51 Mustang and P-47 Thunderbolt, the AN/APS-13 warns the pilot with a light or bell if the aircraft comes within 800 yards from his rear. The system consisted of a 3-element Yagi antenna on the vertical stabilizer, a 410 Mhz transceiver in the fuselage, and a simple control panel with a warning light and bell in the cockpit.

In a dogfight, this allows the pilot to focus on what’s in front of him, as well as helping him determine if he has gotten rid of a pursuer. Since it could not identify the source of the reflection, it would also trigger on friendly aircraft, jettisoned wing tanks, passing flak, and the ground. This last part ended up being useful for safely descending through low-altitude clouds.

This little side effect turned out to have very significant consequences. The nuclear bombs used on Hiroshima and Nagasaki each carried four radar altimeters derived from the AN/APS-13 system.

Continue reading “Bogey Six O’clock!: The AN/APS-13 Tail Warning Radar” →

A Look Inside A Vintage Aircraft Altimeter

There’s a strange synchronicity in the projects we see here at Hackaday, where different people come up with strikingly similar stuff at nearly the same time. We’re not sure why this is, but it’s easily observable, with this vintage altimeter teardown and repair by our good friend [CuriousMarc] as the latest example.

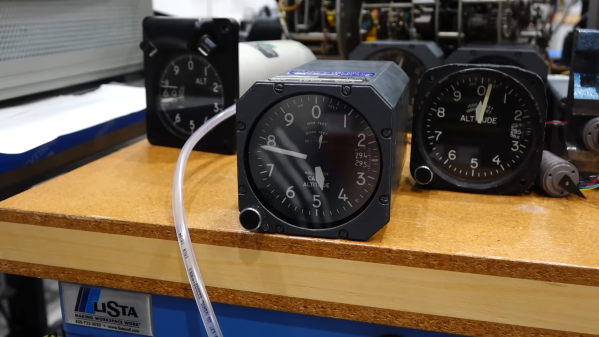
The altimeter that [Marc] dissects in the video below was made by Kollsman, which is what prompted us to recall this recent project that turned a jet engine tachometer into a CPU utilization gauge. That instrument was also manufactured by Kollsman, but was electrically driven. [Marc]’s project required an all-mechanical altimeter, so he ordered a couple from eBay.

Unfortunately, thanks to rough handling in transit they arrived in less than working condition, necessitating the look inside. For which we’re thankful, of course, because the guts of these aneroid altimeters are quite impressive. The mechanism is all mechanical, with parts that look like something [Click Spring] would make for a fine timepiece. [Marc]’s inspection revealed the problem: a broken pivot screw keeping the expansion and contraction of the aneroid diaphragms from transmitting force to the gear train that moves the needles. The repair was a little improvisational, with 0.5-mm steel balls used to stand in for the borked piece. It may not be flight ready, but it worked well enough to get the instrument back in action.

We suspect that [Marc] won’t be able to leave well enough alone on this one, so we’ll be on the lookout for a proper repair. In the meantime, he’ll be able to use this altimeter in the test setup he’s building to test a Bendix air data computer from a 1950s-era jet fighter. Continue reading “A Look Inside A Vintage Aircraft Altimeter” →

Greedy Receivers: FCC Considers Regulating Receivers After Altimeter Showdown

Recently, the media was filled with articles about how turning on 5G transmissions in the C-band could make US planes fall out of the sky. While the matter was ultimately resolved without too much fuss, this conflict may have some long-term consequences, with the FCC looking to potentially address and regulate the root of the problem, as reported by Ars Technica.

At the heart of the whole issue is that while transmitters are regulated in terms of their power and which part of the spectrum they broadcast on, receivers are much less regulated. This means that in the case of the altimeters in airplanes for example, which use the 4.2 GHz – 4.4 GHz spectrum, some of their receivers may be sensitive to a part of the 5G C-band (3.7 GHz -3.98 GHz), despite the standard 200 MHz guard band (upped to 400 MHz in the US) between said C-band and the spectrum used by altimeters.

What the FCC is currently doing is to solicit ways in which it could regulate the performance and standards for receivers. This would then presumably not just pertain to 5G and altimeters, but also to other receivers outside of avionics. Since the FCC already did something similar back in 2003 with an inquiry, but closed it back in 2007 without any action taken, it remains to be seen whether this time will be different. One solid reason would be the wasted spectrum: a 400 MHz guard band is a very large chunk.

Thanks to [Chris Muncy] for the tip.

Hub-powered bike computer

Battery-less Bike Computer Gets Power And Data From The Wheels

Bicycle generator technology has advanced far beyond the bottle dynamos of years past, which as often as not would introduce enough drag when engaged to stall the bike. Granted, it’s not as much of a current draw as a big old incandescent headlight, but this wheel-powered cyclocomputer is a great example of harvesting both power and data from the rotation of a bike’s wheel.

While there are plenty of cyclocomputers available commercially, [Lukas] was looking for some specific features. His main goal was something usable at night, which means a backlit display, ruling out the usually coin-cell power sources. His bike’s hub dynamo offered interesting possibilities — not only does it provide AC power, but its output frequency is proportional to the bike’s speed. This allows him to derive speed, distance, RPM, time-in-motion, and other parameters to display on the 1×8 character LCD display. There’s some clever circuitry needed to condition the output of the hub dynamo, and a 1.5 farad supercapacitor keeps the unit powered for about four days when the bike isn’t in motion.

As for measuring the frequency of the dynamo’s output, [Lukas] simply used a digital input on the MSP430 microcontroller, with a little signal conditioning of course. He also added a barometer chip for altitude data, plus an ambient light sensor to control the LCD backlight. Everything lives in a clever 3D-printed case with a minimalist but thoughtful design that docks and undocks from the bike easily; [Lukas] assures us that a waterproof version of the case is in the works.

We really appreciate the elegance of this design, and the way it uses the data that’s embedded in the power supply. While [Lukas] appears to have used a commercially available generator, we’ve seen other examples of home-brew hub dynamos before — even one that offers regenerative braking.

Make Physics Fun With A Trebuchet

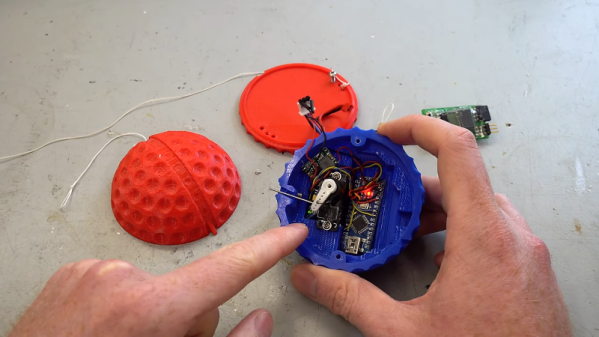
What goes up must come down. And what goes way, way up can come down way, way too fast to survive the sudden stop. That’s why [Tom Stanton] built an altitude recording projectile into an oversized golf ball with parachute-controlled descent. Oh, and there’s a trebuchet too.

That’s a lot to unpack, but suffice it to say, all this stems from [Tom]’s obvious appreciation for physics. Where most of us would be satisfied with tossing a ball into the air and estimating the height to solve the classic kinematic equations from Physics 101, [Tom] decided that more extreme means were needed.

Having a compound trebuchet close at hand, a few simple mods were all it took to launch projectiles more or less straight up. The first payload was to be rocket-shaped, but that proved difficult to launch. So [Tom] 3D-printed an upsized golf ball and packed it with electronics to record the details of its brief ballistic flight. Aside from an altimeter, there’s a small servo controlled by an Arduino and an accelerometer. The servo retracts a pin holding the two halves of the ball together, allowing a parachute to deploy and return the package safely to Earth. The video below shows some pretty exciting launches, the best of which reached over 60 meters high.

The skies in the field behind [Tom]’s house are an exciting place. Between flying supercapacitors, reaction wheel drones, and low-altitude ISS flybys, there’s always something going on up there.

Continue reading “Make Physics Fun With A Trebuchet” →

A Very, Very Small IMU

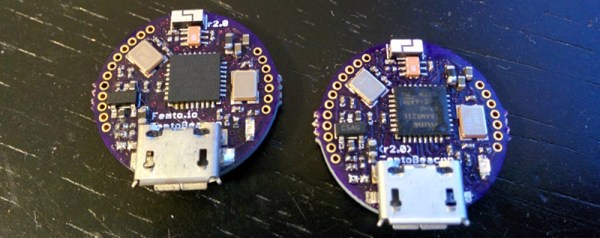
The reason we’re playing with quadcopters, flight controllers, motion controlled toys, and hundreds of other doodads is the MEMS revolution. A lot is possible with tiny accelerometers and gyroscopes, and this is looking like the smallest IMU yet. It’s an 18mm diameter IMU, with RF networking, C/C++ libraries, and a 48MHz ARM microcontroller – perfect for the smallest, most capable quadcopter we’ve ever seen.

The build started off as an extension of the IMUduino, an extremely small rectangular board that’s based on the ATMega32u4. While the IMUduino would be great for tracking position and orientation over Bluetooth, it’s still 4cm small. The Femtoduino cuts this down to an 18mm circle, just about the right size to stuff in a model rocket or plane.

Right now, femtoIO is running a very reasonable Kickstarter for the beta editions of these boards with a $500 goal. The boards themselves are a little pricey, but that’s what you get with 9-DOF IMUs and altimeter/temperature sensors.