A Simple, Overkill, Electric Car

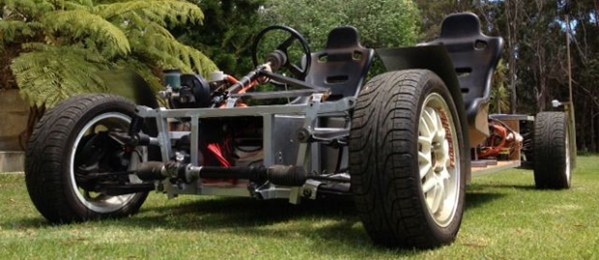
If you’re building an electric car nowadays, you’re probably looking at taking a normal, gas-powered car and replacing the engine and transmission with an electric motor and batteries. [Gahaar] thought this is a rather dumb idea; all the excesses of an internal combustion-powered car, such as exhaust, cooling, differential, and fuel storage is completely unnecessary. Building a new electric car from the frame up is a vastly more efficient means of having your own electric car. So that’s what he did.

[Gahaar] build his new chassis around a single box made of 3mm aluminum sheet. Attached to this box are two AC induction motors at the rear of the car, negating the need for a differential, with 45 lithium cells stuffed into the middle of the box. There’s no gearbox here, greatly reducing the complexity of the build, and with the batteries providing 145V and 100Ah, this simple car has more than enough power for a lot of fun.

The suspension and steering were taken from a wrecked car, in this case a Mazda MX5, or Miata for those of us in North America. The Miata suspension easily unbolts from the frame of the wrecked car, and with just a little bit of welding can easily be attached to the new electric chassis.

Even though [Gahaar]’s car is basically just a bit of aluminum, motors, suspension, and batteries, he’s getting some awesome performance out of it; he estimates a top speed of 100mph with about 60 miles per charge. It’s an awesome way to get around the farm, and with a custom fiberglass body, we can easily see this being one of the coolest electric vehicles ever made.

Salvaging Gold From Old Electronics

If you’re hoarding old electronics like us, there’s a good probability you have a decent amount of gold sitting around in cardboard boxes and storage containers. Everything from old PCI cards, IC pins, and even printers have a non-negligible amount of precious metals in them, but how do you actually process those parts and recover that gold? [Josehf] has a great tutorial for gold recovery up on Instructables for the process that netted him an ounce of gold for three months’ work.

After cutting up a few circuit boards to remove the precious gold-bearing parts, [Josehf] threw these parts into a mixture of muriatic acid and hydrogen peroxide. After a week, the acid darkened and the gold slowly flaked off into dust. This gold dust was separated from the acid by passing it through a coffee filter and readied for melting into a single nugget.

Gold melts at 1064 ˚C, much hotter than what can be obtained by a simple propane torch. This melting point can be reduced by the addition of borax, allowing the simplest tools – a propane torch and a terra cotta crucible – to produce a small gold nugget.

For three months of collecting, stripping, and dissolving electronic parts, [Josehf] netted 576.5 grains of gold, or at current prices, about $1500 worth of the best conductor available. Not too bad, but not something we’d use as a retirement plan.

Thanks [Matthias] for sending this in.

Building A More Nyan Planet

Video

In an effort to give salespeople something impressive to hand out, IBM recently had a bunch of very cool promotional materials printed up. It’s basically a greeting card-sized cardboard folder with a bit of text, an LCD screen, buttons, battery and display controller. This video in print device is meant to display how IBM is building a smarter planet, but [Cookie] and [Stitch] over at the Hack42 hackerspace in The Netherlands decided Nyan Cat would be a much better use of this free, portable video player. (Google translationUPDATE: Site has gone down. Here’s the Google Cache but you’ll need a browser like Chrome that can do the translation for you (we can’t figure out how to link a translation of cache).

This video card uses tech licensed from Americhip, a company that has been putting video in magazines for a few years now. By connecting the USB charging port up to his computer, the guys were able to switch the device over to USB mode where the actual video files could be read and rewritten.

By encoding a few videos to match the format of what was on the card – including some old IBM promotional material by [Jim Henson] – the team were able to get videos playing on a hackable flyer. Very cool, and if you can get your hands on some sales brochures, a free source of tiny displays.

Getting A Shell On Any Android Device

If you’re an Evil Customs Agent or other nefarious Three Letter Agency Person, you’re probably very interesting in getting data off people’s phones. Even if the screen is locked, there’s a way around this problem: just use the Android Debug Bridge (ADB), a handy way to get a shell on any Android device with just a USB cable. The ADB can be turned off, though, so what is the Stasi to do if they can’t access your phone over ADB? [Michael Ossmann] and [Kyle Osborn] have the answer that involves a little-known property of USB devices.

USB mini and micro plugs have five pins – power, ground, D+, D-, and an oft-overlooked ID pin. With a particular resistance between this ID pin and ground, the USB multiplexor inside your phone can allow anyone with the proper hardware to access the state of the charger, get an audio signal, mess around with the MP3s on your device, or even get a shell.

To test their theory, [Michael] and [Kyle] rigged up a simple USB plug to UART adapter (seen above) that included a specific value of resistor to enable a shell on their test phone. Amazingly, it worked and the thought of having a secure phone was never had again.

The guys went farther with some proprietary Samsung hardware that could, if they had the service manual, unlock any samsung phone made in the last 15 years. They’re working on building a device that will automagically get a shell on any phone and have built some rather interesting hardware. If you’re interested in helping them out with their project, they have a project site up with all the information to get up to speed on this very ingenious hack.

Continue reading “Getting A Shell On Any Android Device”

Nearspace Environmental Chamber

vacuum

If you’re going to send some hardware up to 100,000 feet, where atmospheric pressure is 1% of what we enjoy on the surface and temperatures swing down to where Fahrenheit and Celsius don’t matter anymore, you might want to do a bit of testing to make sure everything works before launch. With a few bits of PVC, though, that’s a piece of cake.

There were several environmental conditions to take into consideration; the near vacuum experienced by high altitude balloons would be replicated by a refrigerator compressor, the increased solar flux is simulated by a light bulb, and the cold temperatures provided by a chunk of dry ice.

For a proper high altitude, low temperature environmental chamber the test payload should be cooled down via radiation with tubes filled with liquid nitrogen embedded in the walls. This is the NASA way of doing things, but for the budget of $200, [arko]’s chamber simulates a high altitude environment just fine.

Continue reading “Nearspace Environmental Chamber”

Producing Ozone At 3500 RPM

motor

Motors are fun, and high voltage even more so. We’re guessing that’s what went through [brazilero2008]’s mind when he put together an electrostatic motor using upcycled parts he found lying around.

The electrostatic rotor works by connecting a very high voltage, low current power supply – in this case an industrial air ionizer – to a set or rotors surrounding a plastic rotor. The hot electrodes spray electrons onto the rotor, which are picked up by the ground electrodes. If the system doesn’t arc too much, you have yourself a plastic rotor that spins very, very fast.

[brazilero]’s device is made out of an aluminum turkey pan, a few acrylic tubes, and a few cardboard disks; all stuff you can find in a well-stocked trash can. After completing the device, it was taken apart and finished and screwed onto a beautiful painted jewelry box. Very cool for something you can make out of trash, and dangerous enough to be very interesting.

Continue reading “Producing Ozone At 3500 RPM”

Unbricking A Router With A Raspi

About a decade ago, [Mansour] learned of the Linksys WRT54G, a wireless router that’s been shoved into just about every project under the sun. After learning of this device’s power, he decided a firmware upgrade was in order. Unfortunately, he accidentally bricked this router and left it sitting on a shelf for a few years.

Idle devices are the devil’s playthings, and when [Mansour] discovered a Samsung hard drive with a an SDRAM that was compatible with the WRT54G, he decided he would have a go at repairing this ancient router. There was only one problem: the most popular utility for programming the router through the JTAG header required a PC parallel port.

No problem, then, as [Mansour] had a Raspberry Pi on hand. The parallel port utility bit-banged the new firmware over to the router, something the GPIO port on the Pi could do in spades. By adding Pi support to the debricking utility, [Mansour] had a functional WRT54G with just a little bit of patience and a few wires connecting the GPIO and JTAG header.