Galaxy Note 2 Gets Three And A Half Months Of Standby Time

bat

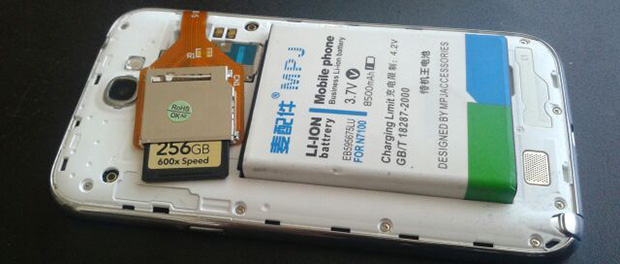
In the quest for the ultimate Android device, [白い熊] on the XDA developers forum created an awe-inspiring monstrosity that gives his Galaxy Note II 288 Gigs of storage and enough battery to theoretically last three and a half months.

First, the storage: the phone can now store movies, videos, apps, and music on an incredibly capacious 256 Gig SD card. Yes, this card currently sells for about $500, but having that much storage space effectively turns the Note into a portable hard drive running Android.

The battery comes direct from an eBay listing that advertises 8500 mAh inside a huge Li-ion battery. It’s extremely doubtful this battery will live up to the stated rating, but even if the new battery has twice the capacity as the stock battery [白い熊] is looking at about 10 weeks of standby time.

Yes, it’s just parts bought online and thrown together, but you really have to admire the sheer ostentatiousness of this phone.

Electro-permanent Magnets For Quadcopters

electromagnet

Imagine a quadcopter hovering above a payload – a can of beans, perhaps. The ‘copter descends onto the payload, activates an electromagnet, and flies away with a hobo’s dinner. Right now, this is a bit of an impossibility. A normal electromagnet that powerful would consume an amazing amount of power, something quads don’t usually have in abundance. With the OpenGrab project, the dream of a remote-controlled skycrane is within reach, thanks to some very clever applications of magnetics.

The tech behind the OpenGrab is an electro-permanent magnet, basically an electromagnet you can turn on and off, but doesn’t require any power to stay on. OpenGrab was heavily influenced by a PhD thesis aimed at using these devices for self-assembling buildings.

This project had a very successful Kickstarter campaign and has seen some great progress in the project. While beer doesn’t come in steel cans anymore, we can imagine a whole lot of really cool applications for this tech from infuriating electronic puzzles to some very cool remote sensing applications.

Ghostly Images Captured Only On Camera

is that a logo

A while back our good buddy [Ch00f] built a QR code clock, unreadable to both humans and computers. A human couldn’t read the clock because of the digital nature of a QR code, and because the clock used persistence of vision in driving the LEDs, a digital camera can’t capture all the pixels in the QR code at the same time. It’s a highly useless but impressive art piece. Now, [Ch00f] is turning that build on its head. He created a rudimentary display that is invisible to the human eye, but easily detected with a digital camera.

This build exploits a basic property of CMOS digital cameras – the rolling shutter. Because it takes time to get pixels off a modern digital image sensor, each picture is actual a composite of many different strips, each taken slightly out of sequence. You can see this for yourself by taking a picture of something rotating very fast with your camera phone; a picture of an airplane propeller will make the blades appear curved, or look like [Dr. Seuss] has an aeronautical engineering degree.

To create his display, [Ch00f] found a few inexpensive fiber optic lights. By aligning a few of these into columns and lighting them up in a precise sequence, he can exploit the rolling shutter and make an image appear. To the human eye, it looks like a solid wall of illuminated fiber optics.

As for how practical this build is, [Ch00f] says not much. For cell phone cameras, you’d need to have a very, very short exposure time for this to work. The only way to do that is to make this display unbelievably bright, or just put it out in the sun. We can’t see that being practical for any potential use case, but we’d be more than happy to see a large-scale attempt at displaying images with this technique.

Building Han Solo’s Blaster

blaster


It’s no secret that [Adam Savage] of Mythbusters fame is a huge fan of replica props, going so far as to make a Maltese Falcon out of Sculpey. This time, though, he’s doing one better for the nerds in the crowd by building the most accurate replica of Han Solo’s blaster ever.

Replica prop gurus already know [Lucas]’ original prop department based Han Solo’s BlasTech DL-44 blaster off an existing gun – the Mauser C96. Along with this gun, there were a few extra bits and bobs tacked onto this gun, including an old German scope, a flash hider from an aircraft machine gun, and even a few bits of metal from a model airplane.

All these extra parts and greeblies are very hard, if not impossible to find. Thankfully, there are a bunch of very skilled replica prop makers reproducing these parts for anyone who wants a very accurate DL-44 Blaster. [Norm] from Tested and [Adam] assembled these parts into an incredibly accurate replica of the ‘hero’ blaster – by far the most identifiable of Solo’s many iterations of blaster seen in Star Wars ep. IV.

The Perils Of Cheap MIDI Adapters

MIDI

[Arvydas] recently bought a Rock Band 3 Wii keyboard thinking it would be an excellent and very inexpensive (£9.99) MIDI controller. The keyboard has a proper DIN-5 MIDI out port, so theoretically the only thing needed to plug this into a computer is a USB to MIDI adapter. Unlike the keyboard, the MIDI adapter was a cheap piece of Chinese cruft, but given some ingenuity and a handful of components, he was able to get everything working.

The 30-year-old MIDI specification includes a few schematics on how to properly connect MIDI devices together. The most important part of these schematics is an optoisolater on the MIDI in, a valuable addition considering early MIDI keyboards cost thousands of dollars. It seems [Arvydas]’ MIDI to USB adapter didn’t include this vital component, instead replacing it with a simple resistor. Anything to keep costs down, right?

To get the MIDI adapter working, [Arvydas] headed over to Maplin and bought an optioisolator, With everything wired up on a breadboard, he got it to work and eventually transplanted the circuit to the adapter’s PCB.

It’s a great piece of work to get this MIDI adapter functioning, especially since it’s doubtful the cheap adapter would have worked with any MIDI device.

The Tiniest Arcade Cabinets You’ve Ever Seen

After perusing Amazon one day, [Dave] found a very interesting piece of kit: a small, 1.5″ digital picture frame. They’re not very complex, just an LCD, a few buttons to cycle the picture, and a battery to keep everything portable. He decided the best use of this tech would be a tiny arcade cabinet, featuring screen shots of the best games a darkly neon lit arcade of the late 80s had to offer.

After sourcing a few of these digital picture frames on eBay, [Dave] set to work disassembling the frames and designing a custom enclosure. He wanted a few specific features: controls in the right place, replaceable sides, and the glowing red eyes of a coin acceptor slot. [Dave] whipped a model up in OpenSCAD and sent the parts over to his printer.

The controls for the digital picture frame were connected to a quartet of tact switches on the control panel, and a red LED provides the glow from the coin acceptor. With a USB plug and the frame’s memory loaded up with screen shots, [Dave] has a fabulous desk toy.

All the relevant files are up on Thingiverse if you’d like to build your own.

Animating A Lamp With The Leap Motion

leap

The Leap Motion is a very cool device, but so far we haven’t seen many applications of interacting with physical devices. [Xavier] wanted to control a cute servo animated desk lamp with his hands, and with the help of a Leap and an Arduino he was able to do just that.

The Leap Motion API has a handy feature that will output all its data over a websocket. It’s a very easy way to transfer hand positions with a minimum amount of overhead, and with just a little bit of Node.js, it’s only two lines of code to connect the Leap to a websocket server.

With the Leap data on a web server, the only thing left to do is pulling it down to an Arduino. Again, [Xavier] used Node.js, this time in the form of johnny five, a Javascript-based Arduino framework. After that, it was a simple matter of mapping the data from the Leap to servo movements in [Xavier]’s Pixar-inspired lamp.

Video of the build below.

Continue reading “Animating A Lamp With The Leap Motion”