Makerbot Shows Off 3D Scanner

scan

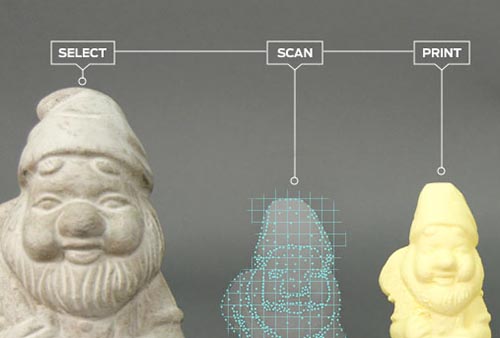
We’ve said our piece over Makerbot and their interpretation of what Open Source means, but the fact remains if you’re sourcing a 3D printer for a high school shop class or a hackerspace, you really can’t do much better than a Makerbot Replicator. Apparently Makerbot is looking to expand their 3D design and fabrication portfolio; they just announced an upcoming 3D scanner at SXSW. It’s called the Makerbot Digitizer, and it takes real, 3D objects and turns them into CAD files.

Since Makerbot and [Bre Pettis] didn’t give out much information about the 3D scanner they’re working on, the best information comes from Techcrunch. The Makerbot Digitizer uses two lasers to scan real objects and turns them into 3D CAD files. The hardware isn’t finalized, and the prototype is made of a few pieces of laser cut plywood. No details are available on how much the Digitizer will cost, when it will be available, or what its resolution is.

Of course 3D scanning of real objects to translate them into CAD files is nothing new for Hackaday readers. We’ve seen our fair share of desktop 3D scanners, including one that was built in a day out of junk. Even the Kickstarter crew has gotten into the action with a few desktop 3D scanners, some of which scan in full color.

Another Salvo In The PIC Vs. AVR Holy War

Ah, PIC vs. AVR, the never-ending battle of electronic design supremacy. Some people swear by Atmel’s AVR microcontrollers, while others are wrong. [majenko] is firmly planted in Microchip’s PIC camp, so he wrote up a nice comparison of Atmel’s AVR versus Microchip’s PIC family of microcontrollers. The results aren’t that surprising; PIC microcontrollers come out as a better product that no hobbyist uses because no hobbyist uses them.

Atmel and their series of AVR microcontrollers has seen a huge increase in popularity in the hobbyist market in the last few years, no doubt thanks to the Arduino and other AVR-powered dev boards. This isn’t to say Microchip and PIC haven’t seen their time in the lime light; there was a time when you could actually buy electronic components at Radio Shack, including kits containing Microchip’s very popular but somewhat outdated Basic Stamp.

After going over the capabilities of the Atmel AVR ATMega328p, the similarly equipped Microchip’s PIC PIC18F25K80, and TI’s MSP430G2533, [majenko] found the perennial favorite, the AVR, lacked in some very important categories. The AVR has a lower resolution ADC, fewer PWM pins, fewer 16-bit timers, while costing about $0.75 more.

Of course [majenko]’s analysis doesn’t take into account the intangibles of choosing a PIC over an AVR. Thanks to the Arduino’s adoption of the AVR, there are many, many more code and schematic examples floating around on the Internet for just about every project imaginable. The development tools for PIC are a bit more expensive than their AVR equivalents; A PICkit2 runs about $50 while AVR ISP programmers can be found just about everywhere for pocket change.

It’s a lazy Sunday, so all ‘yall can go on and argue in the comments.

Dispensing Change For Low-stakes Gambling

change

Every year, [Nathan] hosts an Oscar party with a lot of drinking, adoring the off-color comments of [Joan Rivers] and some low stakes wagering. Everyone throws a dollar into the pot for a particular award, and when the winner is announced, [Nathan] splits the pot between the winners and begins counting out coins. As convenience stores have discovered, there’s an easier way to dole out pocket change, so this year [Nathan] created a change machine that dispenses coins for the winners.

The change machine is just like the ones you would find at a supermarket or convenience store; load up the machine with a few rolls of coins, and a few solenoids fire in response to serial data received from a computer. [Nathan] used an Arduino, Serial shield, button matrix, and LCD display for his change machine interface, allowing him to dispense pocket change to each of the winners after an award is announced.

Printed Machine Does Nothing Until The Heat Death Of The Universe

machine

A 2:1 gear reduction slows down a spinning shaft to half speed and doubles the torque. Repeat this a few times, and you’ve got a ludicrous amount of torque moving too slowly to see with even precision instruments. That’s the idea behind [Jeshua]’s project, a Printed Machine partially embedded in a block of concrete.

[Jeshua]’s build is a replica of one of [Arthur Ganson]’s kinetic sculptures. [Ganson]’s machine uses 50 sets of gears to reduce the rotation of 200 RPM motor more that 200  quintillion times. The final gear in the sculpture is embedded in a block of concrete, waiting to be freed by either erosion of the concrete block or the sun going nova.

Instead of metal gears, [Jeshua] used 3D printed gears in PLA. After assembling them on a stand, he cast concrete around the final, barely moving gear. It’s an impressively useless build that will turn to dust before the final gear makes even 1/10th of a revolution. This machine could have a longer life if it were printed with ABS instead of PLA, but with the time scales we’re talking about here it won’t make much difference.

Hackaday Links: March 8, 2013

Cheap GPS modules

GPS

If you’re making a GPS-enabled project, you may have noticed the commonly available GPS modules are pretty expensive – usually around $50. Here’s one for $8. It’s a U-blox PCI-5S GPS receiver on a PCI Express card. There are test points for serial and USB data, though, so fitting this in your project is a breeze.

Grandfather clock makes a giraffe’s scarf

knit

Here’s a clock project from [Siren Elise Wilhelmsen]. Over the course of 365 days, the clock knits a giant, 2-meter tube of yarn that should be the perfect start for a half-dozen pairs of socks. No video for this, but if you find one, post a comment.

A huge hackerspace for Hotlanta

hotlanta

Atlanta is getting a new hackerspace. It’s called My Inventor Club and they’re starting to move into their space. Judging from [Scott]’s pictures of the new space it’s huge. We can’t wait for the video tour once they’re done moving in.

Ardino and Windows 8

arduino Uno eega

Windows 8 is… weird… and you can’t install unsigned drivers without a lot of rigamarole. This means installing the Arduino IDE is a pain but [Dany] has a solution. Reboot into “test mode” and you can install unsigned drivers without your computer throwing a hissy fit.

Tweet for welts and bruises

IMG_3293

[Zach]’s boss told him to come up with a Twitter-controlled paintball gun. Why he was asked to build this is beyond us, but the build is still cool. It’s powered by an Arduino and was built in just 12 hours. If only there was a video stream…

Hey guys, need some help here.

Alright, I’ve got a little problem with component sourcing. I’m making a ‘shield’ for the Raspberry Pi. Does anyone know where I can get really long female headers for the GPIO pins so the board will fit over the USB and Ethernet jacks? Here’s the project if you’re curious. I think the female part of the header needs to be 14mm high at least to fit over the USB port.

EDIT: Samtec ESQ-113-33-L-D. Here’s their site. This site is amazing. You can actually… find things. Completely unique experience here. Thank you, [Richard].

Putting Yourself Inside A Display

dome

Here’s an interesting build that combines light, sound, and gesture recognition to make a 360 degree environment of light and sound. It’s called The Bit Dome, and while the pictures and video are very cool, we’re sure it’s more impressive in real life.

The dome is constructed of over a hundred triangles made of foam insulation sheet, resulting in a structure that is 10 feet in diameter and seven and a half feet tall. Every corner of these panels has an RGB LED driven by a Rainboduino, which is in turn controlled by a computer hooked up to a Kinect.

The process of interacting with the dome begins by stepping inside and activating the calibration process. By having the user point their arms at different points inside the dome, the computer can reliably tell where the user is pointing, and respond when the user cycles through the dome’s functions.

There are bunch of things this dome can do, such as allowing the user to conduct an audio-visual light show, run a meditation program, or even play Snake and Pac-Man. You can check out these games and more in the videos after the break.

Continue reading “Putting Yourself Inside A Display”

BGA Rework Station

SMD components may be a little challenging for the home builder – even though the’re inordinately practical for homebrew PCBs – but if you play around with electronics and solder long enough, you’re eventually going to run into the horrors of BGA parts. Instead of convenient pins, BGA parts have tiny metallic balls on which solder is applied, a board is thrown through a reflow oven, and hopefully at the end, everything works. Sometimes these balls corrode or otherwise need to be reflowed. This isn’t an easy process, so [Edmar] came up with his own BGA rework station that costs much less than commercial offerings.

[Edmar]’s build began when he wanted to repair a graphics card. A common error on his Amilo XI2428 graphics card is having the small balls on the underside of the chip corrode, leaving the user with a non-functional graphics card. Towel trick notwithstanding, the easiest way to fix this error is to heat up the card to above the melting point of solder, removing the chip, and resoldering it with careful application of solder paste.

[Edmar]’s reflow station is made of an electric skillet for the bottom of the board, an infrared lamp for the top side of the board, and control circuitry constructed from an ATMega128, temperature sensors, and a huge power supply. The temperature is controlled via USB by a computer, allowing [Edmar] to set a temperature profile as recommended by the BGA chip’s data sheet.

Right now, removing a BGA chip works great, but [Edmar] is still working on the tech necessary to replace a BGA chip on a board.