A Real Thermal Imaging Camera For $300

If you want to check your house for hot air leaks, take pictures of the heat coming off a rack of equipment, or just chase the most dangerous animal, [Arnie], through the jungles of central america, a thermal imaging camera is your friend. These devices normally cost a few thousand dollars, but the team behind the Mu Thermal Camera managed to get the price down to about $300.

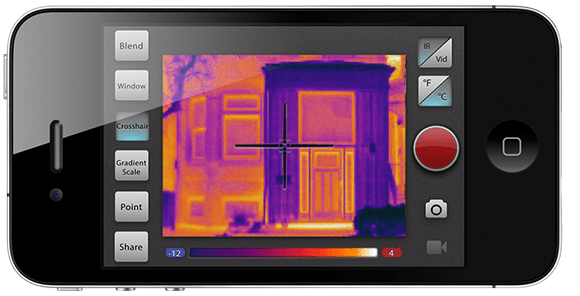
The basic idea behind the Mu Thermal Camera is overlaying the output of an infrared thermopile – basically, an infrared camera – on top of the video feed of a smart phone’s camera. This is an approach we’ve seen before and something that has even been turned into a successful Kickstarter. These previous incarnations suffered from terrible resolution, though; just 16×4 pixels for the infrared camera. The Mu thermal camera, on the other hand, has 160×120 pixels of resolution. That’s the same resolution as this $2500 Fluke IR camera. After the indiegogo campaign is over, the Mu camera will eventually sell for $325.

We have no idea how the folks behind the Mu camera were able to create a thermal imaging with such exceptional resolution at this price point. The good news is the team will be open sourcing the Mu camera after their indiegogo run is over. W’e’d love to see those docs now, if only to figure out how a thousand dollars of infrared sensor is crammed into a $300 device.

Beautiful Replica Team Fortress 2 Weapons

gun

We’ve seen our share of replica props, but [Nathan]’s replica of the spy’s sidearm from Team Fortress 2 is the bee’s knees.

The build began as an off-the-shelf Airsoft gun. After removing the barrel and cylinder, [Nathan] used Apoxie Sculpt and a whole lot of sanding to turn a stock piece of metal and plastic into something that came straight from the Mann Co. store. The in-game version of the Ambassador also includes an engraving of the object of the spy’s affection, replicated by [Nathan] with some very careful Dremel work. Once the prop was done, [Nathan] built a mold box out of plywood and filled it with silicone rubber. This allowed him to make several castings of his prop weapon

This isn’t [Nathan]’s only TF2 replica prop; he also made a replica of the stock sniper gun and scout’s scattergun and a megaphone from Borderlands. In an effort to out do himself, [Nathan] is gearing to build a gun that fires two hundred-dollar, custom-tooled cartridges at ten thousand rounds per minute. He has yet to craft any hats.

Turning The Samsung Galaxy Note 10.1 Into A Proper Linux Box

Over on the xda developers forum, [exception13] shows us the work he’s put into geting Debian running on his Samsung Galaxy Note 10.1, allowing him to dual boot Android and Linux on a single device.

The project is still in a fairly early state, but so far [exception13] has most of the goodies required for a decent Linux experience running already. There’s WiFi, bluetooth, sound, usb-otg and touchscreen support, as well as support for the Note’s S Pen, the Wacom digitizer that basically turns the Galaxy Note 10.1 into an Intuos touch pad.

There’s still a lot of work work to be done, including getting the camera up and running, as well as enabling the GPS receiver. Still, it’s a very cool project that puts the power of a proper desktop interface into a tablet with enough horsepower to get something useful done.

If you’d like to get this running on your Galaxy Note, [exception13] has a download avaiable over on Google Code. There’s also a video [exception13] put together demoing all the cool stuff his Note can do, you can check that out after the break.

Continue reading “Turning The Samsung Galaxy Note 10.1 Into A Proper Linux Box”

Finally, A Machine That Makes Cheap 3D Printer Filament.

If there’s one problem with the RepRap, it’s the cost of filament. Sure, there’s also the computationally difficult problem of slicing 3D models, but a 5 to 10 times markup on turning plastic pellets into filament is the biggest problem. It’s even a bigger problem than the problems of compatibility and interchangeable parts that comes with everyone forking a ‘standard’ printer design dozens of times. The cost of filament, though, is the biggest problem, right up there with RepRap developers focusing nearly entirely on different printer designs instead of the software, firmware, and electronics that are also vitally important to the RepRap project.

Nearly a year ago, we caught wind of a competition to create a home-based filament manufacturing station that takes cheap plastic pellets available for about $5/kg and turns them in to 3D printer filament that usually sells for $50/kg. A winner for this competion has finally been announced. The winner, [Hugh Lyman] just won $40,000 for his home filament creation station, the Lyman Filament Extruder

The goal of the Desktop Factory Competition was to create a machine that produces filament suitable for 3D printers with a total build cost of under $250 USD. [Lyman] met the goal by using a few motors, 3D printed parts, a PID controller, and off the shelf auger drill bit (that’s the actual model and supplier he used, by the way) that is able to reliably churn out plastic filament.

If you want to build your own Lyman Extruder, all the plans are up on Thingiverse, but LulzBot, the awesome people who gave us a 3D printer, hope to sell a pre-assembled version of this extruder sometime in the future, hopefully with a chain guard around that sprocket.

Preserving Locomotives With 3D Laser Scanning And 3D Printing

[Chris Thorpe] is a model railroading aficionado, and from his earliest memories he was infatuated with the narrow gauge locomotives that plied their odd steel tracks in northern Wales. Of course [Chris] went on to create model railroads, but kit manufacturers such as Airfix and Hornby didn’t take much interest in the small strange trains of the Ffestiniog railway.

The days where manufacturing plastic models meant paying tens of thousands of dollars in tooling for injection molds are slowly coming to an end thanks to 3D printing, so [Chris] thought it would be a great idea to create his own models of these small locomotives with 3D laser scanners and high quality 3D printers.

[Chris] started a kickstarter to fund a 3D laser scanning expedition to the workshop where the four oldest locomotives of the Ffestiniog railway were being reconditioned for their 150th anniversary. The 3D printed models he’s able to produce with his data have amazing quality; with a bit of paint and a few bits of brass, these models would fit right in to any model railway.

Even better than providing scale narrow gauge engines to model railway enthusiasts around the world is the fact that [Chris] has demonstrated the feasibility of using modern technology to recreate both famous and underappreciated technological relics in plastic for future generations. There’s a lot that can be done with a laser scanner in a railway or air museum or [Jay Leno]’s garage, so we’d love to see more 3D printed models of engineering achievements make their way onto Kickstarter.

Using OpenCV With The Raspberry Pi

When we first heard of the Raspberry Pi we were elated that projects that once required a full-blown computer could now be done on a tiny, and cheap board running Linux. Unfortunately, we haven’t seen much in the way of using computer vision algorithms on the Raspi, but thanks to [Lentin] the world of OpenCV is now accessable to Raspberry Pi users everywhere.

[Lentin] didn’t feel like installing OpenCV from its source, a process that takes the better part of a day. Instead, he installed it using the synaptic package manager. After connecting a webcam, [Lentin] ssh’d into his Raspi and installed a face detection example script that comes with OpenCV.

It should be noted that [Lentin]’s install of OpenCV isn’t exactly fast, but for a lot of projects being able to update a face tracker five times a second is more than enough. Once the Raspberry Pi camera module is released the speed of face detection on a Raspi should increase dramatically, though, leading to even more useful computer vision builds with the Raspberry Pi.

Warming Seeds In An Outdoor Garden

resistor-string

Spring is almost here and with that the green thumbs out there are preparing for their summer gardens. It’s usually a good idea to get a jump on all your gardening activities by starting seeds indoors, but with this comes the problem of making sure juvenile plants get enough sunlight. Putting a few seeds on a window sill will keep seeds warm enough to start germinating, but that will drastically reduce the amount of sunlight available for any given day. The best solution is to make sure the seeds are kept warm outside, but for wont of a properly placed clothes dryer vent [Tim] decided to make a solar soil heater using junk he had lying around.

[Tim] constructed a simple heater cartridge using a few 5 and 10 Ω resistors. These were sealed inside a piece of copper pipe with heat shrink tubing and silicone. The solution to powering this heater cartridge, though, is an impressive display of thinking outside the box.

The cartridge is powered by a solar lantern – the same kind you’d find illuminating a garden path at night and recharging during the day. After inserting the cartridge in a hill of seeds, the heater provides a little bit of warmth to get the seeds through the night. During the day, the battery in the solar lantern recharges, providing just enough power to cycle through another night.

It works for [Tim] in his native New England, so we’re betting it’s good enough for just about any growing region.