StripInvaders Puts Colored Lights Everywhere

There’s not much to be gained by living in a discotheque but colored lights are awesome, especially when they’re as well implemented as [michu]’s StripInvaders.

The StripInvaders project takes a gigantic 5 meter LED strip with WS2801 controllers and turns it into an Ethernet-enabled 24 bit display with the new Arduino Ethernet. While the Ethernet-enabled may seem a little superflous, [michu] implements it quite nicely. The entire 5 meter LED strip can be controlled from a tablet or smartphone.

Apart from a tablet/smartphone interface with OSC, there’s also mDNS support so we’re sure the StripInvaders could make for an interesting LAN party with the appropriate scripts. While the cost of the LED strip itself is fairly high, we’re sure some Hack a Day commenter will come up with a cheaper solution.

The firmware for StripInvaders has been posted on Github, but for a real treat, check out the demo after the break.

Continue reading “StripInvaders Puts Colored Lights Everywhere”

Ammo Tin ][

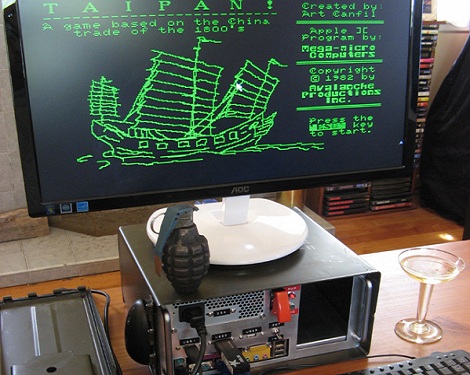
Ammo crate PCs have been around since Unreal Tournament LAN parties, but this one goes further back than that; [Simon] put an Apple II in an ammo crate. It’s a fitting anachronistic build from the same guy that built the TARDIS MAME cabinet.

Thankfully, [Simon] didn’t tear apart an Apple IIc for this build. A bare-bones Celeron motherboard was acquired for this project to run the AppleWin emulator. Instead of shoving all the parts into the box and calling it a day, [Simon] did it right and fabricated a very nice frame for the computer. With a wimpy CPU and no expansion cards, the Ammo Tin ][  can run very cool without drawing a lot of power.

We really have to hand it to [Simon] for this build. The metal work on this build looks great (it should for someone who is rebuilding an Austin 7), and we’ve got to respect the love for the Apple II. Now all that’s needed is a real Apple II keyboard on that USB port.

IP Over LEGO Train Carrier

[Maximilien] sent in a networking protocol built out of a LEGO train set. Unlike IP over Avian Carrier this system won’t be killed by plate-glass windows or birds of prey, but we’d hate to step on [Max]’s work in bare feet.

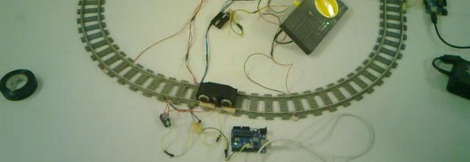
The system uses a USB flash drive to carry data around to different nodes. At each node, [Max] removed the power from the tracks and added a relay to start the train up again. A mechanical switch detects the presence of the train, and an Arduino makes the link to the Linux boxes via serial-over-USB.

The physical connection of the flash drive is with four wires and aluminum foil contacts. To send data, the system waits for the train to arrive at the ‘station’, mounts the drive, checks if there is data for it, and sends what needs to be sent. After unmounting the drive, power is applied to the local rail and the train continues on its journey.

[Max] admits that the latency on his network is terrible, but the bandwidth should be fairly good. As the old saying goes, ‘Never underestimate the bandwidth of a station wagon full of tapes.’ We’re not quite sure how that applies to LEGO trains, but there you go. Check out the gallery of [Max]’s work after the break.

Continue reading “IP Over LEGO Train Carrier”

Hackaday Links: December 25, 2011

Ah, Christmas. That wonderful time of year when you can roll out of bed to the screams and wails of children, grab a hot cocoa, and spend several hours arguing with an 8-year-old about which LEGO set to build first. Simply magical. While you’re waiting for the Doctor Who Christmas special to come on, settle down with these wonderful Christmas-themed builds that came in over the last few weeks.

One step closer to Robot Santa

Here’s an interesting way to spice up your seasonal headwear. [Mark] took a Santa hat and added a string of multicolored LEDs to the brim. The lights were picked up at a drug store for a dollar. Control is through a simple push button connected to an ATtiny13. Press the button, the lights cycle in a different pattern. Very cool, so check out the video.

A holographic holiday tree

[Auger] posted this very cool light up Christmas tree decoration on Instructables. This tree is made up of three pieces of acrylic. Different designs were laser cut into each piece of plastic – candy canes for the ‘red’ piece, stars and tinsel for the ‘yellow’ piece, and the tree for the ‘green’ piece. LEDs of the respective colors are cemented to the bottom of each bit of plastic. It’s called light piping and is used everywhere. This is the first time we’ve seen three colors, though.

This is what nerds do, and it’s awesome

[Rickard Dahlstrand] was playing around with his phone trying to take deliberately fuzzy pictures of his tree. He noticed the dashes produced from the LED Christmas lights must be produced from PCM dimming. Going through the EXIF data in the picture, he found the exposure time was 1/17th of a second. 1/17 of a second = ~ 58 ms / 5 (cycles on the picture) = ~11 ms per cycle = ~100 Hz frequency on the PCM dimming. Of course this is just about 2 times the line frequency in [Rickard]’s native Sweden, so we’ll call this confirmed. There’s no blog post for this, but we’ve never seen a clearer example of applied geekery. Simply awesome.

Yeah, we measured [Rickard] on a nerd meter

In the spirit of giving, [Johannes] decided to tell the entire world exactly how nerdy he is. He built a ‘Nerd Alert’ meter out of an old 1950s Japanese multimeter. The old guts of the meter were chucked, and a simple amp made out of a transistor amplifies the current flowing through the user’s fingers. A neat scale ([Johannes] measures somewhere between Amiga Workbench and Space invaders) replaces the old, boring, number-based one. Again, no write-up, but here’s some awesome build pictures.

Finally a use for all those old radio tubes

[AUTUIN] took apart a vacuum tube with a blow torch and a diamond cutting wheel. Surprisingly, he was able to put it back together, but not before making a wonderful Christmas ornament. There are two copper wires inside the envelope that are the leads to a single orange-red LED. The whole thing is powered by a watch battery. We’ll be sure to reference [AUTUIN] next time we have to take apart a glass bulb, because he managed not to burn, cut or blind himself.

Six things in a links post? It’s a Christmas miracle!

[Darryl] sent in a nice tool to select and display all of the hacker/maker merit badges available from Adafruit. Oh, we’re still trying to figure out who to give 10 badges to. We’re giving away skull ‘n wrench badges to the top ten hacks ever featured here. Leave a note in the comments, or tell us who should win.

Holiday wishes

Now put the computer down and go spend some time with your families, or failing that, strangers. Of course there’s an all day Doctor Who marathon, and that thing isn’t going to watch itself…


We’re On An Atari Jaguar Kick, Apparently

We don’t know why, but the Atari Jaguar is getting a lot of attention this week. [10P6] just came up with this Jaguar/CD combo that reminds us what Atari could have come up with in 1993.

The build itself is relatively simple once you get past [kevincal]’s ‘April Fools’ type joke he played on the Atari Age forum. [10P6] took a regular Jaguar CD drive and cut a hole into a Jaguar case. The whole case mod took less than a three hours, but [10P6] gives us a lot of commentary into what Atari could and/or should have built in 1993.

[10P6] suggests this type of Jaguar would have saved Atari money if the CD drive was stock on the base unit and released at a slightly increased price. This would cut out the cost of the cart slots and reduced the amount of plastic in manufacturing. [10P6] also talks about how Atari engineers could have dropped the 68000 coprocessor with an increase in the system clock. We’re not quite fond of that idea (ask us about our tattoo), but the logic does make sense.

Of course, this build comes on the heels of the Jaguar Portable we saw a few days ago. Honestly, we have no idea what’s going on with the Jaguar build.

Digital Synth For The Non-chiptune Inclined

Chiptunes are great, and we can’t imagine a world without the Mega Man 2 soundtrack, but sometimes we all like a more 70’s style synth. This is where the Roninsynth steps in. It’s an Arduino shield that puts the basic components of a wall of synth into your pocket.

Unlike the analog oscillators of yore, the Roninsynth is based on a single dsPIC33F chip. It has all the waveforms we would expect from its big brother – sine, saw, triangle, square, and noise – and a couple modulation options.  What’s really interesting is the GUI the Roninsynth team put together. Instead of going with the knobs and buttons approach of the MIDIbox SID, the Roninsynth does everything with software. Think of it as a hardware-based softsynth.

Of course, there isn’t support for looping and phrases like what we saw yesterday, but there’s a ton of neat sounds that can be made and the capability for analog input. If you’ve ever wanted to sound like Radiohead, we can’t think of an easier way to build an Ondes Martenot.

A Vacuum Chamber From A Pressure Cooker

[Allan] needed a small vacuum chamber to get all the air out of clear casting resin. Degassing is a simple step in casting that improves the finished product immensely. The problem, though, is building a vacuum chamber. [Allan]’s chamber seems easy enough to build, and pulls enough air out to get to 0.1 atmospheres.

After a hole was drilled in the side of the pressure cooker, [Allan] installed a 15mm “speedfit” plastic tank connector. The seal around the connector is neoprene self-adhesive foam. This foam was also taped around the lip of the pressure cooker for the top.

A thick-walled pressure cooker is more than capable of handling the outside pressure when under vacuum, but [Allan] cautions against using acrylic plastic for the top. Acrylic has the tendency to fail catastrophically, so he used a thick sheet of Lexan. Check out the demo video of [Allan] sucking the air out of shaving cream after the break.

Continue reading “A Vacuum Chamber From A Pressure Cooker”