Build A Kinect Bot For 500 Bones

[Eric] sent in his tutorial on building a Kinect based robot for $500, a low-cost solution to a wife that thinks her husband spends too much on robots.

For the base of his build, [Eric] used an iRobot Create, a derivative of the Roomba that is built exclusive for some hardware hackery. For command and control of the robot, an EEE netbook takes data from the Kinect and sends it to the iRobot over a serial connection.

The build itself is remarkably simple: two pieces of angle aluminum were attached to the iRobot, and a plastic milk crate was installed with zip ties. The Kinect sits on top of the plastic crate and the netbook comfortably fits inside.

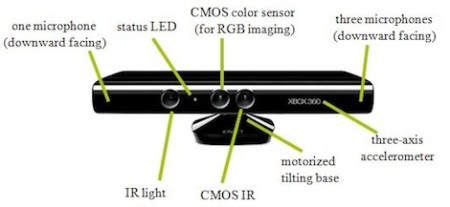
A few weeks ago, [Eric] posted a summary of the history and open-source software for the Kinect that covers the development of the Libfreenect driver. [Eric] used this same driver for his robot. Currently, the robot is configured for two modes. The first mode has the robot travel to the furthest point from itself. The second mode instructs the robot to follow the closest thing to itself – walk in front of the robot and it becomes an ankle biter.

There is a limitation of the Kinect that [Eric] is trying to work around. Objects closer than 19 inches to the Kinect appear to be very far away. This caused a lot of wall bumping, but he plans on adding a few ultrasonic sensors to fill the gap in the sensor data. Not bad for a very inexpensive autonomous robot.


[George Foreman] Seedling Starter For Kitchen Herbs

Sometimes the best kitchen hacks aren’t about the best barbecue, the rarest steak, or the baconiest bacon. Sometimes you need a little color on your plate, son, so why not grow your own herbs in a [George Foreman] rotisserie greenhouse?

[Sam] first saw his barely used rotisserie as his friend was throwing it out. Like any good maker, he quickly snatched it up and began work on some modifications. After removing the fun bits like the motor, heating element, and timer, [Sam] installed two compact fluorescent light bulbs to start a few herbs off right.

Kitchen herb gardens are surprising common, so much so that entire forums are dedicated to the practice. [Sam] doesn’t have any soil in his seedling starter yet but when he does, we expect he’ll be harvesting a nice crop of basil, oregano or cilantro in the spring.

Of course, [Sam] could use his seed starter to grow more “unconventional” plants, but some of us have been kicked out of a dorm for growing a pomegranate seedling, so we’ll leave it at that.

DO NOT Build A Fully Automatic Battery-launching Air Gun

There’s nothing quite like [Elliot]’s cherubic sense of wonder and maniacal laughter after he tests his fully automatic AA battery-launching air gun. That fires 600 rounds a minute. At 200 feet per second.

We need to take a minute and say [Elliot]’s gun is stupidly unsafe. He used PVC pipe to hold air pressure, so that may… explode one of these days. Also, the AA batteries coming out of the end of the barrel have the same kinetic energy as a .22 rifle bullet.

The mechanics of the gun is a simple blow forward bolt. When he pulls the trigger, the bolt – and battery – are forced forward due to air pressure. After the bolt has cleared a plug, air is allowed to flow through the bolt pushing the battery along with it. Once the pressure in the barrel is back down to normal, a spring forces the bolt back into place and the 23 round magazine loads another battery. Simple, really. [Elliot] posted some pics of his gun on the spudfiles.com forum.

The gun is accurate to about 100 yards. It’s a very impressive piece of engineering for a bit of PVC pipe, but we don’t feel the need to copy this one. Check out the videos after the break to see this thing in action.

Continue reading “DO NOT Build A Fully Automatic Battery-launching Air Gun”

Google Hangout Laser Turret

The guys from the House4Hack hackerspace in Johannesburg won the 2011 Google+ Hackathon with their Friggin’ Laser Turret. The build started off as a remote-controlled webcam that can be controlled by anyone in a Google+ hangout. On a whim, the team decided to add a laser to the build because lasers are awesome.

The inspiration for the build was to have a Google+ hangout available whenever someone is at the hackerspace. If a guest can’t grace the team with their physical presence, at least they can be there virtually. The camera is controlled by an Arduino running a bog-standard servo library implementation. The Arduino is connected to a laptop over a serial connection and is able to move left and right. To spice things up a little, the team added a 25mA laser diode to the build controlled from a digital output on the Arduino.

For winning the Jo’burg Google+ Hackathon, the guys scored themselves a Samsung Galaxy S II phone. Not a bad prize for building something cool. Check out the demo of the friggin’ laser turret after the break.

Continue reading “Google Hangout Laser Turret”

Wireless MIDI Piano Glove

Sometimes you just don’t have space for a baby grand. [Abdullah] got around this problem and built a virtual wireless MIDI piano. Unlike it’s inspiration, it’s not bad but we still love it.

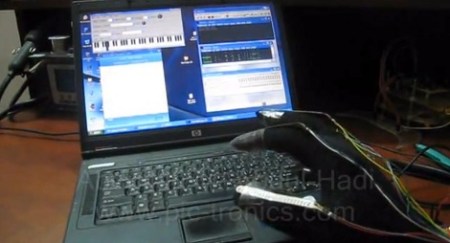
[Abdullah] got his hands on some flex sensors and attached them to a glove. These resistive sensors are put through a voltage divider and sent to a microcontroller (a PIC16F778, we believe) and corresponding MIDI notes are chosen. These MIDI notes are sent to a computer and played over a speaker.

Right now, only a single arpeggio is coded into the microcontroller. Depending on which finger is bent shifts this arpeggio up and down the keyboard. That being said, the firmware can be easily modified to recognize standard piano fingering so chords can be played. The only issue is moving the hand up and down the keyboard.

[Abdullah] is planning on making his glove completely wireless with a microcontroller and battery sewn into the glove. Here’s to hoping he’ll keep us posted.

Check out [Abdullah]’s demo after the break.

Continue reading “Wireless MIDI Piano Glove”

Canon FD Lenses On An EOS Mount

Camera lenses are expensive and if you’re like us, you can easily find really cheap lenses that your camera can’t use. [Sam] has a Canon EOS and a bunch of old-school FD lenses at his disposal. There’s one problem though: using these old lenses with an adapter means focusing at infinity is out of the question. Thankfully, he put up a few videos (part 1, part 2, and part 3) walking through the process of modifying an FD lens for his new camera.

To do the modification for the FD lens, all that’s needed is some epoxy, a screw driver, and an M42 to EF adapter. After disassembling the back of the FD lens, [Sam] mounted the M42 adapter on his camera and held the lens up to check the minimum focusing distance. A bit of grinding or a few metal shims ensure that the lens is in the right position.

The next step is making sure the aperture can still be controlled. [Sam] goes through this in part two of his video. A little bit of dremeling takes care of all the hard work. The lens is finally attached to the M42 adapter with a tiny bit of epoxy, and the conversion is complete.

While [Sam] could have put up a few close up pics of his build, he goes through every step of the process very well. Check out the embedded videos after the break.

Continue reading “Canon FD Lenses On An EOS Mount”

Controlling Shift Registers Via SPI

Hack a Day’s very own (and very prolific contributor) [Mike Szczys] put up a great tutorial on how to drive shift registers with an SPI interface.

[Mike]’s earlier tutorial of the 595 shift register goes through the functions of a shift register pin by pin. In a 595, bits for each position in the register are sent over one at a time. Most microprocessors have an Serial Peripheral Interface, and using an SPI bus means a lot less mucking about.

An ATmega168 was used for this build, although most Atmel chips can be made to work as an SPI master device. There are just three wires connecting the microcontroller to the shift register – SER, SRCLK, and RCLK. Like any other shift register setup, the build can be expanded by connecting the QH’ pin of the first 595 to the SER pin of the second.

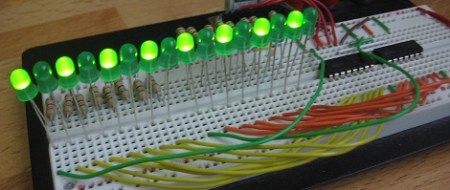
[Mike] graciously made all the code for his build available. The video after the break is a 16-bit binary counter, a good stopping point before [Mike] rebuilds his Larson scanner/Cylon/Kitt, moving away from a PWM-based build to a register-based one.

Continue reading “Controlling Shift Registers Via SPI”