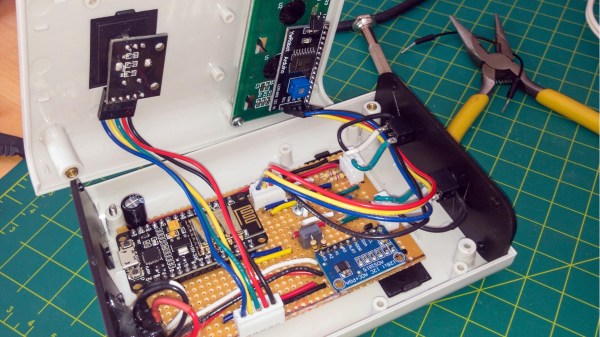
An opened plastic project box with electronics inside

Smoking Meat Finds Natural Home In The Cloud

Did you know that backyard barbecues now come with WiFi? It should be no surprise, given the pervasiveness of cloud-enabled appliances throughout the home. However [Carl] wasn’t ready to part with his reliable but oh-so-analog BBQ smoker, so instead he created an affordable WiFi-based temperature monitor that rivals its commercial counterparts.

Accurate temperature measurement is essential to smoking meat from both a taste and safety standpoint. In this project, two Maverick ET-732/733 thermistor probes take care of the actual temperature monitoring. One probe is skewered into meat itself, and the other measures the ambient ‘pit’ temperature. Combined, these two gauges ensure that the meat is smoked for exactly the right length of time. [Carl] mentions that adding an extra temperature sensor is trivial for larger setups, but he’s getting by just fine with two data points.

Naturally an ESP8266 does most of the heavy lifting in bridging the gap between smoke and cloud. At the core of this project is utility and practicality – temperature statistics can be viewed on any device with a web browser. Being able to study the temperature trends in this way also makes it easier to predict cooking times. Electronic alerts are also used to notify the chef if the temperature is too hot or cold (among other things). The entire contraption is housed in a smart looking project box that contains an LCD and rotary encoder for configuration.

If this has piqued your culinary interest, check out the extensive documentation recipe over on GitHub and the project Wiki.  We also recommend checking out this project that takes automated meat smoking to the next level.

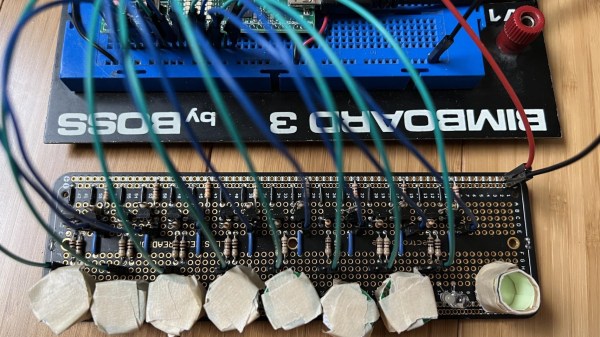
Two circuit boards connected with wires

Glow In The Dark Computer Memory Illuminates The Fundamentals

Computer memory has taken on many forms over the years, from mercury-based delay-line tubes to handwoven magnetic core. These days, volatile storage using semiconductors has become ubiquitous with computing, but what if there was a better way? [Michael Kohn] has been working on a new standard for computer memory that uses glow in the dark stickers.

Clearly we jest, however we’re still mighty impressed by the demonstration. Eight delightful star-shaped phosphorescent stickers represent eight bits of memory, totaling one byte. The glow in the dark material is stuck to the inside of short cylinders, each of which contains a white LED and a phototransistor. The memory array is wired up to an iceFUN FPGA board, which is then connected via level shifters to a Western Design Center MENSCH single board computer.

Continue reading “Glow In The Dark Computer Memory Illuminates The Fundamentals”

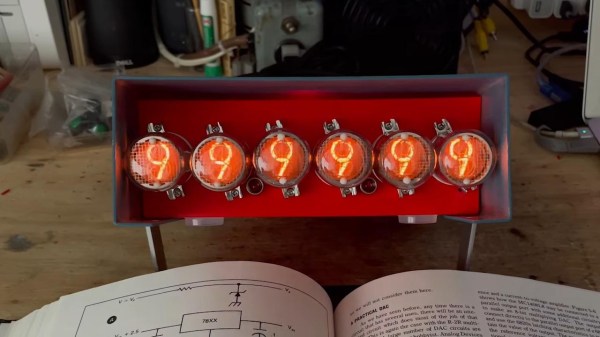
A six digit Nixie clock on a desktop

Upcycled Nixie Clock Fit For A Friend

Building a clock from parts is a rite of passage for makers, and often represents a sensible introduction into the world of electronics. It’s also hard to beat the warm glow of Nixie tubes in a desktop clock, as [Joshua Coleman] discovered when building a Nixie tube clock for a friend.

The original decision to upcycle the chassis from an unrepairable Heathkit function generator came a little undone after some misaligned cutting, so the front panel ended up being redesigned and 3D printed. This ended up being serendipitous, as the redesigned front panel allowed the Nixie tubes to be inset within the metal chassis. This effect looks great, and it also better protects the tubes from impact damage.

Sourcing clones of the 74141 Nixie driver ICs ended up being easier than anticipated, and the rest of the electronics came together quickly. The decoders are driven by an Arduino, and the IN-4 Nixie tubes are powered by a bespoke 170 volt DC power supply.

Unfortunately four of the tubes were damaged during installation, however replacements were readily available online. The gorgeous IN-4 Nixie tube has a reputation for breaking easily, but is priced accordingly on auction sites and relatively easy to source.

The build video after the break should get any aspiring Nixie clock makers started, but the video description is also full of extra information and links for those needing help getting started.

We’re not short on clock hacks here at Hackaday, so why not check out a couple more? This retro-inspired LED clock looks like its right out of a parallel universe, or maybe this stunning Nixie clock driven by relays will strike your fancy.

Continue reading “Upcycled Nixie Clock Fit For A Friend”

Old Casio Calculator Learns New Tricks

[George Stagg] recently found himself stung by the burden of free time while in lockdown. Needing a project to keep him occupied, he decided to upgrade his 90s Casio CFX-9850G calculator to run custom machine code.

All [George] really wanted was for his vintage calculator to understand Reverse Polish Notation (RPN). The calculator in question can already run its own version of BASIC, however the bespoke Hitachi CPU struggles performance-wise with complex programs, and wouldn’t be a realistic way of using RPN on the calculator. An RPN interpreter written in assembly language would be much faster.

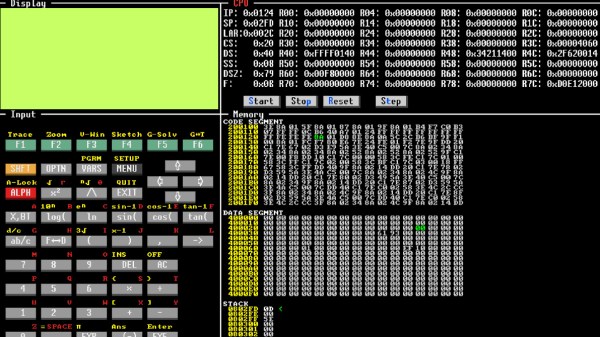
The first step in cracking this calculator wide open was a ROM dump, followed by writing a disassembler. Incredibly, the MAME framework already featured a ‘partial implementation’ of the calculator’s CPU, which was a much needed shot in the arm when it came time to write a full-featured emulator.

With the entire calculator emulated in software, the plan from here involved replacing one of the BASIC commands in ROM with new code that would jump to an address in RAM. With 32KB of RAM there ended up being plenty of room for experimentation, and uploading a program into RAM was simplified by using Casio’s original backup software to dump the RAM onto a PC. Here, the contents of RAM could be easily modified with custom code, then uploaded back into the calculator.

With RAM to burn, new routines were created to write custom characters to the screen, and a new font was created to squeeze more characters onto the display than normal. [George] ended up porting a Forth interpreter, which defaults to RPN style, to finally achieve his humble objective. He also managed to get a version of Conway’s Game Of Life running, check out the video after the break.

We can’t get enough of our calculator hacks here, so make sure to check out the CPU transplant on this vintage Soviet calculator.

Continue reading “Old Casio Calculator Learns New Tricks”

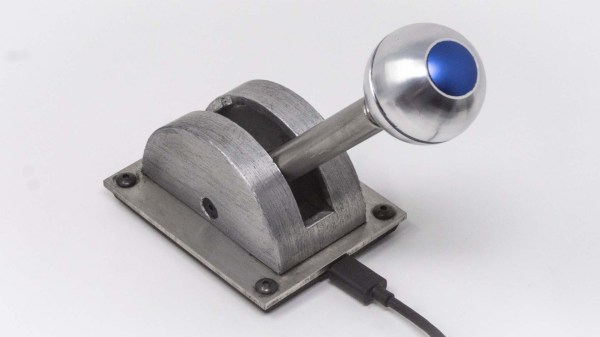
A metal spaceship throttle replica with a spherical knob

Razor Crest Control Lever For The Grogu In Your Life

If you’re looking to add a little more sci-fi authenticity to your gaming setup, you could do much worse than this functional control lever replica that [ZapWizard] has entered into the Hackaday.io Sci-Fi Contest.

Taking inspiration from Disney’s The Mandalorian, this functional prop is almost identical to the throttle seen on the bridge of the Razor Crest gunship, piloted by the television show’s eponymous bounty hunter. The electronic heart of this build is relatively straightforward – a Trinket M0 measures the resistance of an ultra-thin potentiometer, and masquerades as a typical one-axis USB throttle.

The mechanical components and aesthetically pleasing housing is where this project really shines. Helical 3D printed gears smooth out the movement of the solid aluminum throttle shaft, and a simple detent mechanism ‘catches’ the throttle at the middle point. The ballast and baseplate are cut from stainless steel, giving the throttle considerable heft, aiding in its stability on a tabletop (it’s also possible to secure it down using screws or powerful magnets). The throttle case is 3D printed and covered in aluminum foil tape, which is then chemically blackened and aged for that well-loved appearance.

Of course, the most iconic part of this build is the spherical knob, which screws onto the aluminum shaft for Grogu’s convenience. [ZapWizard] put in an order for one over at Custom 3D Stuff, and it absolutely ties the entire build together.

Interested in prop builds from the world of science-fiction, functional or otherwise? Then take a look through the entries in our Sci-Fi Contest. Or better yet, start building your own entry — there’s still about a month to go before the deadline.

Continue reading Razor Crest Control Lever For The Grogu In Your Life”

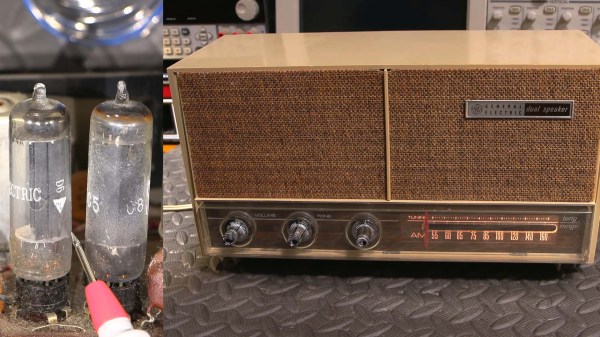
A beige 1960s radio receiver, inset with vacuum tubes

Busted 1960s Vacuum Tube Radio Sings Again

Restoring a vintage radio receiver has the potential to be a fun weekend project, but it pays to know what you’re up against. Especially in the case of vacuum tube electronics, running down gremlins in the circuits isn’t always a straightforward process (also, please mind the high voltage that is present in old vacuum tube equipment). [Mr Carlson] has a knack for getting old radios humming once again, and his repair of a 1960s General Electric barn find radio receiver is a thorough masterclass in vintage electronics servicing.

Seriously, if you’ve got a spare ninety minutes, the video (after the break) is a thorough and unabridged start-to-finish diagnosis and repair of a vintage radio, and an absolute must for anyone interested in doing the same. This barn find radio was certainly showing its age, and it wasn’t long before in-circuit testing found an open filament in one of several vacuum tubes, but the radio was still stubbornly silent. Further testing revealed that the IF transformers were out of spec, requiring servicing and alignment. After fine tuning both the IF and RF sections of the radio, things were definitely looking (and sounding) better.

Fine tuning the various components in the radio went a long way to living up to its “long range” claims, and by the end of the video, it’s almost impossible to find dead air on the AM dial of this radio. If you’ve never had to make fine adjustments to a receiver, especially of this vintage, this video has all the details you’ll need. With the board exposed, [Mr Carlson] also took care of some preventative maintenance, including replacing the original filter capacitor with newer components, as well as replacing the mains safety capacitor with an even safer modern alternative.

We can’t get enough of these restorations, so make sure to check out our detailed write-up of restoring a WWII aircraft radio.

Continue reading “Busted 1960s Vacuum Tube Radio Sings Again”

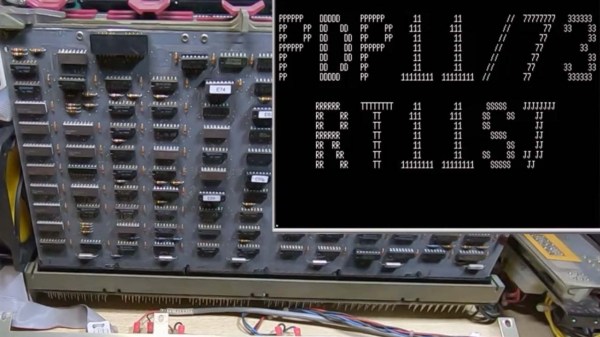
Circuits board from a PDP-11 minicomputer with inset terminal display

PDP-11/34 Restoration And The Virtue Of Persistence

The wildly successful PDP-11 minicomputer was a major influence on the evolution of computing throughout the 1970s. While fondly remembered in modern day emulation, there’s nothing like booting up the real thing, as [Jerry Walker] explores in his video series on restoring a PDP-11/34. Examples of PDP-11 hardware are becoming increasingly rare, which makes restoration and preservation of remaining equipment even more critical. [Jerry] has gone to exhaustive lengths to restore his PDP-11/34 to working condition, painstakingly troubleshooting wire-wrapped backplane and replacing suspect ICs across the entire system. With scant documentation on some of the cards, it was often a matter of sheer will and technical know-how that saw the system eventually come back to life.

If you’ve got a couple of hours, make sure to check out the entire series of videos documentation the restoration over on YouTube. If you’ve ever thought about restoring vintage computers, this series offers an insight into the satisfying yet oh-so-tedious process of chasing down broken traces and faulty logic. Exorcising the demons from decades-old computers is almost never straightforward, but [Jerry] demonstrates that persistence can yield exciting results. After the break is the latest installment of this series, which shows the system booting into the RT-11 operating system from floppy disk.

If you don’t have the time or real estate to restore a real PDP-11, you might want to check out modern hassle-free replicas. Or, if we’ve piqued your interest in restoring minicomputers, don’t miss what we had to say about previous PDP-11 resurrections, like this PDP-11/04.

Continue reading “PDP-11/34 Restoration And The Virtue Of Persistence”