Square Laser Harp Is Hip

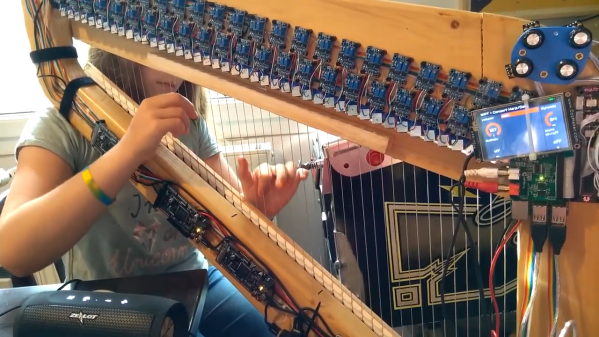
You know, we hadn’t realized how tired we were of vertical laser harps until we saw [Jonathan Bumstead]’s entry into the 2019 Hackaday Prize. It’s all well and good to imitate the design of the inspiring instrument. But the neat thing about synths is that they aren’t confined to the physics of the acoustic instruments they mimic. This project elevates the laser harp into functional sculpture territory. It’s a piece of art that produces art.

And this art harp is entirely self-contained, with built-in MIDI, amplifier, and speakers. The brains of this beauty are an Arduino Mega and an Adafruit music maker shield, which give it twenty different instrument voices. Each of the six layers has two lasers, two mirrors, and two photo-resistors mounted in the corners of the plywood skeleton. The lasers and photo-resistors are mounted back to back in opposite corners, with mirrors in the other two corners to complete the paths. [Jonathan] cleverly diffused the laser light with milky slivers of film canister plastic.

This isn’t [Jonathan]’s first optical rodeo. Previous experience taught him the importance of being able to readjust the lasers on the fly, because every time he moved it, the laser modules would go out of alignment. This time, he built kinematic mounts that let him reposition the lasers using four screws that each push a corner.

There are a lot of nice touches here, especially the instrument selector wheel. [Jonathan] explains it and the rest of the harp in a fantastic demo/build video that’s just burning a hole in the space after the break.

Continue reading “Square Laser Harp Is Hip”

MIDI Harp Looks Pretty Sharp

[Julien] is one of those cool dads who shows his love with time invested rather than money spent. His daughter plays the harp, and you would not believe the price of concert harps. Even the cheap ones are several thousand USD. So naturally, he decided he would build her a MIDI concert harp from the ground up.

This plucky work in progress uses a strain gauge and an AD620 amplifier on every string to detect the tension when plucked. These amplifiers are connected to Arduinos, with an Arduino every nine strings. The Arduinos send MIDI events via USB to a Raspberry Pi, which is running the open synth platform Zynthian along with Pianoteq.

The harp is strung with guitar strings painted with silver, because he wanted capacitive touch support as well. But he scrapped that plan due to speed and reliability issues. Strain past the break to check out a brief demo video.

[Julien] used strings because he wanted to anchor the harpist in tactility. But you’re right; many if not most MIDI harps use lasers.

Continue reading “MIDI Harp Looks Pretty Sharp”

Itty Bitty MIDI Piano Sings With Solenoids

Toy pianos are fun to plink around on for a minute, but their small keyboards and even smaller sound make them musically uninteresting pretty quickly. [Måns Jonasson] found a way to jazz up a two-octave toy piano almost beyond recognition. All it took was thirty solenoids, a few Arduinos, a MIDI shield, and a lot of time and patience.

This particular piano’s keys use lever action to strike thin steel tines. These tines are spaced just wide enough for tiny 5V solenoids to fit over them. Once [Måns] got a single solenoid striking away via MIDI input, he began designing 3D printed holders to affix them to the soundboard.

Everything worked with all thirty solenoids in place, but the wiring was a bird’s nest of spaghetti until he upgraded to motor driver shields. Then he designed a new bracket to hold eight solenoids at once, with a channel for each pair of wires. Every eight solenoids, there’s an Arduino and a motor shield.

The resulting junior player piano sounds like someone playing wind chimes like a xylophone, or a tiny Caribbean steel drum. Check out the build video after the break.

Hate the sound of toy pianos, but dig the convenient form factor? Turn one into a synth.

Continue reading “Itty Bitty MIDI Piano Sings With Solenoids”

KVM Foot Switch In A Few Steps

[Radishmouse], despite the handle, is not a mouse guy. Give him a keyboard and he will get around just fine in any OS or program. As it is, he’s got a handful of ThinkPads, each running a different OS. He wanted to be able to switch his nice mechanical keyboard between two laptops without the hassle of unplugging and replugging the thing. His solution: a DIY KVM foot switch.

He’s been learning about electronics and 3D design, and this problem was the perfect opportunity to dig in and get his hands dirty. After learning enough about the USB protocol and switches to figure out what had to happen, he made a prototype from a pâte tub. Though undeniably classy, this vessel would never survive the rigors of foot-stomping in feline territory. Fortunately, [radishmouse] has also been learning about 3D design. After some trial and error, he came up with a sturdy, curvy 3D-printed two-piece enclosure. We particularly like the blocks built into the bottom piece that shore up the USB ports.

There are lots of reasons to build input controls for those under-utilized appendages at the ends of your legs. You could control your ‘scope with a probe in each hand, or use a foot switch to relocate an inconvenient power button.

Via [r/functionalprint]

Cash Register Hotkey Board Is On The Money

When presented with a pile of free electronics, sometimes you grab things for their ‘someday’ potential. Other times, you know exactly what you’re after. [Bryce] got a big old cash register for free from school because they’ve moved on to using Square or something. He scored two VFDs and a solenoid as a side effect, but he was really after that sturdy keypad and its paper-label keycaps, ripe for customization.

Two hours of reverse engineering later, he knew where the button presses were going well enough to reach for a knockoff Arduino Pro Micro and a couple of shift registers. [Bryce] wanted his hotkey-board to handle keyboard presses as well as media key input, so he went with the HID-Project library over the standard-issue Arduino version. Of course, the whole point of making your own hotkey-board is customization. For [Bryce], that means Word shortcuts and quick access to Greek letters for all those engineering reports he must write. Dig that Half-Life lambda!

What? You don’t have access to free electronics? You could make a hotkey-board out of arcade buttons. Those things can really take a beating.

Xpedit Is A Mood Ring For Mother Nature

Whether you’re in the woods or way up a mountain, basic knowledge of your environment can yield a lot of power. The more you know about the temperature, humidity, barometric pressure, and your altitude, the easier it is to predict future weather and stick to your height limits. Sure, you could buy some pre-fab doohickey that does all of this, but why? [DIYMechanics] shows how easy it is to build your own pocket-sized weather station for under $20.

Xpedit’s brain is an ATMega328 running on a 20MHz crystal heartbeat. The atmospheric readings come from a BME280, a nifty all-in-one module that’s available for pennies on Ali. The rotary encoder handles user inputs, and the simple interface displays on an OLED. There’s even a tiny compass embedded in the 3D printed case.

We really like the custom alarm feature, which can buzz you via vibe motor if you’ve climbed too high, or the pressure is dropping. [DIYMechanics] has Xpedit completely open-sourced, so trek on down to the GitHub for the latest Eagles, Gerbers, and INOs. Don’t have a USBtiny ISP yet? He’s got the plans for that, too.

Maybe you’re the indoorsy type who’d rather read about mountainous jungle adventures than experience them firsthand. Add some weather-driven ambiance to your book nook by hacking an IKEA cloud lamp.

Cat Feeder Adds Metrics To Meow Mix

If there’s one thing any cat will work for, it’s food. Usually, this just consists of meowing and/or standing on your chest until you give up the goods. [DynamicallyInvokable] has a beautiful cat, Emma, who meows loudly for food at obscene hours of the morning. As she ages, it’s getting harder and more important to control her weight. Clearly, it was time to build the ultimate automatic cat feeder—one that allows him to get lazy while at the same time getting smart about Emma’s weight.

After a year and a half of work, the feeder is complete. Not only does it deliver the goods several times a day, it sends a heap of data to the cloud about Emma’s eating habits. There’s a scale built into the platform, and another in the food bowl. Together, they provide metrics galore that get automatically uploaded to AWS. Everything is controlled with an ESP32 Arduino, including a rainbow of WS2812s that chases its tail around the base of the feeder. The faster it goes, the closer it is to feeding time.

The best part about this unique feeder is that nearly every piece is 3D printed, including the gears. Be sure to check out the build gallery, where you can watch it come together piece by piece. Oh, and claw your way past the break to see Emma get fed.

Emma doesn’t have to worry about sharing her food. If she did, maybe [DynamicallyInvokable] could use facial recognition to meet the needs of multiple cats.

Continue reading “Cat Feeder Adds Metrics To Meow Mix”