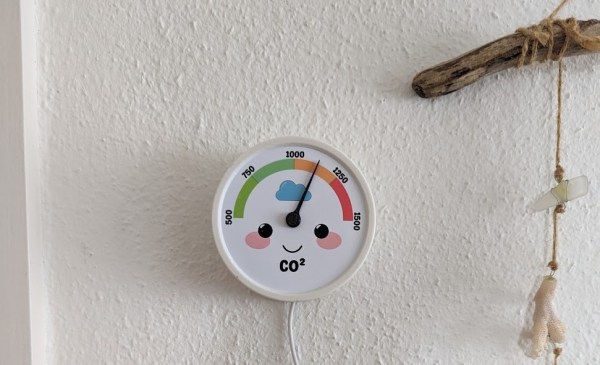
Thumbs Up To This Pico MIDI Kalimba

The kalimba, or thumb piano, is an easy way to make some music even if you have next to no idea what you’re doing. The only real downside is that they are limited to the twinkly sounds of metal tines being plucked by thumbs.

[Jeremy Cook] broke the sonic possibilities wide open by converting a couple of kalimbas into capacitive-touch MIDI instruments using the Raspberry Pi Pico. He started with a small one that is curiously made of solid wood. Usually these instruments are at least partially hollow to allow air to resonate inside the body.

After soldering up all the 1 MΩ resistors necessary to utilize the capacitive touch capabilities of the Pico, [Jeremy] found it a bit difficult to play individual notes on such a small instrument, so he made version two out of a much larger specimen.

This time, [Jeremy] cooked up a custom PCB which he is calling the Pico Touch 2, which adds the necessary resistors at the SMD level for capacitive touch sensing and in turn cleans up the wiring a bit. Be sure to check it out in action after the break.

Okay, so you don’t have an iota of musical talent. You could always build a kalimba that plays itself.

Continue reading “Thumbs Up To This Pico MIDI Kalimba”

RGB LED Disco Ball Reacts To Sound And Color

Although disco music and dancing may be long dead, the disco ball lives on as a staple of dance parties everywhere. [Tim van de Vathorst] spent a considerable amount of time reinventing the disco ball into something covered with RGB LEDs that reacts to sound and uses a color sensor to change hue based on whatever it’s presented with.

[Tim] started by modeling the disco ball after a soccer ball with a mixture of pentagons and hexagons. Then it was off to the laser cutter to cut it out of 3mm plywood sheets. Once assembled, [Tim] added LED strips across all the faces and wired them up. Then it was time to figure out how to hold the guts together inside of the ball. Back to the drawing board and laser cutter [Tim] went to design a simple two-piece skeleton to hold the Raspberry Pi and the power supply.

In order to do some of the really interesting effects, [Tim] had to make sure that the faces were divvied up correctly in code. That was difficult and involved a really big array, but the result looks worth the trouble. Finally, [Tim] covered the ball in white acrylic to diffuse the LEDs. As you will see in the build/demo video after the break, the ball turned out really well. The only real problem is that the camera doesn’t work very well without light, which is something good parties are usually short on. [Tim] might add a spotlight or something in the future.

Do you prefer the mirrored look of the standard disco ball? Peep the tiny one in this Disco Containment Unit.

Continue reading “RGB LED Disco Ball Reacts To Sound And Color”

Luggable Cyberdeck Can Still Be A Luggable PC

In the 80s and early 90s, there existed a class of personal computers that are no longer around today — the luggable. Planted firmly between a desktop and a laptop, these machines were lovingly called so because they were portable, but just barely. Think Kaypro, Osborne, or the Compaq Portable.

First things first — this lovely 1990-era industrial luggable has not been gutted according to [D1g1t4l_G33k]. The chassis, CRT, power supply, and ISA backplane are original and still intact, and they still have all the parts to restore it to its original DOS 3.1 form.

What [D1g1t4l_G33k] did do is replace the 386x-based ISA SBC with a 2005 AMD LX-600 Geode at 366 MHz. Gone are the ISA data acquisition cards and 80 MB SCSI hard drive, replaced with a 32 GB compact flash drive. The floppy drive is functional, too. Now it sits on a cart next to the workbench running AntiX Core 19.5, functioning happily as an AVR development workstation.

Having an old luggable to mess with in the first place isn’t a requirement. We’ve seen a modern take on the luggable, and here’s one with three monitors.

A “Full” Keyboard For $5*

Sure, we’ve all seen PCB business cards at this point, but what about giving away a full-blown keyboard at meetups and such? That’s just how cost-effective the idawgz32 keyboard is. How on Earth can it cost so little? [sporewoh] used the CH552 microcontroller, which comes in around a dollar and only needs a couple of capacitors to get it up and running. The firmware is FAK.

As [sporewoh] writes in this blog post about the keyboard, they did some analysis and realized that most of the cost of their previous tiny board came from the switches. In addition to switching up the switches, [sporewoh] performed a few tricks to get the cost down, like making the key spacing 9 mm x 9 mm so that the overall board is less than 100 mm x 100 mm (which triggers a deal at a certain board house).

Unfortunately, the switches turned out not to be so good. They had greater travel and required more actuation force than the ones [sporewoh] was used to with previous board. The switches were also scratchy, which was solved with a little Krytox. But ultimately, they are pretty unreliable, so the next revision will use Panasonic EVQP0N02Bs.

If this seems familiar, you may be recalling this $3 macro pad which uses the same chip, or maybe the fact that we’ve covered the CH552 in detail.

*Thanks to the current CAD to USD exchange rate.

Recreating The Pop Ball

Those who were kids in the 80s may remember a sweet little toy called the Pop Ball. A simple rubber hemisphere, this rubber cup could be turned inside out and thrown on the ground, where it would hit and bounce sky high whilst knocking itself right side out. The black ones worked particularly well, and were the first to be banned from [electrosync]’s school along with yo-yos, slap bracelets, and any number of toys that eventually became weaponized by enterprising children.

An industrial Vegemite injection-molded version that only kind of worked.

You can still find Pop Balls today, but they don’t work nearly as well as they did originally because of a lower Shore hardness in the rubber. Naturally, as an adult with futuristic toys at hand, [electrosync] just had to try re-creating the ’80s version. But it wasn’t easy.

They started by studying the patents and anything else they could find. They even managed to get a hold of Peter Fish, the original creator of the Pop Ball, to get some questions answered about the things. According to Peter, the black Pop Ball was made from recycled rubber and worked almost too well. Peter sent [electrosync] an old-stock Pop Ball, which they used to modify their CAD design.

It’s easy to root for [electrosync] throughout this journey, which consists of many failed prints and injection molding attempts. At last, they are able to at least recreate the snap of the modern Pop Ball once they finally found the right filament — the extremely elastic Recreus Filaflex 60A TPU. Of course, it wasn’t all lollipops and rainbows from there, because the filament is notoriously difficult to print with, but [electrosync] made it work. Check it out after the break.

Continue reading “Recreating The Pop Ball”

Tiny Motion Detection Alarm Does The Trick

If you have mischievous children or forgetful elderly in your life, you might want to build a couple of these tiny motion detection alarms to help keep them out of harm’s way. Maybe you want to keep yourself out of the cookie jar. We say good for you.

But you could always put one of these alarms on a window, a drawer, or anything else you don’t want opened or moved. The MPU6050 3-axis IMU makes sure that any way the chosen item gets jostled, that alarm is going off.

As you may have guessed, there isn’t much more to this build — the brain is a Seeed Xiao ESP32-C3, and there’s a buzzer, a battery, a switch, and a push button to program it.

The cool thing about using an ESP32-C3 is that [gokux] can use these for other things, like performing a task when motion is detected. If you do want to build yourself a couple of these, here are step-by-step instructions.

If you’d rather detect motion in the vicinity, here’s a PIR-based solution.

Solar E-Ink Weather Station Works On Dark Days, Too

One way to get through the winter doldrums is to take notice of the minuscule positive changes in weather as spring approaches. Although much of the US is experiencing a particularly warm month, that’s not the case in Germany where [rsappiawf] resides. Even so, they are having a good time charting the weather on their new solar-powered E-ink weather station.

And in spite of the dark winter days, the device has been delivering weather updates for over a week on solar power alone. The brains of this operation is an ESP32 S3 Mini, which [rsappiawf] operated on a little bit. For starters, they removed the integrated RGB LED in order to save precious milliamps. Then they upgraded the voltage regulator to a TPS73733DCQR.

[rsappiawf] also has a TPL5110 power timer breakout module in the mix, which saves even more power by only turning on every once in a while according to the potentiometer setting, and only then turning on the project’s power. Check out the brief demo after the break, including the cool sliding action into the 3D-printed holder.

There’s a lot you can do to lower power consumption in a project like this. Here’s one that will go 60 days on a charge.

Continue reading “Solar E-Ink Weather Station Works On Dark Days, Too”