Reinvented Retro Contest Winners Announced

Good news, everyone! The results of the Reinvented Retro contest are in, and the creators of these three groovy projects have each won a $200 online shopping spree to Digi-Key. We asked you to gaze deeply into your stuff piles and come up with a way to modernize a cool, old piece of hardware, and we left it up to you to decide how cool and how old.

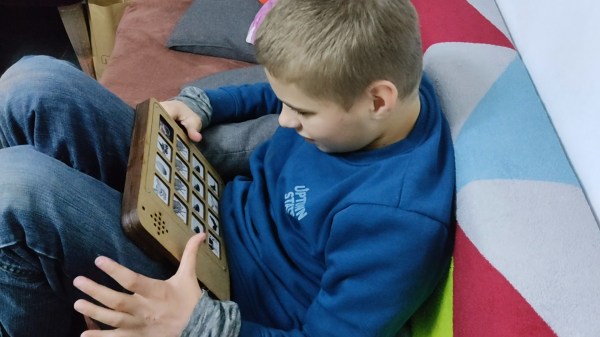
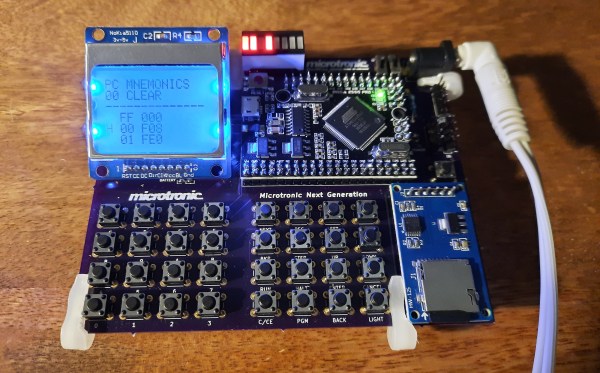
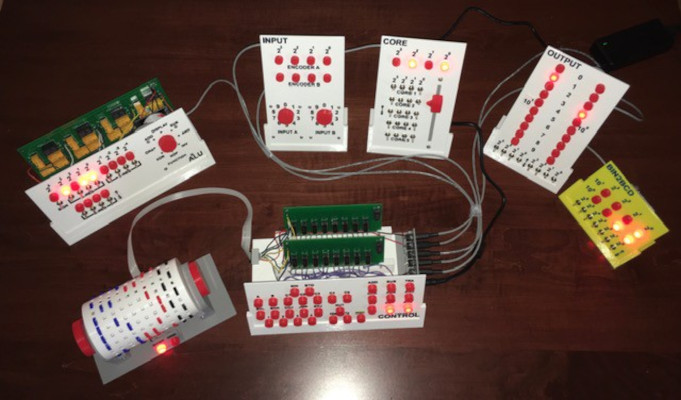
No matter your personal vintage, you have probably used or even built an educational computer like [Michael Wessel]’s next-generation Microtronic. This is a re-creation of an early 1980s West German 4-bit microprocessor trainer called the Busch 2090 Microtronic Computer System. You may have never heard of it, but [Michael] swears it’s one of the best ever made. Years ago, [Michael] made a talking Arduino-based Microtronic emulator and has grown the concept into a prize-winning system that uses an ATMega2560 Pro Mini and a Nokia 5110 display. As a bonus, it doubles as a cassette interface emulator that plugs into the 2090’s expansion port. Take some time to dive into the YouTube videos or go straight for the gerbers and make your own.

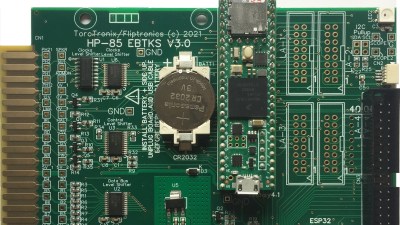
Retrocomputing fans will love EBTKS, a project that seeks to circumvent the disintegrating tape drives in HP85A and other early 1980s HP computers by emulating them and delivering 20,000 virtual tapes via SD card. The project began as a solid state replacement using a Teensy and an ESP32, but [Philip] and the team realized they could do a whole lot more than that. The full list of features includes 70 new keywords and both disk and tape drive emulation. Everything is explained in detail on the project’s main documentation site, where you’ll also find a handy user guide.

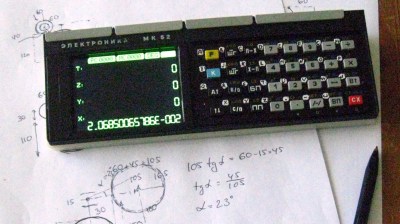
If you have a soft spot for old Soviet gear, check out [ptrav]’s MK-52 Resurrection. [ptrav] took an early 90s-vintage calculator with a busted vacuum fluorescent display and breathed new life into it with an ESP32 and a 320×240 TFT screen. The point isn’t to merely resurrect the MK-52, but rather to create a phoenix of programmable Soviet calculating power that rises from the ashes and realizes its hardware unleashed potential. As part of the software development path, [ptrav] also built a fully-functional simulator in C# which you can check out on GitHub.

A Most Honorable Mention

It’s always so difficult to pick winners from among all the amazing projects we see. For this contest, we’ve chosen [Michael Gardi]’s WDC-1 — aka the Paperclip Computer — for an honorable mention. And that means more than just a published pat on the back — [Michael] has won a $25 gift card for Tindie. Way to go, [Michael]!

This WDC-1 is a bit of an inverse take on the reinvented retro concept. Instead of new tech in an old box, [Michael] employed modern PCB fabrication and 3D printing to house the upgraded homebrew guts of this 50+ year-old computer design.

Congratulations to all the winners, and a big thank you to all 138 entrants for your faux nostalgia-inspiring builds. Take some time this weekend to check them out, and get your alternate reality on.

Fixing Joy-Con Drift With Recycle Bin Parts

Have you seen this yet? YouTuber [VK’s Channel] claims to have a permanent fix for Joy-Con drift — the tendency for Nintendo Switch controllers to behave as though they’re being moved around when they’re not even being touched. Like everyone else, [VK’s Channel] tried all the usual suspects: compressed air, isopropyl alcohol, contact cleaner, and even WD-40. But these are only temporary fixes, and the drift always comes back. None of the other fixes so far are permanent, either, like shimming the flat cable that connects the stick to the mobo, adding graphite to the worn pads inside, or trying to fix a possible bad antenna connection.

While calibrating a drifting Joy-Con, [VK’s Channel] noticed that applying pressure near the Y and B buttons corrected the issue immediately, so they got the idea to add a 1mm thick piece of card stock inside. [VK’s Channel] believes the issue is that there is no fastener connecting the plastic part of the joystick to the metal part on the bottom. Over time, using the joystick causes the bottom to sag, which makes the metal contacts inside lose their grip on the graphite pads. It’s been two months now and there is absolutely no drift in either of the Joy-Cons that [VK’s Channel] has shored up this way.

Nintendo is now fixing Joy-Cons for free. The problem is that they are replacing irreparable ones outright, so you have to agree that you will settle for a plain old gray, red, or blue instead of your special edition Zelda controllers or whatever you send them. Hopefully, this really is a permanent fix, and that Nintendo gives [VK’s Channel] a job.

You could forego the joysticks altogether and swap them out for touchpads. Suffering from XBOX drift instead? We have just the thing.

Continue reading “Fixing Joy-Con Drift With Recycle Bin Parts”

DIY PECS Board Uses Pictures To Communicate

One way of communicating with autistic and non-verbal people is through the use of a Picture Exchange Communication System or PECS board, which they can use to point out what they need or want throughout the day. However, the commercial versions of these boards have their share of problems — they’re expensive, and they’re fairly rigid as far as the pictures go. [Alain Mauer] has created an open-source PECS board that is far more personalized, and has audio to boot.

The number one requisite here is sturdiness, as [Alain]’s son [Scott] has already smashed two smartphones and a tablet. [Alain] went with a laser-cut MDF enclosure that should last quite a while. Inside is an Arduino Pro Mini and a DF Player Mini that plays corresponding clips from a micro SD card whenever [Scott] presses a button on the 16-key copper foil capacitive keypad. This PECS board is smart, too — it will sound a turn-me-off reminder after a few minutes of inactivity, and issue audible low battery warnings.

So far, [Scott] is responding better to photographs of objects than to drawings. Watch him interact with the board after the break.

This is far from the first thing [Alain] has built to help [Scott]. Be sure to check out this Pi-based media player built to engage and not enrage. Continue reading “DIY PECS Board Uses Pictures To Communicate”

Wobble Disk Coffee Roaster Looks Good In Wood

If you love coffee, you probably make it yourself at home most of the time using beans from some hipster coffee shop where the employees have full-sleeve tattoos and strong opinions. Maybe you even buy whole beans and grind them right before you use them. If you want to go all the way, you gotta roast those beans yourself. There are various ways to go about it, like repurposing a hot air corn popper. If you’re [Larry Cotton], you buy heaps of green beans and keep building wobble disk roasters until you’ve achieved DIY perfection.

[Larry]’s latest roaster boasts all-wood construction with no metal brackets or housings in the structural parts. This is good because you’re less likely to burn yourself on anything, and you aren’t sinking heat away from the beans. Nothing should get hot except the sifter, the beans, and the stiff triangle of wire that holds the heat gun nozzle in place. Once the roasting cycle is complete, [Larry] just shakes out the beans onto an adjacent screen that’s situated over a fan so they can cool off.

Unlike some of [Larry]’s previous designs, this one uses an 8-cup flour sifter situated over a heat gun. A battery-powered screwdriver drives the wobbling disk that churns the beans and helps them roast evenly, and a wooden arm holds down the power button. We love the simplicity of this machine, and think wobble disk roasters are mesmerizing to watch. Check out the video after the break to see it in action and learn how to build your own.

There’s more than one way to roast beans, and one of them is even officially sanctioned by Hackaday editor [Elliot Williams].

Continue reading “Wobble Disk Coffee Roaster Looks Good In Wood”

Responsive Paintings Do It With Heat And Light

Art is a conversation, yes. But normally, it’s a short one: the artist makes a statement and the audience responds, each bringing their own interpretations. The hard thing about being an artist is that once you release a piece into the world, it’s sort of bound and gagged in that it can’t defend itself from comments and misinterpretation.

On the other hand, interactive art allows for a longer discussion. Pieces are responsive and no longer mute. But so much of the interactive art out there is purely digital, and lacks a certain analog warmth that comes from physicality. For this year’s Hackaday Prize, [Laura] sought to put a digital interface on an analog visual piece and make paintings that change based on data inputs.

For now, [Laura] is focusing on adding two dynamic elements to her paintings: shifting color and light patterns in response to a viewer’s presence and/or actions using an Arduino and TinyML. For the color changes, [Laura] ended up mixing thermochromic pigment powder with a transparent gel medium.

This was a bit of a journey, because the regular kind of transparent medium came out too runny, and mixing the pigments with white paint made the colors come out lighter than [Laura] wanted and left white behind when heated. But transparent gel medium was just right. You can see the difference in this picture — the colors come out darker with the gel medium, and disappear almost completely with heat.

[Laura] didn’t want to just poke LEDs through the canvas, which in this case is a 1/8″ birch panel. Instead, there’s an RGB matrix shining behind a pair of thin, diffused cutouts filled with thermoplastic.

Check out the video after the break of a painting sketch that uses both techniques. Keep your eye on the purple triangles on the right side, and watch them slowly turn blue in real time as light patterns dance behind the diffused cutouts. Stick around for the second brief video that shows an updated light animation.

We’ve seen many ways of making interactive art, like this Rube Goldberg fairy tale ball maze that you control with your phone.

Continue reading “Responsive Paintings Do It With Heat And Light”

Virginia Apgar May Have Saved Your Life

Between the 1930s and the 1950s, something sort of strange happened in the United States. The infant mortality rate went into decline, but the number of babies that died within 24 hours of birth didn’t budge at all. It sounds terrible, but back then, many babies who weren’t breathing well or showed other signs of a failure to thrive were usually left to die and recorded as stillborn.

As an obstetrical anesthesiologist, physician, and medical researcher, Virginia Apgar was in a great position to observe fresh newborns and study the care given to them by doctors. She is best known for inventing the Apgar Score, which is is used to quickly rate the viability of newborn babies outside the uterus. Using the Apgar Score, a newborn is evaluated based on heart rate, reflex irritability, muscle tone, respiratory effort, and skin color and given a score between zero and two for each category. Depending on the score, the baby would be rated every five minutes to assess improvement. Virginia’s method is still used today, and has saved many babies from being declared stillborn.

Virginia wanted to be a doctor from a young age, specifically a surgeon. Despite having graduated fourth in her class from Columbia University College of Physicians and Surgeons, Virginia was discouraged from becoming a surgeon by a chairman of surgery and encouraged to go to school a little bit longer and study anesthesiology instead. As unfortunate as that may be, she probably would have never have created the Apgar Score with a surgeon’s schedule. Continue reading “Virginia Apgar May Have Saved Your Life”

Revolving Plant Tower Is Solar-Powered

Do you live in a small or yard-less space, but want to grow things anyway? You’re not totally out of luck — you’ll just have to get creative and probably vertical with your planting scheme. And since apartments and other smallish dwellings often have a limited amount of exposure, it would really help a lot if you could somehow rotate the plants so that they receive even sunlight.

[JT_Makes_It]’s rotating strawberry tower ticks all these boxes and more. The 12 V solar cell powers a small DC motor that spins at the gentle speed of 0.6 RPM. The tube is hanging from a swiveling carabiner that acts like a clutch — if a strong wind comes along or something bumps into it, the motor will continue to spin the carabiner.

[JT_Makes_It] already had a tube with holes, though they did cut several more into it. As built, this is not exactly apartment dweller-friendly, unless you have off-site access to things like plasma cutters and welding equipment. But as they point out, you could theoretically use PVC and a hole saw and make it shorter and therefore lighter. We think this looks great, although we’re a bit concerned about the weight. Not so much on the mechanism itself; that looks strong. We’re just wondering how long that carport frame will support it. Judge the build quality for yourself from the video after the break.

Did you know that strawberries can do tricks? Fasciation makes fanned-out berries, and vivipary makes them hairy.

Continue reading “Revolving Plant Tower Is Solar-Powered”