Cyberdecks are great projects, and [Salim Benbouziyane]’s scratch-built CM Deck is a fantastic specimen. It’s a clamshell-style cyberdeck with custom split keyboard, trackpad, optional external WiFi antenna, and some slick underlighting thanks to a translucent bottom shell. There’s even a hidden feature that seems super handy for a cyberdeck: a special USB-C port that, when plugged in to another host (like another computer), lets the cyberdeck act as an external keyboard and trackpad for that downstream machine.
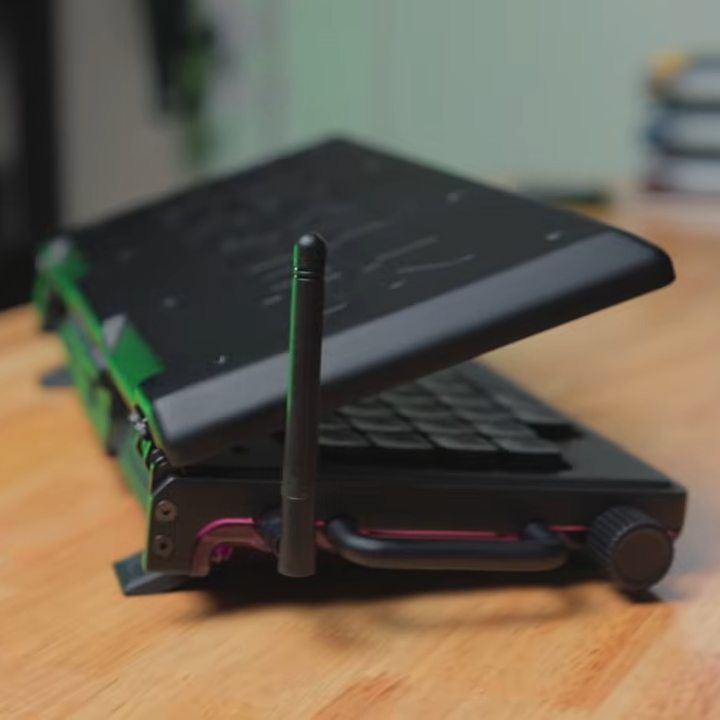
Notably, the CM Deck is custom-built around the Raspberry Pi Compute Model 5. When we first peeped the CM5 the small size was striking, but of course that comes at the cost of having no connectors, supporting hardware, or heat management. That’s something [Salim] embraced because it meant being able to put connectors exactly where he wanted them, and not have to work around existing hardware. A custom PCB let him to lay out his cyberdeck with greater freedom, less wasted space, and ultimately integrate a custom-built keyboard (with RP2040 and QMK firmware).
Even the final enclosure is custom-made, with 3D printing being used to validate the design and PCBway providing finished plastic shells in addition to manufacturing the PCBs. [Salim] admits that doing so was an indulgence, but his delight at the quality of the translucent purple undercarriage is palpable.
[Salim]’s video (embedded below) is a deep dive into the whole design and build process, and it’s a great watch for anyone interested in the kind of work and decisions that go into making something like this. Experienced folks can expect to nod in sympathy when [Salim] highlights gotchas like doing CAD work based on the screen’s drawings, only to discover later that the physical unit doesn’t quite match.
The GitHub repository contains the design files for everything, so give it a browse if you’re interested. [Salim] is no stranger to clean builds, so take a moment to admire his CRT-style Raspberry Pi terminal as well.
Continue reading “Custom Clamshell Cyberdeck Shows Off Underlighting”