If you’re on the edge about getting your amateur radio license, just go do it and worry about the details later. But once you’ve done that, you’re going to need to know a little bit about the established culture and practices of the modern ham — the details.
Toward that end, [McSteve] has written up a (so far) two-part introductory series about ham radio. His first article is fairly general, and lays out many of the traditional applications of ham radio: chatting with other humans using the old-fashioned analog modes. You know, radio stuff.
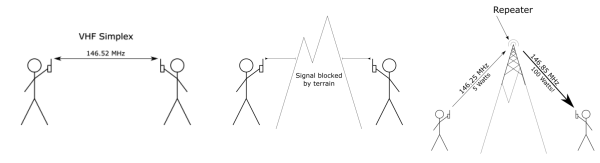
The second article focuses more on using repeaters. Repeaters can be a confusing topic for new radio operators: there are two frequencies — one for transmitting and one for receiving — and funny control tones (CTCSS) etc. This article is particularly useful for the new ham, because you’re likely to have a relatively low powered radio that would gain the most from using a repeater, and because the technology and traditions of repeater usage are a bit arcane.
So if you’re thinking about getting your license, do it already. And then read through these two pages and you’re good to go. We can’t wait to see what [McSteve] writes up next.
Hernando Barragán is the grandfather of Arduino of whom you’ve never heard. And after years now of being basically silent on the issue of attribution, he’s decided to get some of his grudges off his chest and clear the air around Wiring and Arduino. It’s a long read, and at times a little bitter, but if you’ve been following the development of the Arduino vs Arduino debacle, it’s an important piece in the puzzle.
Wiring, in case you don’t know, is where digitalWrite() and company come from. Maybe even more importantly, Wiring basically incubated the idea of building a microcontroller-based hardware controller platform that was simple enough to program that it could be used by artists. Indeed, it was intended to be the physical counterpart to Processing, a visual programming language for art. We’ve always wondered about the relationship between Wiring and Arduino, and it’s good to hear the Wiring side of the story. (We actually interviewed Barragán earlier this year, and he asked that we hold off until he published his side of things on the web.)
The short version is that Arduino was basically a fork of the Wiring software, re-branded and running on a physical platform that borrowed a lot from the Wiring boards. Whether or not this is legal or even moral is not an issue — Wiring was developed fully open-source, both software and hardware, so it was Massimo Banzi’s to copy as much as anyone else’s. But given that Arduino started off as essentially a re-branded Wiring (with code ported to a trivially different microcontroller), you’d be forgiven for thinking that somewhat more acknowledgement than “derives from Wiring” was appropriate.
See what we mean?
The story of Arduino, from Barragán’s perspective, is actually a classic tragedy: student comes up with a really big idea, and one of his professors takes credit for it and runs with it.
[Jesus Echavarria] sent us a link to this cute little tool that he’s built. It’s a dual USB-to-I2C-or-UART adapter, with a few more oddball features thrown in for good measure. If you were electronics Batman, you’d have this on your utility belt.
[Jesus] originally designed the board because he wanted to sniff a bi-directional UART conversation using his computer, and get it all done in inexpensive hardware with minimal fuss. So he looked to the Microchip MCP2221 chip, which is an inexpensive USB to serial and I2C chip, but with some extras. In particular, it’s got four GPIOs, a ten-bit ADC and a five-bit DAC with selectable reference voltage, and it’s all controllable over USB. And [Jesus]’s board has two of them.
Implementing USB on a microcontroller isn’t always that much fun, so we can see why he took the straight-ahead hardware approach. And as a side benefit, he gets all the other kooky functionalities that the chip brings. And we have been introduced to what looks like a neat chip to use in USB and microcontroller projects. We’re going to put one in our next random chip order.
The beginning of the DIY 3D printing movement was a heady time. There was a vision of a post-scarcity world in which everything could and would be made at home, for free. Printers printing other printers would ensure the exponential growth that would put a 3D printer in every home. As it says on the front page: “RepRap is humanity’s first general-purpose self-replicating manufacturing machine.” Well, kinda.
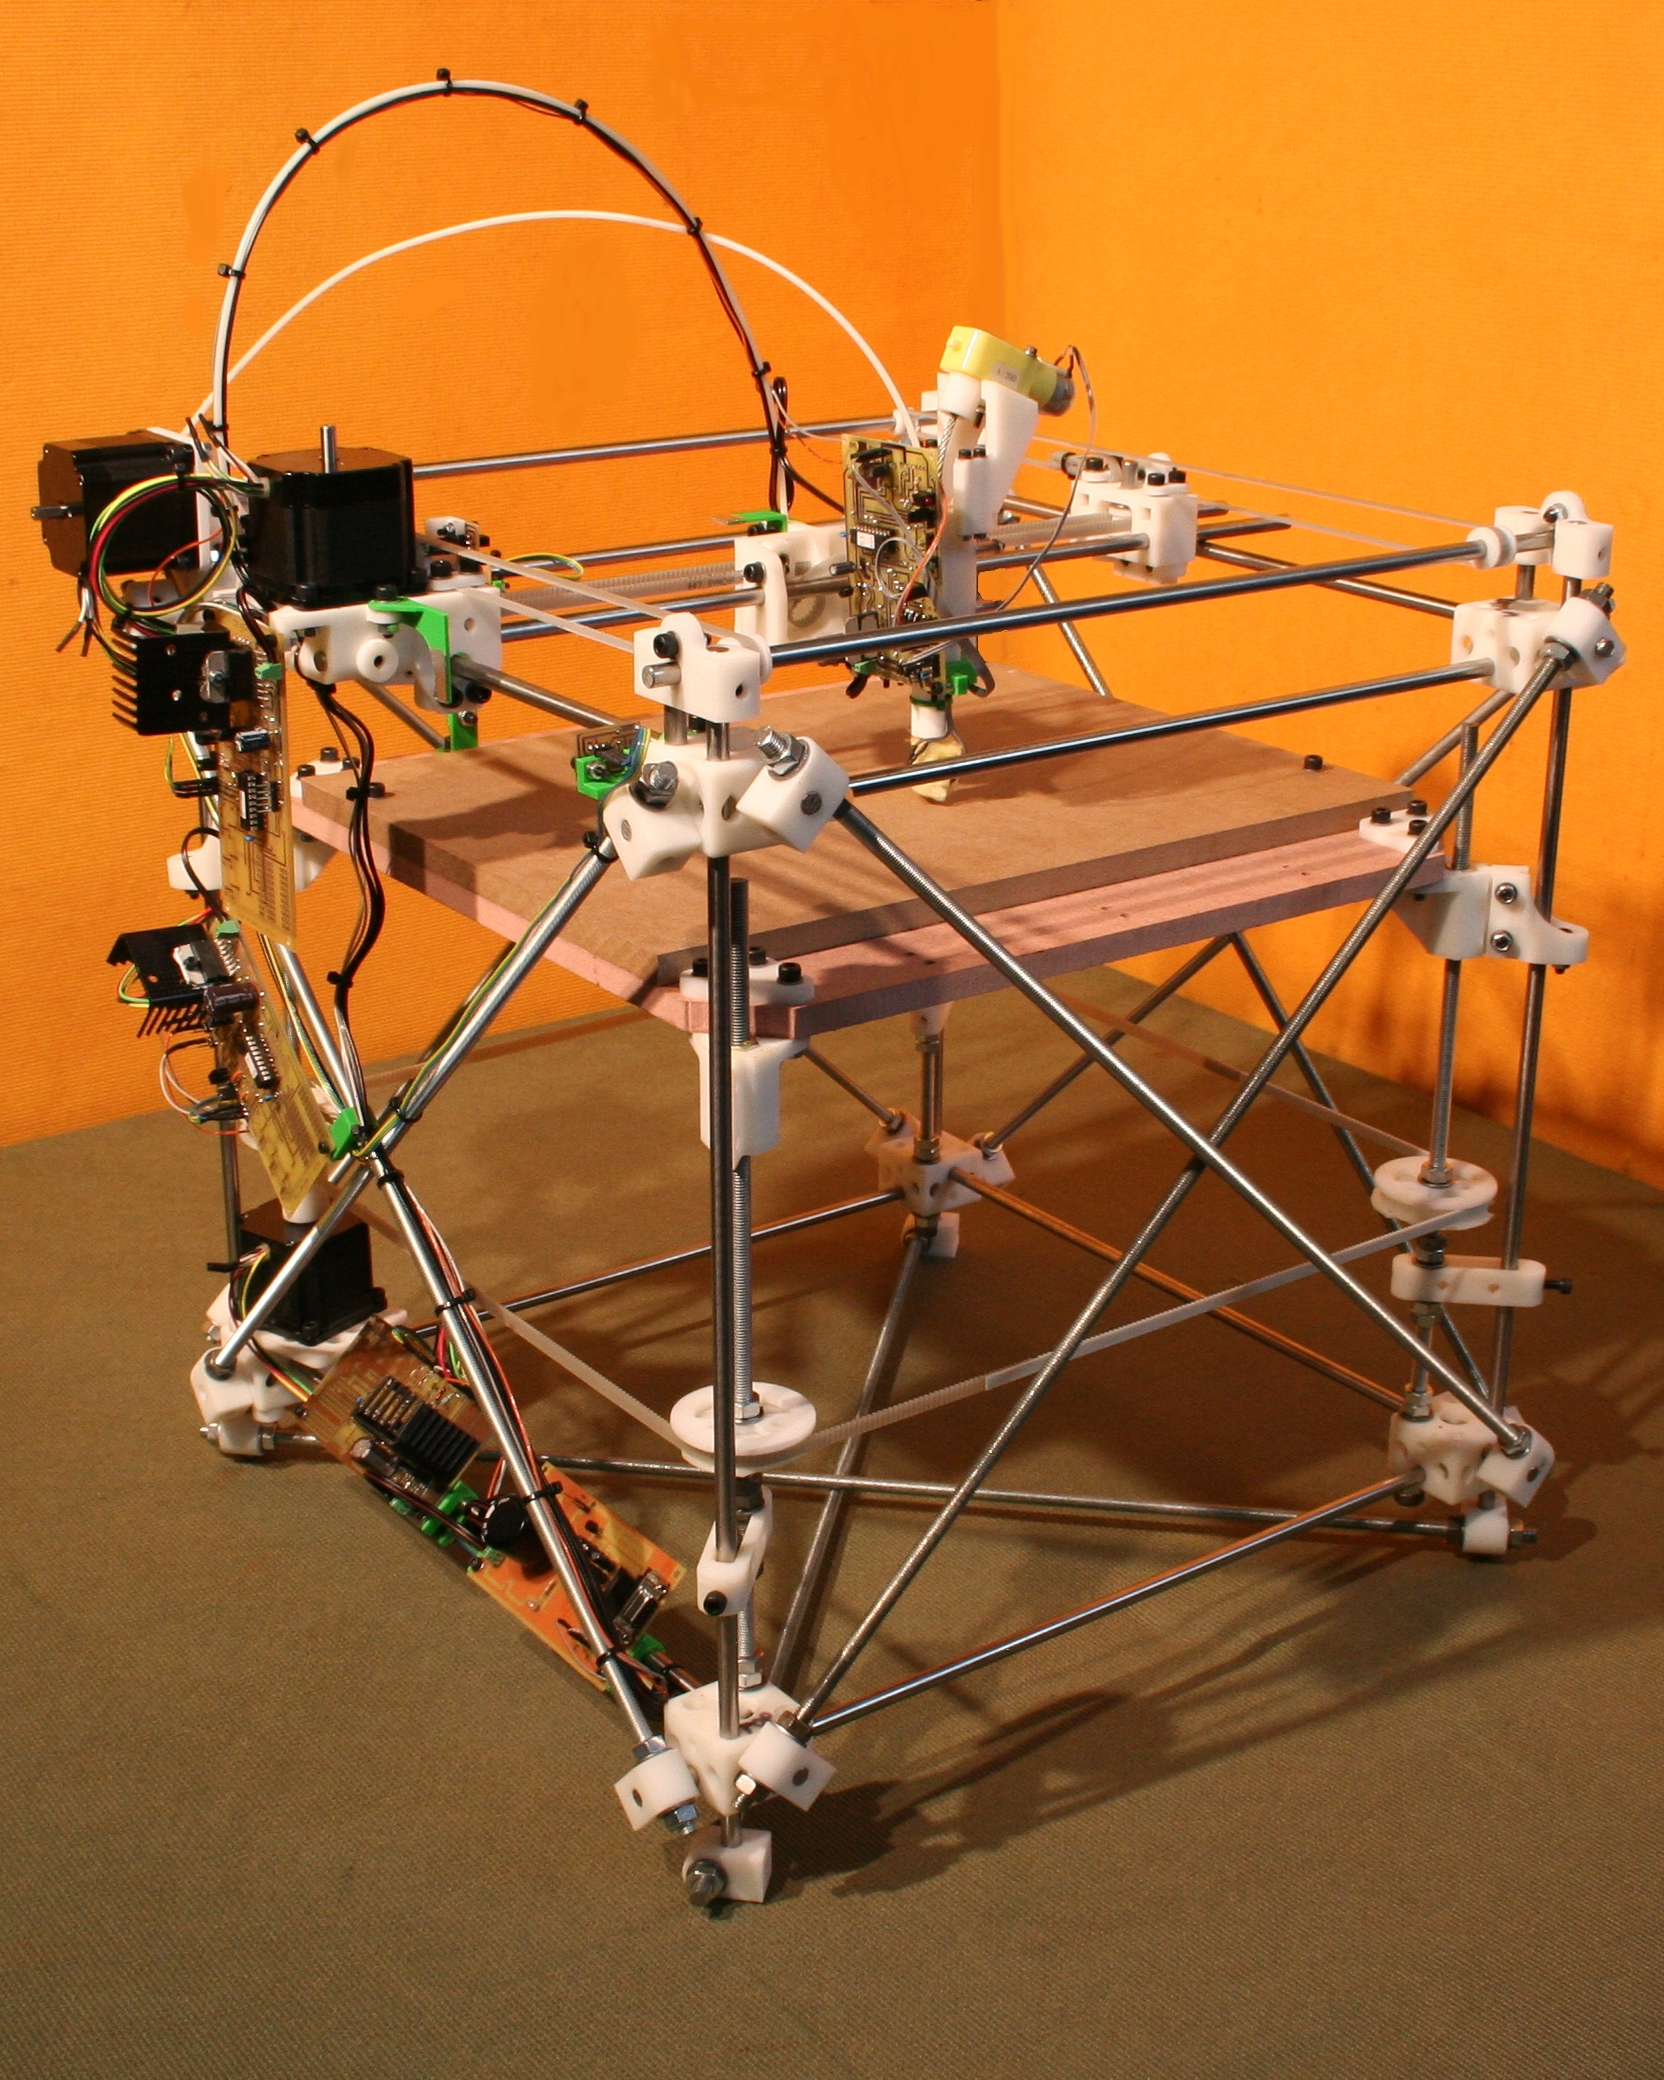
Original Darwin. Photo: Adrian Bowyer, founder of RepRap.
Just to set the record straight, I love the RepRap project. My hackerspace put our funds together to build one of the first few Darwins in the US: Zach “Hoeken” came down and delivered the cut-acrylic pieces in person. I have, sitting on my desk, a Prusa Mendel with 3D parts printed by Joseph Prusa himself, and I spent a fantastic weekend with him and Kliment Yanev (author of Pronterface) putting it together. Most everyone I’ve met in the RepRap community has been awesome, giving, and talented. The overarching goal of RepRap — getting 3D printers in as many peoples’ hands as possible — is worthy.
But one foundational RepRap idea(l) is wrong, and unfortunately it’s in the name: replication. The original plan was that RepRap printers would print other printers and soon everyone on Earth would have one. In reality, an infinitesimal percentage of RepRap owners print other printers, and the cost of a mass-produced, commercial RepRap spinoff is much less than it would cost me to print you one and source the parts. Because of economies of scale, replicating 3D printers one at a time is just wasteful. Five years ago, this was a controversial stance in the community.
On the other hand, the openness of the RepRap community has fostered great advances in the state of the DIY 3D printing art. Printers haven’t reproduced like wildfire, but ideas and designs have. It’s time to look back on the ideal of literal replication and realize that the replication of designs, building methods, and the software that drives the RepRap project is its great success. It’s the Open Hardware, smarty! A corollary of this shift in thought is to use whatever materials are at hand that make experimentation with new designs as easy as possible, including embracing cheap mass-produced machines as a first step. The number of RepRaps may never grow exponentially, but the quality and number of RepRap designs can.
Hacking for the Raspberry Pi Zero is a tricky proposition. Whatever you do, you’re working with a nominal five dollar board, so your hacks can’t be too highfalutin. For instance, a decent PS/2 to USB adapter will cost you as much as the Zero did, if not more. But if you just need to drive your Pi Zero from your old Model M (we hear you!) you’ve got to do it on the cheap.
So when prolific Pi hacker [mincepi] set out to build a PS/2 adapter, some corners were cut. PS/2 is a clocked data protocol, but the good news is that the clock doesn’t start and stop all the time as in I2C or SPI. This means that if you poll the data line at just the right frequency, at least in principle you’ll be able to ignore the clock.
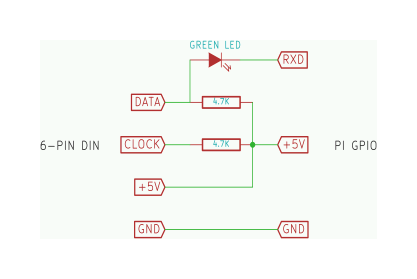
So that’s what [mincepi] did. As you can see in the schematic and the banner image, there’s nothing to it. Two resistors provide the pullup voltage for the clock and data lines. And here’s a gem: a green LED with a drop voltage of about 2 V converts the 5 V data line down to something that the Pi Zero’s 3.3 V won’t get fried with. Cute, and very much in keeping with the spirit of the hack. You might be tempted to scrounge up a 3.3 V zener diode from somewhere just to be on the safe side, but remember, it’s a five dollar computer you’re protecting.
The last piece is a custom kernel module for the Pi that polls the PS/2 data line at just the right frequency. If you’re not a Linux person and “compiling a kernel module” sounds scary, [mincepi] has even put together a nice guide for the Raspbian distribution that he’s using. It should work with minor tweaks for any other distro.
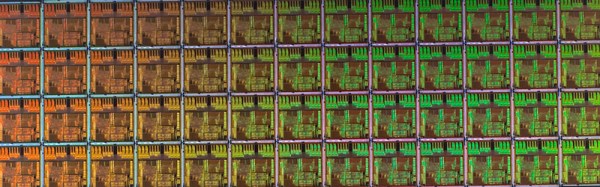
There was a time, a few years back, when the constant exponential growth rate of the number of transistors packed into an IC was taken for granted: every two years, a doubling in density. After all, it was a “law” proposed by Gordon E. Moore, founder of Intel. Less a law than a production goal for a silicon manufacturer, it proved to be a very useful marketing gimmick.
Rumors of the death of Moore’s law usually stir up every couple years, and then Intel would figure out a way to pack things even more densely. But lately, even Intel has admitted that the pace of miniaturization has to slow down. And now we have confirmation in Nature: the cost of Intel continuing its rate of miniaturization is less than the benefit.
We’ve already gotten used to CPU speed increases slowing way down in the name of energy efficiency, so this isn’t totally new territory. Do we even care if the Moore’s-law rate slows down by 50%? How small do our ICs need to be?
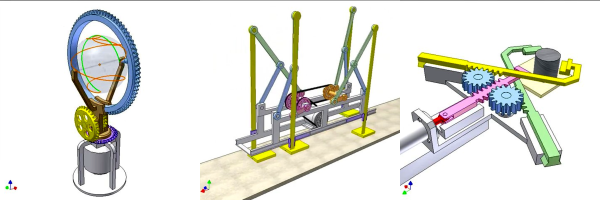
[Nguyen Duc Thang]’s epic 2100 Animated Mechanical Mechanisms is one of the best YouTube channels we’ve ever seen. A retired mechanical engineer, [Nguyen Duc Thang] has taken on an immense challenge: building up 3D models of nearly every imaginable mechanism in Autodesk Inventor, and animating them for your amusement and enlightenment. And, no, we haven’t watched them all for you, but we’re confident that you’ll be able to waste at least a couple of hours without our help.
If you’re actually looking for something specific, with this many mechanisms demonstrated, YouTube is not the perfect lookup table. Thankfully, [Nguyen Duc Thang] has also produced a few hundred pages of documentation (PDFs, zipped) to go along with the series, with each mechanism classified, described, and linked to the video.
This is an amazing resource as it stands, and it’s probably a good thing that we don’t have access to the 3D files; between the filament cost and the time spent shepherding our 3D printer through 2,100 mechanisms, we’d be ruined. Good thing we don’t know about the Digital Mechanism and Gear Library or KMODDL.