Minimal Mighty Mite

If you’re getting started building your own ham radio gear, it’s hard to imagine a more low-tech transmitter than the Mighty Mite, but [Paul Hodges, KA5WPL] took it one step further and rolled his own variable capacitor. (That’s the beer can with tape and alligator clips that you see on the left.)

A Mighty Mite is barely a radio at all. One transistor, capacitor, crystal and inductor in the form of a bunch of wire wrapped around a pill bottle form a minimalist oscillator, and then by keying this on and off with a switch, you’re sending Morse code. [Bill Meara], of the Soldersmoke Podcast, has been a passionate advocate of the Mighty Mite, suggesting that it can be made by scrounging the 3.57954 MHz colorburst crystal from an old analog TV set, which tunes the radio to a legal frequency for ham radio operators. (It will also probably work with other low-MHz crystals from your junkbox, but it won’t necessarily be legal.)

michigan_mighty_mite_schematic
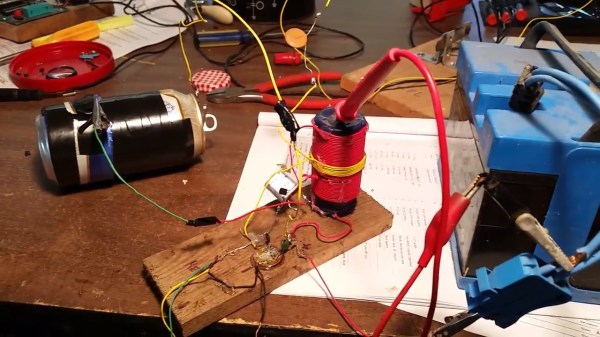
If the crystal is “easily” scavengeable, and the rest of the radio is easily home-made, the tuning capacitor (obtainable from old AM/FM radios) can become the sticking point. So [Paul] cut up two aluminum “beverage” cans, wrapped the inner one in electrical tape, hooked up wires and made his own variable capacitor. By sliding the cans in or out so that more or less of them overlap, he can tune the radio to exactly the crystal’s natural frequency.

If you’re interested in building a Mighty Mite, you should definitely look at the topic on Soldersmoke. There are more build instructions online as well as plans for an optional filter to take off the harmonics if you’re feeling ambitious.

If you’re not a Morse code wiz, we can’t help but note that you could replace the key with a simple FET (we’d use a 2N7000, but whatever) and then you’ve got the radio under microcontroller control. Scavenge through Hackaday’s recent Morse code projects for ideas, and we’re sure you’ll come up with something good.

Continue reading “Minimal Mighty Mite”

Let’s Make Robots Changes Hands: Kerfuffle Ensues

There’s been a bit of a shakeup at Let’s Make Robots (LMR).

LMR is possibly the most popular DIY robotics website around and was started up by a fun-loving Dane, [Frits Lyneborg]. It grew a large community around building up minimal robots that nonetheless had a lot of personality or pushed a new technical idea into the DIY robotics scene. [Frits] says that he hasn’t had time for DIY robotics for a while now, and doesn’t have the resources to run a gigantic web forum either, so he worked out a deal to let the Canadian hobbyist supply company Robot Shop take it over.

LMR has always been a little bit Wild-West, and many of the members quite opinionated, and that’s been part of its charm. So when the new corporate overlords came in, set up “Rules” (which have seemingly been downgraded to “suggestions”) and clarified the ownership of the content, some feathers were ruffled.

A few weeks later, everything looks to be settling back down again. (Edit: Or has it?!? See the comments below.) We wish LMR all the best — everyone loves robots, and LMR is a tremendous resource for the newbie interested in getting into DIY robotics on the cheap. More than a few LMR posts have been featured here at Hackaday over the years. Among our favorites are this drumming rovera clever 3D printed gripper, and this wicked bicycle-style balancer.

Embed With Elliot: Interrupts, The Bad

We love interrupts in our microcontroller projects. If you aren’t already convinced, go read the first installment in this series where we covered the best aspects of interrupts.

But everything is not sunshine and daffodils. Interrupts take place outside of the normal program flow, and indeed preempt it. The microcontroller will put down whatever code it’s running and go off to run your ISR every time the triggering event happens. That power is great when you need it, but recall with Spider-Man’s mantra: With great power comes great responsibility. It’s your responsibility to design for the implicit high priority of ISRs, and to make sure that your main code can still get its work done in between interrupt calls.

Put another way, adding interrupts in your microcontroller code introduces issues of scheduling and prioritization that you didn’t have to deal with before. Let’s have a look at that aspect now, and we’ll put off the truly gruesome side-effects of using interrupts until next time.

Continue reading “Embed With Elliot: Interrupts, The Bad”

Transparent ESP8266 WiFi-to-Serial Bridge

These days, connecting your microcontroller project to a WiFi network is pretty easy — you connect up an ESP8266 to your microcontroller project and pretend it’s a WiFi modem, using these old-school-style AT commands. But what do you do if you need to flash new code into the microcontroller? You can’t reprogram the micro remotely through the ESP8266 because those stupid AT commands get in the way.

The solution? By flashing the esp-link firmware into your ESP8266, you talk directly to the microcontroller over WiFi as if it were connected by a serial cable: the ESP8266 becomes a totally transparent WiFi-serial bridge. Now, with a serial bootloader and an ESP8266 in Wifi-to-serial bridge mode, you can reflash your microcontroller wirelessly, and then telnet in to interact with and debug the system remotely. Once you’ve fixed the bugs, you can re-flash the microcontroller: all over WiFi, without having to climb up a ladder to reach your IoT attic-temperature sensor.

To flash a connected Arduino, for instance, all you need to do is convince AVRDUDE to use the network instead of a locally-connected USB-serial cable: avrdude -p m328p -c arduino -b 115200 -P net:192.168.1.123:23 -U:yourHexFile.hex. The ESP8266 passes the data straight through its TX and RX lines to your microcontroller and everything works as if it were wired.

Configuration to allow the ESP8266 to join your WiFi network takes place on a self-hosted webpage that uses [Sprite_tm]’s esp-httpd standalone server, which makes setup pretty painless. And then after that you can simply telnet to the ESP8266 at port 23 and type away, or do anything else you would with a wired serial connection.

Although the simple bridge mode came first, esp-link looks like it’s growing to be a one-stop shop for all your IoT or microcontroller + WiFi needs. In addition to the serial bridge code, there is also a REST-based microcontroller-to-internet mode and there is bi-directional MQTT support in the wings. We haven’t had a chance to dig into these yet, so if you have, let us know in the comments.

If you want to dig in deeper, head over to [Jeelabs]’ blog for a slightly outdated tour of the project written by the code’s author, [Thorsten von Eicken]. For the most up-to-date development news, follow the very active development of esp-link in this thread on the esp8266 forums.

Embed With Elliot: Interrupts, The Good…

What’s the biggest difference between writing code for your big computer and a microcontroller? OK, the memory and limited resources, sure. But we were thinking more about the need to directly interface with hardware. And for that purpose, one of the most useful, and naturally also dangerous, tools in your embedded toolchest is the interrupt.

Interrupts do exactly what it sounds like they do — they interrupt the normal flow of your program’s operation when something happens — and run another chunk of code (an interrupt service routine, or ISR) instead. When the ISR is done, the microcontroller picks up exactly where it left off in your main flow.

Say you’ve tied your microcontroller to an accelerometer, and that accelerometer has a “data ready” pin that is set high when it has a new sample ready to read. You can wire that pin to an input on the microcontroller that’s interrupt-capable, write an ISR to handle the accelerometer data, and configure the microcontroller’s interrupt system to run that code when the accelerometer has new data ready. And from then on everything accelerometer-related happens automagically! (In theory.)

This is the first part of a three-part series: Interrupts, the Good, the Bad, and the Ugly. In this column, we’ll focus on how interrupts work and how to get the most out of them: The Good. The second column will deal with the hazards of heavyweight interrupt routines, priority mismatches, and main loop starvation: the Bad side of interrupts. Finally, we’ll cover some of the downright tricky bugs that can crop up when using interrupts, mainly due to a failure of atomicity, that can result in logical failures and corrupted data; that’s certainly Ugly.

Continue reading “Embed With Elliot: Interrupts, The Good…”

Tiny Headless Servers Everywhere

Quick, what do “cloud compute engines” and goofy Raspberry Pi Internet of Things hacks have in common? Aside from all being parody-worthy buzzword-fests, they all involve administering remote headless (Linux) installations. It’s for exactly that reason that a new Ubuntu distribution flavor, Ubuntu (Snappy) Core, targets both the multi-bazillion-dollar Amazon Elastic Compute Cloud and the $55 BeagleBone Black.

If that combination seems unlikely to you, you’re not alone. But read on as we hope to make a little more sense of it all.
Continue reading “Tiny Headless Servers Everywhere”

Strange Signals? Sigidwiki!

If you’ve gotten into software-defined radio (SDR) in the last five years, you’re not alone. A lot of hackers out there are listening in to the previously unheard. But what do you do when you find an interesting signal and you don’t know what it is? Head on over to the Signal Identification Wiki! You’ll find recordings and waterfall plots for a ton of radio signals categorized by frequency band as well as their use.

Or, conversely, maybe you’ve just got a new radio and you want to test it out. What would be a fun challenge to receive? Signals in the catalog range from the mundane, like this smart home energy meter from California, or a Chrysler tire-pressure monitoring system to (probably) secret military or intelligence transmissions.

If you’re looking at a waterfall plot and you’re not sure what to make of it, the sigidwiki is worth a look. And it’s a wiki, so if you’ve got a cool signal and you want to add it, create an account and get to it!

Thanks to [mkie] for the tip!