We should come clean right up front. We like blinky stuff, tech art, smoke machines, and dark atmospheric electronic music. This audiovisual installation piece (scroll down) by [supermafia] ticks off all our boxes. As the saying doesn’t really go, writing about site-specific audiovisual art pieces is like dancing about architecture, so go ahead and watch the video (Vimeo) below the break.
Author: Elliot Williams1450 Articles
Logic Noise: 4046 Voltage-Controlled Oscillator, Part One
In this session of Logic Noise, we’ll be playing around with the voltage-controlled oscillator from a 4046 phase-locked loop chip, and using it to make “musical” pitches. It’s a lot of bang for the buck, and sets us on the path toward much more interesting circuits in the future. So watch the intro video right after the break, and we’ll dig straight in.
Continue reading “Logic Noise: 4046 Voltage-Controlled Oscillator, Part One”
No Windows Drivers? Boot Up A Linux VM!
[Voltagex] was fed up with BSODs on his Windows machine due to a buggy PL2303 USB/serial device driver. The Linux PL2303 driver worked just fine, though. A weakling would simply reboot into Linux. Instead, [Voltagex] went for the obvious workaround: create a tiny Linux distro in a virtual machine, route the USB device over to the VM where the drivers work, and then Netcat the result back to Windows.
OK, not really obvious, but a cool hack. Using Buildroot, a Linux system cross-compilation tool, he got the size of the VM down to a 32Mb memory footprint which runs comfortably on even a small laptop. And everything you need to replicate the VM is posted up on Github.
Is this a ridiculous workaround? Yes indeed. But when you’ve got a string of tools like that, or you just want an excuse to learn them, why not? And who can pass up a novel use for Netcat?
Embed With Elliot: The Static Keyword You Don’t Fully Understand
One of our favorite nuances of the C programming language (and its descendants) is the static keyword. It’s a little bit tricky to get your head around at first, because it can have two (or three) subtly different applications in different situations, but it’s so useful that it’s worth taking the time to get to know.
And before you Arduino users out there click away, static variables solve a couple of common problems that occur in Arduino programming. Take this test to see if it matters to you: will the following Arduino snippet ever print out “Hello World”?
void loop()
{
	int count=0;
	count = count + 1;
	if (count > 10) {
		Serial.println("Hello World");
	}
}
Continue reading “Embed With Elliot: The Static Keyword You Don’t Fully Understand”
RIP: HitchBot
Equal parts art project and social media experiment, with a dash of backyard hackery “robotics” thrown in for good measure, hitchBot was an experiment in the kindness of strangers. That is, the kindness of strangers toward a beer bucket filled with a bunch of electronics with a cute LED smiley face.
The experiment came to a tragic end (vandalism, naturally) in Philadelphia PA, after travelling a month across Canada, ten days in Germany, and yet another month across the Netherlands. It survived two weeks in the USA, which is more than the cynics would have guessed, but a few Grand Canyons short of the American Dream.
Professors [David Smith] and [Frauke Zeller] built hitchBot to see how far cuteness and social media buzz could go. [Smith], a former hitchhiker himself, also wanted hitchBot to be a commentary on how society’s attitudes toward hitching and public trust have changed since the 70s. Would people would pick it up on the side of the street, plug it in to their own cigarette lighters, and maybe even take it to a baseball game? Judging by hitchBot’s Twitter feed, the answer was yes. And for that, little bucket, we salute you!
But this is Hackaday, and we don’t pull punches, even for the recently deceased. It’s not clear how much “bot” there was in hitchBot. It looks like it had a GPS, batteries, and a solar cell. We can’t tell if it took its own pictures, but the photos on Twitter seem to be from another perspective. It had enough brains inside to read out Wikipedia entries and do some rudimentary voice recognition tasks, so it was a step up from Tweenbots but was still reassuringly non-Terminator.
Instead, hitchBot had more digital marketing mavens and social media savants on its payroll than [Miley Cyrus] and got tons of press coverage, which seems to have been part of the point from the very start. And by writing this blog post, we’re playing right into [Smith] and [Zeller]’s plan. If you make a robot / art project cute enough to win the hearts of many, they might just rebuild it. [Margaret Atwood] has even suggested on Twitter that people might crowdfund-up a hitchBot 2.0.
Our suggestion? Open-source the build plans, and let thousands of hitchBots take its place.
Shinewave Gamecube Controller Reacts To Smash Brothers
[Garrett Greenwood] plays Smash Brothers, and apparently quite seriously. So seriously that he needed to modify his controller with five Neopixels so that it flashed different color animations according to the combo he’s playing on the controller; tailored to match the colors of the moves of his favorite character, naturally.
All of this happens with an ATtiny85 as the brains, which we find quite ambitious. Indeed, [Garrett] started out thinking he could simply read each of the inputs from the controller directly into the microcontroller at the heart of the whole thing, but then counted up how many wires that would be, and looked at how many pins he had free (six), and thought up a better solution.
[Garrett]’s routine instead reads the single line that the Gamecube controller uses to send back to the console. The protocol is well understood, using long-short and short-long signals to encode bits. The only trick is that each bit is sent in four microseconds, so the decoding routine has to be fairly speedy. To make it work he had to do quite a bit of work. More about that, and the demo video, after the break.
Continue reading “Shinewave Gamecube Controller Reacts To Smash Brothers”
DIY Punch Card System Despite Hanging Chads
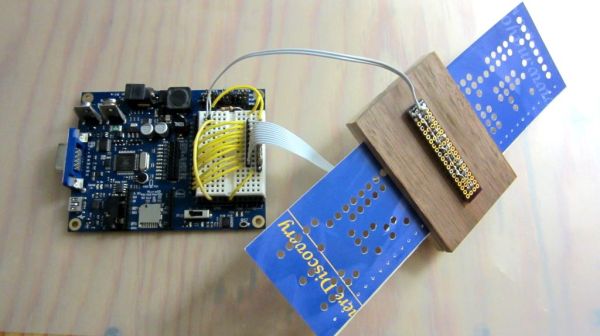
Sometimes you just have parts lying around and want to make something out of them. [Tymkrs] had a robot paper cutter, so naturally they made punch cards. But then, of course, they needed a punch card reader, so they made one of those too. All with stuff lying around the shop.
The Silhouette Portrait paper cutter is meant for scrapbooking, but what evokes memories of the past more than punchcards? To cut out their data, rather than cute kittens or flowers, they wrote some custom code to turn ASCII characters into rows of dots. And the cards are done — you just have to clean up the holes that didn’t completely cut. These are infamously known as hanging chads.
The reader is made up of a block of wood, with a gap for the cards and perpendicular holes drilled for LEDs and photoresistors. This is cabled to a Propeller dev board with some simple firmware. We would have used photodiodes or phototransistors, because that’s what’s in our junk box (and because they have faster reaction time), but when you’ve got lemons, make lemonade.
OK, now that you’ve got a punch card reader and writer, what do you do with it? Password storage comes to mind.
Continue reading “DIY Punch Card System Despite Hanging Chads”


