Retrocomputer enthusiasts will quite often be found pondering the great what ifs of their hobby. What if Commodore had had a half-way decent marketing division is a popular one, but the notoriously penny-pinching ways of Sinclair Research are also a plentiful source. What if Sinclair had won the competition for a computer in UK schools, not only the first time around when Acorn’s BBC Micro scooped the prize, but also what if they’d entered the fray once more in 1983 when there was another chance? [10p6] investigates this possibility, and comes up with a Spectrum desktop computer that you can see in the video below the break.
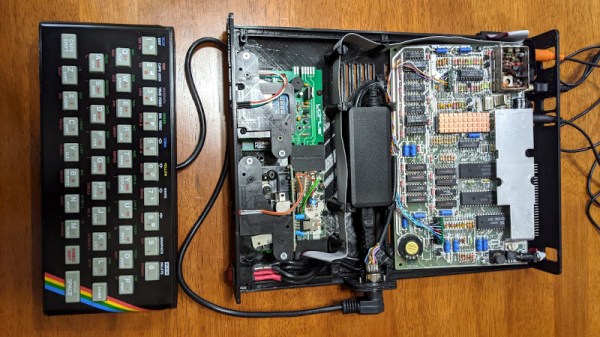
The first two-thirds of the video is devoted to renders which, while pretty to look at, offer nothing of substance. In the later part though we see a build, putting a Spectrum 48k board, Interface 1, and two Microdrives in a slimline case along with a power supply. Meanwhile a ZX rubber keyboard is mounted stand-alone on the end of a cable. It’s a computer that we know would have been an object of desire for many kids back in the day, and we agree with the video that it could have been integrated onto one board without the need for a separate Interface 1. We feel it’s inevitable though that Sinclair’s cost-cutting would have caused something to go astray and there would certainly have been only one Microdrive, even though we like that separate keyboard a lot.
They claim that the STLs will be available from a Facebook group, however unless you happen to have a set of Microdrives and an Interface 1 to go with your Spectrum that you’re prepared to butcher for the project we’re guessing that the chief interest lies in watching it unfold and that some of the ideas might translate to other platforms. Meanwhile if you’re interested in the Microdrive, we did a teardown on them last year.
Continue reading “A Redesigned ZX Spectrum Desktop Computer That Works Surprisingly Well”