A Masterpiece, But Our Maestro Is A CNC Machine

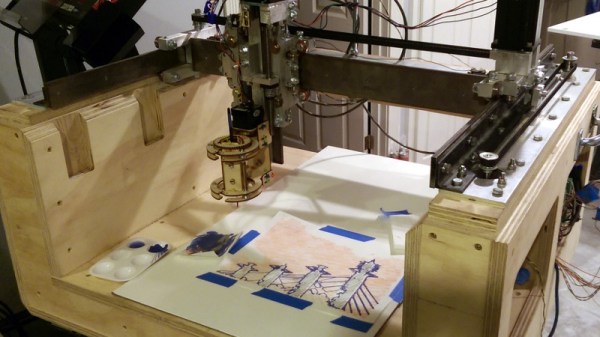
Sometimes we manage to miss projects when they first appear, only to have the joy of discovering them a while later. So it is with [John Opsahl]’s Project Convert To Paint, a CNC painting ‘bot that takes a bitmap image and paints it on canvas as a fine artist would, with a real brush, and paints.

It was first created for the 2017 robotart.org competition, and takes the form of a fairly standard CNC gantry machine. It departs from the norm in its chuck however, as it has what is described as a universal artist chuck, capable of holding a variety of artistic implements. The images are converted from bitmap to vector format, and thence to gcode with the help of a bit of custom Python code.

He’s at pains to say that simply because an image can be converted to a paintable format does not mean that it will produce a good picture. But some of the results are rather impressive, delivering anything from a pointilist effect to a broader brush stroke. We can see that with a bit of experience in the processing it would be possible to create a veritable gallery of masterpieces.

We may have missed this one the first time, but we did catch another drawbot from the same competition.
Hands-On: BornHack’s Light Sabre Badge

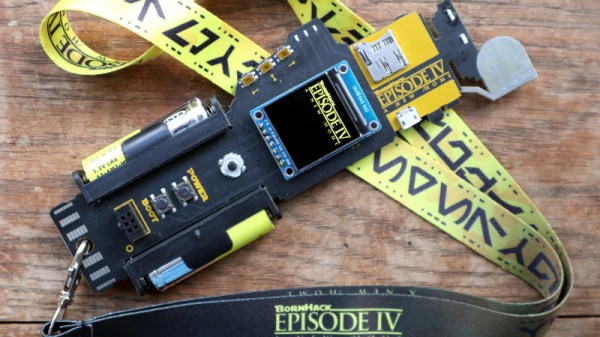
A badge modelled after the handle of a light sabre? Yes Please! This Star Wars themed hardware is the work of hardware designer Thomas Flummer for the 2019 BornHack conference held in Denmark last month. (Check out my roundup of the event if this is the first you’ve heard of it.)

It's not a badge but a light sabre! The front of the BornHack 2019 badge.
It’s not a badge but a light sabre! The front of the BornHack 2019 badge.

It fits the hand nicely, and with clever side-on placement of the two AA battery holders (a trick we first saw with the 2016 Hackday Superconference badge) it also keeps any protruding solder joints away from clothing. In the centre of the badge is the 240×240 pixel colour display that also hides the Silicon Labs Happy Gecko processor and its surrounding components. Three buttons at the edge of the board to the left of the screen are a nice fit for your thumb when holding it in your left hand — a good choice if you happen to leave your right hand behind on a visit to the Cloud City of Bespin.

Between the battery holders lies a four-way joystick, two buttons, and a 6-pin add-on connector. Above it is a micro SD card socket and a micro USB socket, and above them are an IR emitter and receiver. All of the hardware is on the front of the PCB, with no components on the reverse (other than the solder joints for the batteries). But it is there you will find a set of exposed pads for serial and I2C interfaces. Continue reading “Hands-On: BornHack’s Light Sabre Badge” →

Is It A Boat? Is It A Hammock? No, It’s Both!

If you’re enjoying a Western Canadian summer, two of the best ways to do so involve a hammock, or a boat. Seeking to improve on this mighty duo with a hammock-boat combo, [Jarrett] describes his progress at Vancouver Hack Space.

The boat he chose was a one-person catamaran with an aluminium frame and what appear to be inflatable pontoons, while the hammock is one designed for a garden or patio with a steel tubular frame. A design goal was to not modify or destroy the structure of either item, so the challenge was to securely mount the two frames together. A variety of false starts involving bent steel or aluminium were tried, followed by a final success with the aluminium tubes reinforced with more tube inside them, and the hammock attached with U-bolts.

The testing took place on what appears to be a public lake, and the contraption floated well. When it had been pushed out to a landing stage our intrepid adventurer boarded the hammock —  and promptly the whole edifice tipped itself over, depositing him in the drink. Further experimentation revealed that balance was critical, and a revised position could achieve a stable boarding. He paddles off into the sunset as you can see in the video below the break, though as his friends remind him, without his beer.

Commercial hammocks are surprisingly expensive for what they are. Don’t worry though, if you find them to be beyond your budget you can always make a frame for one yourself.

Continue reading “Is It A Boat? Is It A Hammock? No, It’s Both!” →

Because Conventional Laser Harps Aren’t Dangerous Enough

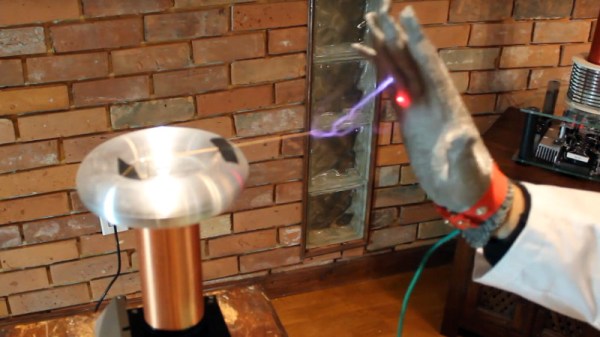
In the late 1980s, the French musician [Jean-Michel Jarre] famously toured with a laser harp. The word among teenage fans was that he had to wear special gloves to stop his hands getting burned, because 1980s teens were both impressionable and didn’t know much about lasers. In fact we’re told by a member of our community who was part of his road crew that the glove was a matter of reflectivity, so laser harps remain relatively harmless and French harpists retain their fingers. To add a bit of spice to the laser harp experience, [James Cochrane] hooked up a laser rangefinder to a Tesla coil to make an instrument with a bit more crackling energy in its performance than the [Jarre] model.

It starts with a laser tape measure modified to serve as an Arduino rangefinder, coupled to custom MIDI code to make a laser harp MIDI controller. The Tesla coil in question happens also to be a MIDI instrument, so the one can control the other with ease. The addition of an earthed chain mail glove allows it to be played in close proximity to the coil, and he rewards us with a rendition of the Star Trek theme. Tesla fun and games behind us, he then gives us a demonstration with a more conventional MIDI instrument.

We’ve had innumerable Tesla coil projects here over the years, if you’re hungry for more we suggest starting with this unusual planar PCB coil design. Meanwhile you can see the laser harp coil in the video below the break.

Continue reading “Because Conventional Laser Harps Aren’t Dangerous Enough” →

Core Rope Memory Makes One Of The Oddest LED Flashers We’ve Ever Seen

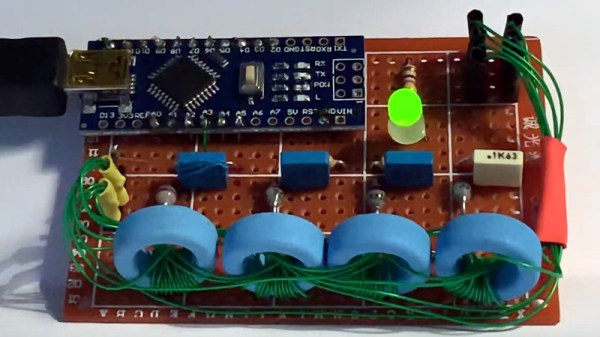
If you’ve heard of core rope memory, it will probably be in the context of vintage computing equipment such as Apollo-era NASA hardware. A string of magnetic cores and sense wires form a simple ROM arrangement, which though long-ago-superceded by semiconductor memory remains possible to recreate by the experimenter. It’s a path [Nicola Cimmino] has trodden, as he’s not only made a few nibbles of core rope memory, but incorporated it with an Arduino as part of one of the most unusual LED flashers we’ve ever seen. The memory holds a known sequence of bits which is retrieved in sequence by the Arduino, and the LED is kept flashing as long as the read values conform to those expected.

The memory itself is simple enough (and not to be confused with magnetic core memory). The cores are ferrite rings that form a sequence of small transformers that become the bits of the memory. Individual bits are set high or low by either passing a sense wire through a core to create a primary, or bypassing it. Multiple sense wires can be used for separate nibbles in the same cores, so for example his four nibbles all share the same four cores. Pulses are sent down the wires, either passing through a core or not, and equivalently picked up or not on sense lines.

In this case the sense wire is driven directly to ground by Arduino pins which means that the circuit is relying upon the current limiting of the ATmega328 to avoid destroying itself, it’s possible we’d add a driver transistor. The bits are read meanwhile from the secondary windings through a diode rectifier and capacitor to an Arduino analogue pin.

Core memory has been paired with an Arduino before on these pages, though of the RAM variety.

Lego House: Right Next To Denmark’s Legoland, But Way Cooler

If there is one thing that most Hackaday readers will know about Denmark, it is that it’s the home of the Lego brick. The toy first appeared at the end of the 1940s from the factory of Ole Kirk Christiansen‘s Lego company in Billund, central Denmark, and has remained inseparable from both the town and the country ever since.

When spending a week in Denmark for the BornHack hacker camp it made absolute sense to take a day out to drive up to Billund and visit the famous Legoland theme park. All those childhood dreams of seeing the fabled attraction would be satisfied, making the visit a day to remember.

Your first view of the Lego House, in the centre of Billund.

The Danes at Bornhack however had other ideas. By all means go to Legoland they said, but also take in Lego House. As a Brit I’d never heard of it, so was quickly educated. It seems that while Legoland is a kid’s theme park, Lego House is a far more Lego-brick-focused experience, and in the view of the Danish hackers, much better.

Continue reading “Lego House: Right Next To Denmark’s Legoland, But Way Cooler” →

Ask Hackaday: At What Point Is Hand Pick And Place Too Much Work?

Just a section from a render of the board in question. It's a daunting task for anyone facing it with a set of tweezers or a vacuum pencil.
Just a section from a render of the board in question. It’s a daunting task for anyone facing it with a set of tweezers or a vacuum pencil.

A friend of ours here at Hackaday has an audacious design in the works that we hope will one day become a prototype that we can feature here. That day may be a little while coming though, because it has somewhere close to a thousand of the smaller SMD components in multiple repeated blocks on a modestly sized board, and his quote from a Chinese board house for assembly is eye-watering. He lacks a pick-and-place machine of his own, and unsurprisingly the idea of doing the job by hand is a little daunting.

We can certainly feel his pain, for in the past we’ve been there. The job described in the linked article had a similar number of components with much more variety and on a much larger board, but still took two experienced engineers all day and into the night to populate. The solder paste had started to spread by the end, morphing from clearly defined blocks to an indistinct mush often covering more than one pad. Our eyes meanwhile were somewhat fatigued by the experience, and it’s not something any sane person would wish to repeat.

Mulling over our friend’s board and comparing it with the experience related above, are we on the edge of what is possible with hand pick-and-place, or should we be working at the next level? Board assembly is a finely judged matter of economics at a commercial level, but when at a one-off personal construction level the option of paying for assembly just isn’t there, is there a practical limit to the scale of the task? Where do you, our readers, draw the line? We’d love to hear your views.

Meanwhile our friend’s audacious project is still shrouded in a bit of secrecy, but we’ll continue to encourage him to show it to the world. It’s not often that you look at a circuit diagram and think “I wish I’d thought of that!”, but from what we’ve seen this fits the category. If he pulls it off then we’ll bring you the result.

PCB image, Andrew Magill (CC BY 2.0).