From Trash To TV

In days gone by, when TVs had CRTs and still came in wooden cabinets, a dead TV in a dumpster was a common sight. Consumer grade electronic devices of the 1960s and ’70s were not entirely reliable, and the inside of a domestic TV set was not the place for them to be put under least stress. If you were electronic-savvy you could either harvest these sets as a source of free components, or with relative ease fix them for a free TV set.

With today’s LCDs, integrated electronics, and electronic waste regulations, the days of free electronics in every dumpster are largely behind us. Modern TVs are more reliable, and when they reach end-of-life we’re less likely to see them.

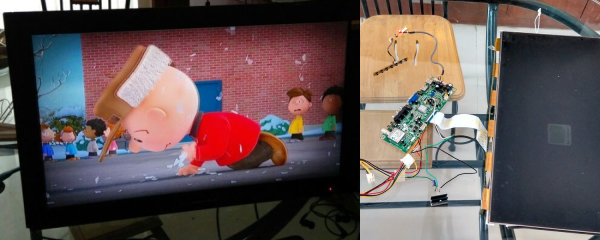
[Sidsingh] happened to find an LCD TV in a dumpster, and being curious as to whether he could fix it or salvage some components, cracked it open to take a look.

He found that somebody had already been into the set and that some components on the PSU and backlight boards showed evidence of magic smoke escaping, having been desoldered by the previous repairer. The signal board was intact though, a generic Chinese model based around a Mediatek MTK8227 SoC. Information was scarce on these boards, but some patient research yielded a schematic for a similar set.

Once he knew more about the circuit, he was able to identify the power lines and discovered that the 1.8v line to the SoC was faulty. This he traced to a switching regulator for which there was no equivalent in his junkbox, so he substituted a linear regulator to obtain the required voltage. The CFL backlight was then removed and replaced with LED strips, and as if by magic he had a working TV set.

This might seem a relatively mundane achievement on the scale of some of the projects we feature on these pages, but it is an important one. In these days of throwaway items it is still not impossible to repair dead electronic devices, indeed as [Sidsingh] found the power supply is most likely to be the culprit. If you score a dead LCD TV then don’t be afraid to crack it open yourself, you may be able to fix it.

As you might imagine, many repairs have made it onto Hackaday over the years. Of relevance to this one is this LCD that inexplicably worked when exposed to light, an LED backlight conversion, and this capacitor swap to return an LCD monitor to health.

A Simple And Educational Brushless Motor

Sometimes there is no substitute for a real working model to tinker with when it comes to understanding how something works. Take a brushless motor for example. You may know how they work in principle, but what factors affect their operation and how do those factors interact? Inspired by some recent Hackaday posts on brushless motors, [Matt Venn] has built a simple breadboard motor designed for the curious to investigate these devices.

The rotor and motor bodies are laser-cut ply, and the rotor is designed to support multiple magnet configurations. There is only one solenoid, the position of which relative to the magnets on the rotor can be adjusted. The whole assembly is mounted on the edge of a breadboard, and can be rotated relative to the breadboard to vary the phase angle at which the drive circuit’s Hall-effect sensor is activated by the magnet. The drive circuit in turn can have its gain and time constants adjusted to study their effects on the motor’s running.

[Matt] has made all the design files available in his GitHub repository, and has recorded a comprehensive description of the motor’s operation in the YouTube video below the break. Continue reading “A Simple And Educational Brushless Motor”

A 3D-Printed Engagement Ring

[Hans Peter] had reached the moment of popping the question. Going down on one knee and proposing to his girlfriend, the full romantic works.

He’s a brave man, [Hans]. For instead of heading for the jeweller’s and laying down his savings on something with a diamond the size of a quail’s egg he decided that his ring should contain something very much of him. So he decided to 3D print a ring and embed a slowly pulsing LED in it. He does mention that this ring is a temporary solution, so perhaps his soon-to-be-Mrs will receive something sparkly and expensive in due course.

To fit his LED and flasher in such a small space he used a PIC10F320 microcontroller that comes in a SOT-23-6 package. This was chosen because it has a handy PWM output to pulse the LED rather than flash it. This he assembled dead-bug style with an 0603 LED, and a couple of hearing aid batteries to power the unit. He has some concerns about how long the hearing aid batteries will power the device, so as he wrote he had better hurry and get on his knees. (He informs us in his tip email that she said yes.)

Surprisingly we’ve covered quite a few engagement ring builds over the years. Closest to this one is an LED ring powered by an induction coil, but we’ve also featured machined titanium rings and some rather nice cast rings.

A Requiem For Meters

Smart Energy GB are the organisation campaigning for the roll-out of smart energy meters in the UK. Publicizing smart meters and making traditional electricity and gas meters look obsolete is part of their mission, and towards the end of last year they came up with a novel idea. “Requiem for Meters”, is a piece of orchestral music performed on instruments made from old gas and electricity meters, and recorded by the Royal Philharmonic Orchestra at the famous Abbey Road Studios in London.

The old meters serve as much as artworks in some of the instruments as they do a function. As far as we can see for example the gas meter violins are electric instruments rather than acoustic, the meter serving only as the physical body of the instrument rather than as an acoustic cavity in the way the body of a traditional violin does. The wind instruments seem to incorporate the cavity of a gas meter in their construction though and the percussive instruments are very much dependent on the properties of the meters themselves, though we’ll leave it to the reader to decide whether the resulting sound is one you’d want regularly on your hi-fi.

The video below the break shows some of the background to the piece, though sadly not as much instrument building detail as we’d like.

Continue reading “A Requiem For Meters”

The AAduino Is An Arduino In An AA Battery

You might think that there could be no form factor that has not as yet had an Arduino fitted in to it. This morning a new one came our way. [Johan Kanflo]’s AAduino is an Arduino clone with an onboard RF module that fits within the form factor of an AA battery. Putting the Arduino inside its own battery pack makes a very neat and compact self-contained unit.

At the heart of the board is an ATmega328 clocked at 8MHz to reduce power consumption and fused to drop out at 1.7V. The radio module is a HopeRF RFM69C which as supplied is a little bit too big for the AA form factor so [Johan] has carefully filed away the edge of the PCB to make it fit. Enough room is left within the shape of an AA cell for a couple of DS18B20 temperature sensors and an indicator LED. He provides a handy buyer’s guide to the different versions of a 3xAA box with a lid, and all the files associated with the project are available in his GitHub repository.

Especially with the onboard radio module we can see that the AADuino board could be a very useful piece of kit. Perhaps for instance it could be used as a very low power self-contained UKHASnet node.

We’ve featured quite a few Arduino clones over the years that try to break the size mould in some way. This stripboard Arduino almost but not quite equals the AAduino’s size, as does this PCB version barely wider than the DIP package of its processor. But the AADuino is a bit different, in that it’s a ready-made form factor for putting out in the field rather than just another breadboard device. And we like that.

Bootstrapping An Amiga 2000 Graphics Card Because Vintage Is Pricey

If you have a computer on your desk today, the chances are that it has an Intel architecture and is in some way a descendant of the IBM PC. It may have an Apple badge on the front, it may run Linux, or Windows, but in hardware terms the overwhelming probability is that it will be part of the Intel monoculture. A couple of decades ago though in the 16- and early 32-bit era you would have found a far greater diversity of architectures. Intel 3-, and 486s in PCs and clones, Macintosh, Commodore, and Atari platforms with the 68000 family, the WDC 65C816 in the Apple IIGS, and the Acorn Archimedes with an early ARM processor to name but a few.

In the tough environment of the 1990s most of these alternative platforms fell by the wayside. Apple survived to be revitalised under a returning Steve Jobs, Atari and Commodore withered under a bewildering succession of takeovers, and Acorn split up and lost its identity with its processor licensing subsidiary going on to power most of the mobile devices we take for granted today.

Surprisingly though some of the 16-bit platforms refused to die when their originators faded from view. In particular Commodore’s Amiga has lived on with new OS versions, new platforms, and community-supported hardware upgrades. News of just such a device came our way this morning, [Lukas Hartmann]’s MNT VA2000, a graphics card for the Amiga 2000 using a GPU implemented on an FPGA.

Continue reading “Bootstrapping An Amiga 2000 Graphics Card Because Vintage Is Pricey”

Save A Spaceship With Spacehack!

York Hackspace needed a demonstration piece to grace their stand at Maker Faires and similar events. Their solution was Spacehack, a multi-player control console based starship emergency simulator game. Each Spacehack player has console with a selection of displays, switches, dials, and levers. Players must operate their controls in response to a series of sometimes confusing commands the game supplies them from their fellow crew members. Each wrong move brings the disaster-prone ship closer to destruction, and the aim is to keep it spaceworthy for as long as possible. The result is an engaging and addictive draw for the hackspace.

Behind the brilliantly designed consoles, silver ducting and pyramidal hub box the game relies on a Raspberry Pi acting as a server and a Beaglebone Black for each player. All resources can be found on York Hackspace’s GitHub repository. The hackspace has a selection of videos on the Spacehack website, the one below the break shows the game as well as a montage of its construction. Continue reading “Save A Spaceship With Spacehack!”