Long-Term Review: Weller Magnastat Soldering Iron

One of the things you find yourself doing as a young engineer is equipping yourself with the tools of your trade. These will be the foundations upon which your career is built in a way that a diploma or degree certificate will never be, for the best degree in the world is less useful if the quality of your tools renders you unable to capitalise upon it. You may be lucky enough to make some of them yourself, but others you’ll lust after as unaffordable, then eventually put the boat out a little to buy at the limit of your meager income.

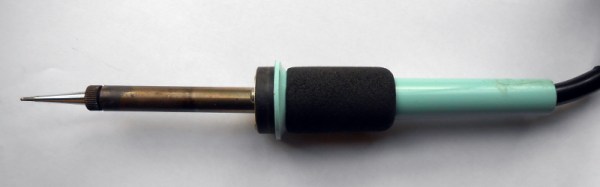
Your bench may have a few of these lifetime tools. They could be something as simple as screwdrivers or you may have one of those indestructible multimeters, but in my case my lifetime tool is my soldering iron. At some time in 1992 I spent about £60($173 back then), a lot of money for a student, on a mains-powered Weller Magnastat. The World Wide Web was still fairly fresh from Tim Berners-Lee’s NeXT in those days, so this meant a trip to my university’s RS trade counter and a moment poring over a telephone-book-sized catalogue before filling in an order slip.

The Magnastat is a simple but very effective fixed-temperature-controlled iron. The tip has a magnet on its rear end which holds closed a power switch for the heating element. When the tip has heated to the Curie temperature of the magnet, it loses its magnetism and the switch opens. The temperature falls to below the Curie temperature and the magnetism returns, the switch closes, the tip warms up again, and the cycle repeats itself. The temperature of the tip is thus dictated by the magnet’s Curie temperature, and Weller provides a range of tips fitted with magnets for different temperatures.

The result is an iron with enough power to solder heat-sucking jobs that would leave lesser irons gasping for juice, while also having the delicacy to solder tiny surface-mount components without destroying them or lifting tracks. It’s not a particularly small or lightweight iron if you are used to the featherlight pencil irons from today’s soldering stations, but neither is it too large or heavy to be unwieldy. In the nearly quarter century I have owned my Magnastat it has had a hand in almost everything I have made, from hi-fi and tube amplifiers through radio transmitters, stripline filters, kits, and too many repairs to mention. It has even been pressed into service plastic-welding a damaged motorcycle fairing. It has truly been a lifetime tool.

Continue reading “Long-Term Review: Weller Magnastat Soldering Iron”
Dragging Teletypes Into The 21st Century

If you are of a certain age you may have worked in an office in the days before the computer revolution, and the chances are that in the corner of your office there would have been a teletype machine. Like a very chunky typewriter with a phone attached, this was an electromechanical serial terminal and modem, and machines like it would have formed the backbone of international commerce in the days before fax, and then email.

Teletypes may have disappeared from the world of trade, but there are a surprising number still in private hands. Enthusiasts collect and restore them, and radio amateurs still use digital modes based on their output. The problem facing today’s teletype owner though is that they are becoming increasingly difficult to interface to a modern computer. The serial port, itself an interface with its early history in the electromechanical world, is now an increasingly rare sight.

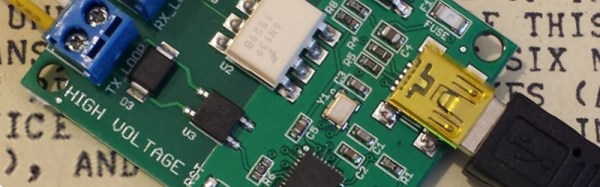
[Eric] has a project which addresses the teletype owner’s interfacing woes, he’s created a board with all the necessary level shifters and an Atmega32u2 microcontroller to translate the teletype’s output to USB.

In his design he’s had to solve a few problems related to such an aged interface. Teletypes have a serial output, but it’s not the TTL or RS232 we may be used to. Instead it’s a high-voltage current loop designed to operate electromagnets, so his board has to incorporate an optocoupler to safely isolate the delicate computer circuitry. And once he had the teletype’s output at a safe level he then had to translate its content, teletypes speak 5-bit ITA2 code rather than our slightly newer 7-bit ASCII.

The result though is a successful interface between teletype and computer. The former sees another teletype, while the latter sees a serial terminal. If you have a teletype and wish to try it for yourself, he’s released the source code in a GitHub repository.

Teletypes have featured a few times here at Hackaday over the years. We’ve had one as an SMS client, another that monitors a Twitter feed, and while it’s not strictly a teletype, a close examination of an Olivetti mechanical serial terminal.

OzQube-1: A Tiny Australian Satellite

Over the last couple of decades we have become used to the possibility of launching a satellite into orbit no longer being the exclusive preserve of superpowers. Since the first CubeSats were launched over a decade ago a myriad others have followed, and scarcely a week passes without news of another interesting project in this area.

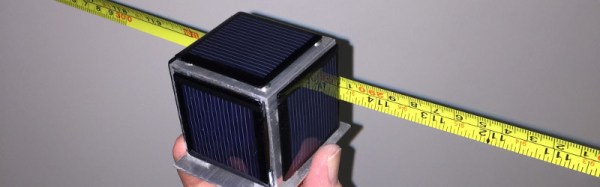
OzQube-1 is just such a satellite, designed for imaging of the Southern Hemisphere, and it’s the brainchild of Australian [Stuart McAndrew]. He’s posted significant details of its design: it’s a PocketQube, at 50mm cubed, an eighth the volume of a CubeSat, and its main instrument is a 2 megapixel camera with a 25mm lens. Images will be transmitted to earth as slow-scan digital video via the 70cm amateur band, the dipole antenna being made from a springy tape measure which will unfurl upon launch. Attitude control is passive, coming from a magnet aligned to ensure the camera will be pointing Earthwards as it passes over the Southern Hemisphere. The project has a little way to go yet, but working prototypes have been completed and it has a Gofundme campaign under way to help raise the money for a launch.

There are plenty of Cubesat and other small satellite builds to be found on the web, here at Hackaday we’ve covered a significant number of them. Many of them are the fruits of well-funded university departments or other entities with deep pockets, but this one comes from a lone builder from Western Australia. We like that, and we wish OzQube-1 every success!

Free Radio On My Phone

If you have owned Android phones, there’s a reasonable chance that as the kind of person who reads Hackaday you will at some time have rooted one of them, and even applied a new community ROM to it. When you booted the phone into its new environment it’s not impossible you would have been surprised to find your phone now sported an FM radio. How had the ROM seemingly delivered a hardware upgrade?

It’s something your cellphone carrier would probably prefer not to talk about, a significant number of phones have the required hardware to receive FM radio, but lack the software to enable it. The carriers would prefer you to pay for their data to stream your entertainment rather than listen to it for free through a broadcaster. If you are someone capable of upgrading a ROM you can fix that, but every other phone owner is left holding a device they own, but seemingly don’t own.

Across North America there is a group campaigning to do something about this situation. Free Radio On My Phone and their Canadian sister organization are lobbying the phone companies and manufacturers to make the FM radio available, and in the USA at least they have scored some successes.

We have covered numerous attempts to use the DMCA to restrict people’s access to the hardware they own, but this story is a little different. There is no question of intellectual property being involved here, it is simply that the carriers would rather their customers didn’t even know that they had bought an FM radio along with their phone. If this bothers you, thanks to Free Radio On My Phone you can now join with others and find a voice on the matter.

It’s interesting to note that many FM radio chips also support a wider bandwidth than the North American and European 88 to 108MHz or thereabouts. In parts of Asia the broadcast band extends significantly lower than this, and the chipset manufacturers make products to support these frequencies. This opens up the interesting possibility that given a suitable app a cellphone could be used to receive other services on these frequencies. Probably more of a bonus for European radio amateurs with their 70MHz allocation than for North American residents.

Via CBC News. Cellphone image: By Rob Brown [Public domain], via Wikimedia Commons.

Flame Triodes Don’t Need Any Vacuum

There is a rich history surrounding the improvisation of electronic components. From cats-whisker foxhole radio detectors using razor blades through radio amateurs trying antique quartz lenses as crystal resonators and 1950s experimenters making their own point-contact transistors, whenever desirable components have been unavailable the ingenuity of hackers and makers has always sought to provide.

In an age when any component you might wish for is only a web browser and a courier package away, you might think there would be no need for such experiments. But it is in our curious nature to push the boundaries of what can be made without a factory at our disposal, so there are still plenty of ingenious home-made components under construction.

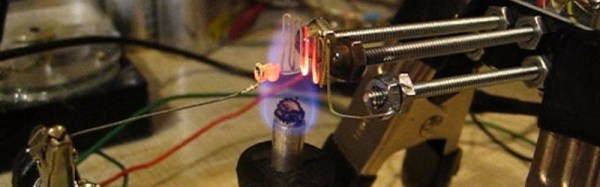
One such experiment came our way recently. It’s a few years old, but it’s a good one. [Nyle Steiner, K7NS] made a working triode without any form of vacuum, instead its medium is a flame. He’s demonstrated it as a rectifier, amplifier, and oscillator, and while it might not be the best triode ever it’s certainly one of the simplest.

In a traditional vacuum triode the current flows as electrons released from a hot cathode and are able to cross the space because there are no gas molecules for them to collide with. The flame triode has an abundance of gas, but the gasses within it and its immediate surroundings are also strongly ionized, and thus electrically conductive. Flame ionization detectors have exploited this phenomenon in scientific instruments for a very long time.

A roaring flame might not be the most practical thing to keep in your electronic equipment, but [Nyle]’s experiment is nonetheless an impressive one. He’s posted a video showing it in action, which you can see below the break.

Continue reading “Flame Triodes Don’t Need Any Vacuum”

Arduino Motion Detection With A Bit Of Wire

It is likely that many of us will at some time have experimented with motion detectors. Our Arduinos, Raspberry Pis, Beaglebones or whatever will have been hooked up to ultrasonic or PIR boards which will have been queried for their view of what is in front of them.

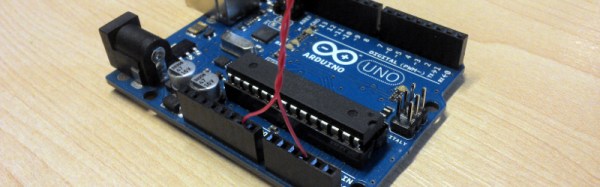
[Connornishijima] has stumbled on a different way to detect motion with an Arduino, he’s polling an ADC pin with a simple length of twisted pair hooked up to it and earth, and reliably generating readings indicating when he (or his cat) is in its vicinity. He’s calling the effect “Capacitive turbulence”, and he’s open to suggestions as to its mechanism. He can only make it work on the Arduino, other boards with ADCs don’t cut it.

Frequent Hackaday featuree [Mitxela] may have also discovered something similar, and we’ve hesitated to write about it because we didn’t understand it, but now it’s becoming unavoidable.

It’s always dangerous in these situations to confidently state your opinion as “It must be…” without experimental investigation of your own. Those of us who initially scoffed at the idea of the Raspberry Pi 2 being light sensitive and later had to eat their words have particular cause to remember this. But this is an interesting effect that bears understanding. We would guess that the Arduino’s fairly high input impedance might make it sensitive to mains hum, if you did the same thing to an audio amplifier with a phono input you might well hear significant hum in the speaker as your hand approached the wire. It would be interesting to try the experiment at an off-grid cabin in the woods, in the absence of mains hum.

If you’d like to give his experiment a try, he’s posted his sketch on Pastebin. And he’s put up the video below the break demonstrating the effect in action, complete with cats.

Continue reading “Arduino Motion Detection With A Bit Of Wire”

A Minitel Terminal As A USB Linux Terminal

If you paid a visit to France in the 1980s the chances are you’d have been surprised to see a little brown screen and keyboard sitting next to the telephones wherever you went. At the time, it was another reason apart from the food, wine, and super-fast trains to envy our Gallic cousins. This was Minitel, their take on the cutting-edge of online data services of the day.

Minitel stood apart from similar services of the day in most other countries, because of its business model. Unlike the UK’s Prestel or West Germany’s BTX for which you had to spend significant money on a terminal, the French Minitel terminals were free. Thus in the early 1980s everybody in France was busy using videotext while most of the rest of Europe was still excited by chipping bits of flint into arrow heads. Or at least, that’s how it seemed at the time to those of us who didn’t have Minitel.

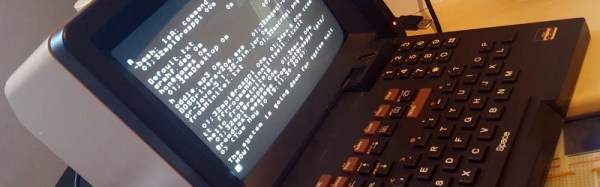
The Minitel service was finally shuttered in 2012, but the terminals can still be found. [Tony Pigram] bought one, an Alcatel Minitel 1, and made it into something useful by turning it into a USB serial terminal for his Raspberry Pi. Surprisingly the physical interface between the Minitel and the USB port is a relatively simple level shifter, but the configuration of both the Minitel and the Pi was anything but.

The problem was that Minitel terminals were meant to work with Minitel, and [Tony]’s difficulties were increased by his machine being an earlier model without the handy function key to access settings found on later terminals. A lot of research paid dividends though, and he now has what must be one of the most compact and stylish CRT serial terminals available. We can’t help noticing it has a QWERTY keyboard and English menus, it would be interesting to know which non-French market it was made for.

We’ve featured an RS-232 integration into a Minitel terminal before here at Hackaday, but if you are really interested in Gallic retro-tech take a look at our discussion of their 8-bit scene.