Fan With Automatic Door Is Perfect For Camper Vans

Ventilation fans are useful for clearing stuffy or stale air out of a space. However, they also tend to act as a gaping hole into said space. In the case of caravans and RVs, an open ventilation fan can be terrible for keeping the interior  space warm, quiet, and free from dust. “Blast doors” or fan blocks are a common way to solve this problem. [Raphtronic] whipped up a duly-equipped ventilation fan to do just that.

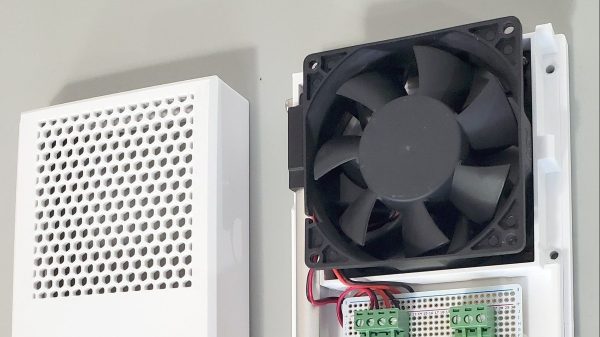
The solution was to create a fan setup with a custom fan holder and a sliding door to block airflow when necessary. [Raphtronic] designed a fan frame for this purpose using parts 3D printed in ASA plastic. This material was chosen such that they could readily withstand the 50 C (120 F) temperatures typical in his Ford Transit camper during the summer. A simple 12 V ventilation fan was then fitted to the frame, along with a sliding door controlled by a 12 V linear actuator.

The mode of operation is simple. A DPDT switch controls the linear actuator. Flipped one way, the linear actuator is fed 12 V in such a polarity as to move it to open the fan door. In this mode, 12 volts is also supplied to the fan to start ventilation. When the switch is flipped the other way, the actuator moves to the closed position, and a diode in the circuit stops the fan spinning backwards. As a bonus, limit switches are built into the linear actuator, so there’s no need for any microcontrollers, “off” switch positions, or additional wiring.

It’s a tidy solution to the problem of ventilating a camper in a clean and effective manner. Files are on GitHub for those wishing to build their own. We’ve seen some great work in this area before, like this off-grid van project that made excellent use of 3D scanning during the build process. If you’ve designed and built your own nifty camping gear, don’t hesitate to drop us a line!

Check Out This PDP-11 Running Unix With A Teletype Terminal

If you’ve spent a few years around Hackaday, you’ve probably seen or heard of the DEC PDP-11 before. It was one of the great machines of the minicomputer era, back when machines like the Apple ][ and the Commodore 64 weren’t even a gleam in their creator’s eyes. You’ve also probably heard of Unix, given that so many of us use Linux on the regular. Well, now you can see them both in action, as [HappyComputerGuy] fires up real Unix on a real PDP-11/73… with a real Teletype Model 33 to boot!

It’s a fascinating dive into the tech of yesteryear, with a rich dose of history to boot. It’s mindboggling to think that video terminals were once prohibitively expensive and that teletype printers were the norm for interacting with computers. The idea of interacting with a live machine via a printed page is alien, but it’s how things were done! We’re also treated to a lesson on how to boot the PDP-11 with 2.11BSD which is a hilariously manual process. It also takes a very long time. [HappyComputerGuy] then shows off the Teletype Model 33 rocking the banner command to great effect.

It’s awesome to see this hardware as it would really have been used back in its heyday. Computing really was different before the microcomputer format became mainstream. It’s not the only PDP-11 we’ve seen lately, either! Video after the break.

Continue reading “Check Out This PDP-11 Running Unix With A Teletype Terminal”

Kinetic Clock Is A Clean Modern Way To Tell Time

Hackers and makers aren’t usually too interested in basic round analog clocks. They tend to prefer building altogether more arcane and complicated contraptions to display numbers for the telling of time. [alstroemeria] did just that with this nifty kinetic clock build.

The basic concept of the kinetic clock is to have a flat plate, which individual segments raise out of to create a physical (instead of illuminated) 7-segment display. This is achieved with servos which push the segments in and out using a small rack mechanism. It’s not a sophisticated build; it simply uses 30 servos to handle all the segments needed to tell time. Thus, the Arduino Mega was the perfect tool for the job. With a sensor shield added on, it has an abundance of IO, driving a ton of servos is a cinch. There’s also a DS3231 real time clock to help it keep accurate time.

Incidentally, it’s a hefty thing to print, according to YouTuber [Lukas Deem] who replicated the project. It took around 85 hours to print, and a total of 655 grams of filament – not counting mistakes and trashed parts.

And if you think you’re having deja-vu, you might well be. We’ve seen a take on this exquisite design before. We liked it then, and we like it now.

Overall, it’s a stylish build that looks as good as your 3D printer’s output will allow. A resin printer would be a massive boon in this regard. Video after the break.

Continue reading “Kinetic Clock Is A Clean Modern Way To Tell Time”

Solar Chimneys: Viable Energy Solution Or A Lot Of Hot Air?

We think of the power we generate as coming from all these different kinds of sources. Oil, gas, coal, nuclear, wind… so varied! And yet they all fundamentally come down to moving a gas through a turbine to actually spin up a generator and make some juice. Even some solar plants worked this way, using the sun’s energy to heat water into steam to spin some blades and keep the lights on.

A solar updraft tower works along these basic principles, too, but in a rather unique configuration. It’s not since the dawn of the Industrial Age that humanity went around building lots of big chimneys, and if this technology makes good sense, we could be due again. Let’s find out how it works and if it’s worth all the bluster, or if it’s just a bunch of hot air.

Continue reading “Solar Chimneys: Viable Energy Solution Or A Lot Of Hot Air?”

E-Ink Photo Frame Is A Simple, Pleasing Design

Regular photo frames are good, but they tend to only display a single photo unless you pull them to bits and swap out what’s inside. [Ben] decided to make a digital photo frame using an e-ink display to change things up, and unlike some commercial versions we’ve seen, it’s actually pretty tasteful!

The build is based on a Nook Simple Touch Reader, which can be had pretty cheaply on the used market. It was chosen for the fact it runs Android, which makes it comparatively easy to hack and customize compared to some other e-readers on the market. Once it’s running a custom Android brew, it can be set to run an app called Electric Sign which simply shows a given website fullscreen and updates it at regular intervals. That turns the Nook into a remotely updateable photo frame in one fell swoop. From there, it just took a little trickery to access an iCloud album to update the frame with fresh pics. Then [Ben] just had to customize a nice photo frame to neatly mount the e-reader with room for the cable to subtly snake out the back.

It’s a simple build that relies on some existing tools already laying around the Internet. That’s nice, because it makes it easy for anyone to replicate themselves at home given the same materials. We’ve seen some other great digital photo frames before, too. If you’ve built your own neat and creative way to display your pics, don’t hesitate to drop us a line!

Weird Trashcan Is Actually Advanced 1990s Robot

[Clay Builds] found a bit of a gem at a recent auction, picking up a Nomadic Technologies N150 robot for just $100. It actually looks like something out of science fiction, with its cylindrical design, red bumpers, and many sensors. He decided to try and restore the research-grade robot to functionality with the aid of modern hardware.

Right away, it’s clear this was an expensive and serious bit of kit. It’s full of hardcore gears and motors for driving three rubber-tired wheels, each of which has a pivoting mount for steering the thing. Through his research, [Clay] was able to find some ancient websites documenting university work using the robots. His understanding is that the platform was designed for researchers experimenting with simultaneous localization and mapping (SLAM) algorithms, and other robotic navigation tasks.

[Clay] doesn’t just settle for a teardown, though. He’s been able to get the platform running again in one sense, using an Arduino to manually run the robot’s drive controls under the command of a gamepad. Without official software or resources, it’s perhaps unlikely he’ll be able to get the stock hardware to do much without completely rebraining it, so this method makes sense. In future he hopes to get the bumper sensors and sonar modules working too.

It’s a fair effort given [Clay] was working with no documentation and no supporting software. We’ve seen similar efforts for robotic arms before, too. Video after the break.

Continue reading “Weird Trashcan Is Actually Advanced 1990s Robot”

Voice Controlled Rover Follows Verbal Instructions To Get Around

Typically, when we want to tell a robot where to go, we either pre-program a route or drive it around with some kind of gamepad or joystick controller. [Robotcus] decided to build a simple robot platform that drove around in response to voice commands instead.

The robot is based around a Raspberry Pi Zero, charged with instructing the motor controllers to drive the ‘bot around. The Pi Zero is also in charge of interpreting the voice commands via Google’s speech recognition tool. The ‘bot itself is a fairly simple design using brushed gearmotors for propulsion and a 3D-printed chassis to tie everything together.

The car is capable of understanding five commands – drive, turn left, turn right, go backwards, and “attack”. The last command simply activates a flipper from the robot’s former life as a battlebot. Things ran okay at first, but the Pi Zero was slow at processing commands. The wheels also had minimal traction. A full-fat Raspberry Pi solved the latter issue, while a new chassis provided better grip.

It’s a simple project, but one that taught [Robotcus] plenty about programming and building small robots in the process. Like so many learning experiences, it’s easy to see how the robot starts out flailing uselessly and eventually starts to perform as intended. It’s always nice to see that progression. Video after the break.

Continue reading “Voice Controlled Rover Follows Verbal Instructions To Get Around”