Raspi Z-Wave Automation Is Automated

raspiAutomationLocksnLights

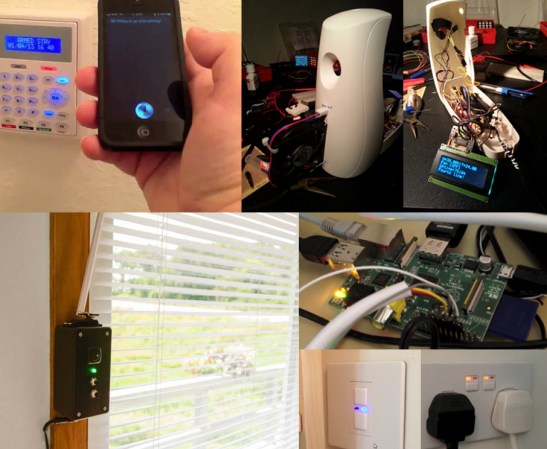
Home automation keeps popping up here at Hackaday, so [Cristian Zatonyl] decided to share his Raspberry Pi-based system with us. This build takes a firm stance on the “automated” side of the automation vs. control debate we had last week: no user input necessary. Instead, [Cristian] relies on geofencing to detect whether he has driven outside the set radius and automatically turns off the lights and locks his door.

The build takes advantage of Z-Wave products, which are your typical wireless remote-control gadgets, but tacks on a third-party “RaZberry” board to a Raspi to give it control over off-the-shelf Z-wave devices. The final step is the integration of a custom iOS app that keeps tabs on the geofence boundaries and signals the Pi to control the lights and the front door lock.

[Cristian’s] tutorial covers the basics and admits that it’s a proof of concept without any security features. Judging by his other YouTube videos, however, we’re sure more developments are underway. Check out the video below for a demonstration of the system, then feel free to speculate on security concerns in the comments. Our article on Z-wave security from a few years ago might be a good starting point.

Continue reading “Raspi Z-Wave Automation Is Automated”

Hack A Solar Garden Light Into A Flashlight

solargardenflashlight

While browsing through his local dollar store, [Taylor] came across a suspicious looking rock that, upon closer inspection, turned out to be a solar garden light. He scooped it up, took it home and cracked it open, modding it to function as a handheld solar flashlight.

Inside was a pathetically small 40mAh rechargeable battery, which he upgraded to a more standard rechargeable AA. The garden rock came pre-built with its own boost converter to kick up the voltage for the LED, but it was fairly dim. We’re guessing [Taylor] didn’t bother reverse engineering the converter and instead simply did some trial and error, but he managed to increase the LED’s brightness by slapping on a different value inductor.

As fun as it may be to have a rock for a flashlight, [Taylor] decided to cobble together a custom case out of a spare USB charger, making a battery holder and adding a pushbutton. The result is a handy solar flashlight that takes around five hours to charge. Check out some other custom lights: a lithium-powered PVC flashlight or one with a snazzier aluminum body and interchangeable heads.

Ask Hackaday: What Is “Home Automation”?

homeAutomationCollage

We’re not entirely sure what’s become of the term “home automation.” The definition seems to have settled for any user interface in the home—via tablets, phones, handheld remote controls, etc. Some of these devices lack any form of automation and instead require manual input. Even Wikipedia’s home automation article suggests a move toward this trend, offering the following definition (emphasis ours):

It is automation of the home, housework or household activity. Home automation may include centralized control of lighting, HVAC (heating, ventilation and air conditioning), appliances, security locks of gates and doors and other systems, to provide improved convenience, comfort, energy efficiency and security.

Though “automation” is clearly included in the first sentence, one could interpret the bolded potion as meaning either:

  • Truly automated systems may also include centralized control (as a feature).
  • The category of home automation also includes systems that merely provide centralized controls.

So, are automated components optional? Judging by the phrasing of projects submitted to our tips line: yes sir. Truly automated systems exist, but if you browse through any home improvement store’s “home automation” section, you’ll be pummeled by a string of remote-controlled light dimmers and outlets. How many of these are designed to interact with sensors as feedback systems or otherwise function unattended?

Our articles often favor an “automation-optional” categorization. Should we, however, reserve the “automation” label for projects like the light switch based on room occupancy and deny other builds, like the voice-activated lights/outlets system or the RasPi lighting and audio control via web interface? Hit up the comments and help shed some light on how to properly use the terminology.

Electric Bicycle Hack Is Hilariously Simple

Necessity may be the mother of invention, but limited resources give birth to some of the best hacks. [joejoeboom’s] 5-minute electric bike conversion probably can’t drive you into the next town, but it can scoot you around your neighborhood.

[jojoeboom] found a cordless drill at a local hardware store for $15, which he simply zip-tied to the bicycle’s frame. He positioned the drill so the chuck pressed firmly against the side of the bicycle’s rear wheel, creating a simple friction drive system. To create a throttle, [joejoeboom] strapped a spare hand brake to the handlebar and wrapped the brake’s cable around the drill’s trigger. Several carefully placed zip ties hold everything in place and allow the cable to tug at the trigger when the hand brake is squeezed.

Watch the bike poking around in a video below, and for some extreme contrast check out the 102-mph bicycle build from earlier this summer.

Continue reading “Electric Bicycle Hack Is Hilariously Simple”

Custom Wireless Headphone Charging Station

wirelessHeadphoneChargingStation

We’ve come to expect quite a lot of convenience from our technology, to the point where repeatedly plugging in a device for recharging can seem tedious. Hackaday regular [Valentin Ameres] decided to ditch the plugs and built his own wireless headphone charger. We’ve seen [Valentin’s] work before, and one thing’s for certain: this guy loves his laser cutter. And he should, considering it’s churned out key components for a gorgeous Arc Reactor replica and his Airsoft Turret. [Valentin] fired it up yet again to carve the charging stand out of acrylic, then used a small torch and the edge of a table to bend the stand into shape.

He sourced the needed coils online and soldered the receiving coil to a spare miniUSB plug. These components are glued onto a laser-cut acrylic attachment, which fits against the side of the headphone and is held in place by plugging directly into the earpiece’s miniUSB jack. The headphones rest on the laser-cut charging stand, which has an extrusion of acrylic on one side that holds the emitter coil in position against the receiver coil. [Valentin] also added a simple momentary switch at the top of the stand to activate both the emitter coil and a status LED when pressed by the headphones.

Stick around for a video of the build below, and check out some other headphone hacks, like adding a Bluetooth upgrade or making a custom pair out of construction earmuffs.

Continue reading “Custom Wireless Headphone Charging Station”

LED-Guided Piano Instruction

LEDpianoGuide

[Kay Choe] can’t play the piano. Rather, he couldn’t, until he converted his keyboard to include LED-guided instruction. [Kay] is a microbial engineering graduate student, and the last thing a grad student can afford is private music lessons. With $70 in components and a cell phone, however, he may have found a temporary alternative.

The build works like a slimmed-down, real-world Guitar Hero, lighting up each note in turn. We’ve seen a project like this before, with the LEDs mounted above the keys. [Kay]’s design, however, is much easier to interpret. He embedded the LEDs directly into the keys, including ones above each black key to indicate the sharps/flats. An Android app takes a MIDI file of your choice and parses the data, sending the resulting bits into an IOIO board via USB OTG. A collection of shift registers then drives the LEDs.

For a complete novice, [Kay] seems to benefit from these lights. We are unsure whether the LEDs give any indication of which note to anticipate, however, as it seems he is pressing the keys after each one lights up. Take a look at his video demonstration below and help us speculate as to what the red lights signify. If you’re an electronics savant who wants to make music without practicing a day in your life, we recommend that you check out [Vladimir’s] Robot Guitar.

Continue reading “LED-Guided Piano Instruction”

Halloween Doorknocker Decoration Hack

halloweenDoorHack

If you’re new to hacking, Halloween is a great excuse to get started, and [Chuck] has put together an inexpensive animated Halloween decoration that you can show off on your front door. After scoring a $5 plastic Halloween doorknocker from Wal-Mart, [Chuck] gathered together a small pile of components and then set about breathing some life (death?) into its scary but motionless face.

Though he opted to use a Digispark, you should be able to use any Arduino that is small enough to stuff inside the plastic head. [Chuck] cut some holes in the eyeballs and glued in two RGB LEDs, then cobbled together a quick-and-dirty mount in the mouth area to hold a small servo. The lights and the servo are wired to the Digispark, which turns the lights on and instructs the servo to slam the ring against the door. It’s is battery powered and currently has only two settings: on or off. This should be good enough to scare the kids for this year, but [Chuck] has plans to add a much-needed motion sensor and sound via a Bluetooth connection. 

As simple as this build is, it could be just the thing to get you in the holiday spirit, or to introduce the young hacker in your home to the world of electronics and coding. Check out the short video of the doorknocker after the break, then swing by [Chuck’s] website for detailed build instructions and his Github for the source code. If you’re having trouble finding this doorknocker at Wal-Mart, [Chuck] recommends a similar one on Amazon. Don’t stop now! Make some Flickering Pumpkins too, or if you want a challenge, hack together your very own Pepper’s Ghost illusion.

Continue reading “Halloween Doorknocker Decoration Hack”