Ask Hackaday: Can We Do Better Than Phonebloks?

Our tips line is on fire with suggestions for us to cover the modular cell phone concept named Phonebloks. The phone’s designer states the problem as follows:

A phone only lasts a couple of years before it breaks or becomes obsolete. Although it’s often just one part which killed it we throw everything away since it’s almost impossible to repair or upgrade.

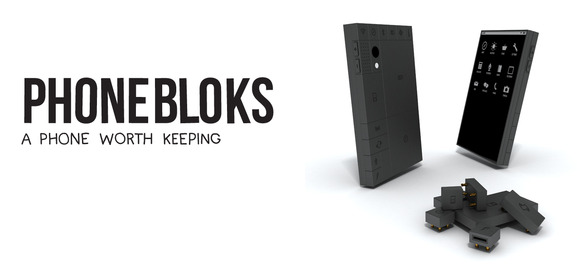
His solution is the above pictured phone, with modular components for each feature: wifi, camera, battery, etc. Rather than upgrade your entire phone, upgrade just the parts you need. A wave of followers have thrown their support behind this concept, and perhaps their hearts are in the right place hoping to reduce waste and cost. Behind the scenes here at Hackaday, however, the response has been a unanimous facepalm. The primary objection (other than design implausibilities) should be obvious: dividing the phone into exchangeable bits does not inherently reduce waste. Those bits have to go somewhere.

Now, don’t rush to the comments section to identify additional problems; there’s a juicy Reddit thread for that. Instead, we want to take the high road: Can we do better? Can we make a phone for the future that is less wasteful to produce, more easily recycled, and possibly upgradable? What would be included in its features, and how would we do it? Check out a video of the concept phone and tell us your alternatives after the break.

Continue reading “Ask Hackaday: Can We Do Better Than Phonebloks?”

Motobrain: A Bluetooth Controlled PDU

motobrain

If you’ve ever considered modding your vehicle’s electrical system, [Josh Oster-Morris’s] Motobrain PDU (power distribution unit) might make life easier by providing precision control and protection for auxiliary 12V outputs in your car, bike, boat, etc. Once the Motobrain is paired to a phone over Bluetooth, a companion app displays real-time telemetry and lets you program up to 8 output channels.

Each of these 8 outputs can be directly controlled in the app, but the real power lies in the 4 programmable inputs. Here you can tie systems together and dictate exactly how one should respond to the other, e.g. detecting high-beams and disabling the auxiliary light bar you added. There’s even a “delayed on” option. Programming also has PWM capabilities, so flipping a switch could raise the brightness of some lights over 4 levels of intensity. If those lights are LEDs, the Motobrain can also provide constant current to specification. Each circuit can supposedly handle 15A continuous current and has a programmable circuit breaker, which would make fuses optional.

You can watch an overview video after the break to get a better idea of how it all works, but stop by [Josh’s] project blog to see all the features explained across multiple videos and blog posts as they are developed and tested.

Continue reading “Motobrain: A Bluetooth Controlled PDU”

Tooth Fairy Goes Pneumatic

pneumaticToothFairy

Kids’ fantasy figures are long overdue for some tech upgrades, so MAKE’s [Jeff Highsmith] carved a few holes in the walls and built a pneumatic transport system for his children to deliver their teeth to the Tooth Fairy. The project uses a system of 1.5″ PVC pipe with a central vacuum in the attic and two endpoint stations, one in each child’s room. Alternating which station has the closed valve and open door dictates the airflow path and shuttles a small plastic travel bottle from one station to the next.

Each station has its own iPhone interface that sends data to a Raspberry Pi and relays information, including a simulated map indicating the travel path taken by the tooth. Apart from controlling the vacuum via one of the Pi’s GPIO, the phone serves primarily as a visual distraction for the children while one parent sneaks off into the other room and replaces the tooth with some pocket change. [Jeff] made sure to add a locking door on each station to limit access and hopefully keep the mystery alive.

Watch his son’s face light up with sheer glee at the whole event in the video below, and regret that your childhood happened before the maker revolution. Then celebrate your adulthood with a beer fetching robot.

Continue reading “Tooth Fairy Goes Pneumatic”

DIY Electricity And Internet For Burning Man

bmPowerInet

Despite this being [Kenneth Finnegan’s] first Burning Man, the guy came prepared and stayed connected by setting up a beefy electricity supply and a faint yet functional internet connection. If you saw [Kenneth’s] Burning Man slideshow, you know that the desert is but a mild deterrent against power, water, and even temporary runways.

He borrowed a 20V 100W solar panel from Cal Poly and picked up a bargain-price TSMT-20A solar charge controller off eBay. The controller babysits the batteries by preventing both overcharging and over-discharging. The batteries—two Trojan-105 220Ah 6V behemoths—came limping out of a scissor lift on their last legs of life: a high internal resistance ruled out large current draws. Fortunately, the power demands were low, as the majority of devices were 12VDC or USB. [Kenneth] also had conveniently built this USB power strip earlier in the year, which he brought along to step down to 5VDC for USB charging.

Internet in the desert, however, was less reliable. A small team provides a microwave link from civilization every summer, which is shared via open access points in 3 different camps. [Kenneth] pointed his Ubiquiti NanoStation at the nearest one, which provided a host of inconvenient quirks and top speeds of 2-20kBps: enough, at least, to check emails.

Accelerometer Poi

accelerometerPoi

Even if you’ve never attended a rave, you have probably seen one portrayed on film or television. Those glowing spheres-on-a-string being swung around are called poi, and [Matt Keeter] has designed a pair with an accelerometer upgrade. Poi have a long history and were originally made from plants, but contemporary examples usually feature some kind of light, whether it’s fire, LEDs, or even glowsticks tied to shoelaces.

This build required double-sided PCBs and [Matt] had to custom make the protective covering that slips over the board. The poi are powered by 2 AA batteries fed into a 5V boost regulator. But wait, no microcontroller and no PWM? Actually, we think it’s quite clever that [Matt] took the output from the accelerometer and fed into an inverting amplifier. This keeps the voltage constant while allowing the accelerometer to vary the current. Had he used PWM, the fast motion of the swinging poi would instead produce a blinking effect.

An additional trimmer potentiometer accounts for variability in the accelerometers’ output by adjusting the default brightness. If the recent recap of Burning Man has you excitedly planning to attend next summer, you’d probably find plenty of opportunities to use these in the desert.

NES: Nixie Entertainment System

nixieNES

[Bradley W. Lewis] is no stranger to Nixie clock builds, and he felt his latest commission was missing something. Instead of merely mounting the Nixie clock into a case resembling an NES console, he goes full tilt and makes it into an NES console emulator. After some work on the milling machine, a wooden box has room to squeeze in a few new components. [Bradley] originally planned to mount only an Arduino with an ArduNIX shield to handle the Nixie clock, but the emulator demands some space saving. Flipping the Arduino on its side freed up plenty of room and the shield still easily connects to the adjacent Nixie tube board.

A Raspberry Pi serves as the console emulator and was mounted close to the side of the case to allow access to its HDMI port. The other ports from both the Arduino and RasPi stick out of the back, including an extension to the Pi’s RCA video out and buttons to set both the hour and minutes of the clock. The two surplus NES buttons on the front of the case control power to the RasPi and provide a reset function for the Nixie clock.

If that isn’t enough Nixie to satisfy you, check out the WiFi Nixie counter.

Game Of Light

gameoflight

Hyperrealistic graphics may be the standard for gaming, but Game of Light (Warning: Loud video volume) is a welcomed detour into vivid, low-res delight. Built for a course at the University of Oslo by [Abdimaalik], [Martin], [Andre], [Eivind], and [Stian], Game of Light has a handful game options, some of which allow up to four players. The build uses eight DE-DP14211 LED dot matrix boards, each with 32×16 bi-color LEDs and a built-in HT1632C display controller to handle the multiplexing. They are mounted together to form the 64×64 resolution display.

The box was custom-made out of what we suspect is acrylic, and uses some 3D printed pieces to offset the top from the bottom and to hold components in place. SNES controllers send data to the Arduino, which also runs the games and feeds the display controllers. Buried in the mix are two fans to keep the components cool. Everything is open source, so race to Github for source code and the games.

For another LED matrix project with a lot of gaming potential, check out [Brad’s] PS2 mouse interface that lets him interactively draw in real-time.

Continue reading “Game Of Light”