Keurig Hack Runs A Water Supply Line To Your Coffee Maker

We were skeptical about Keurig machines when we first heard about them. Although we still scoff at the added waste of throwing away a plastic container of used grounds for each cup of coffee made, we tried one at the in-laws and it does brew a great cup of Joe. One of the draws of the machine is that it does it pretty much automatically as long as you fill it with water first. [Joseph Collins] is even taking the work out of that by adding a water supply line to his Keurig.

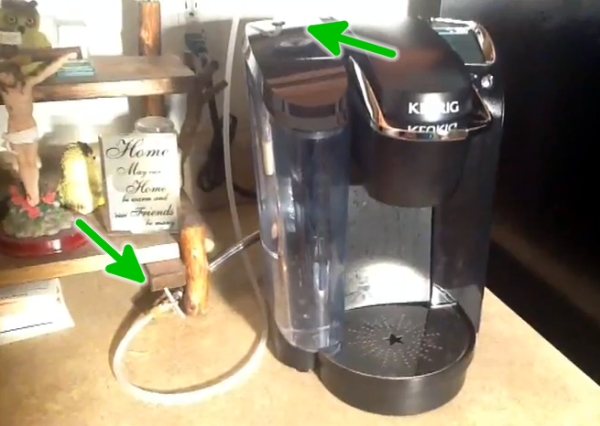
His coffee maker sits right next to the fridge, which has its own water supply. So one day he thought, why not run a line to the coffee maker as well? As far as plumbing projects go it’s very simple. He pulled out the refrigerator and added a T-fitting to split the water supply line. From there he ran an extension next to the coffee maker that terminates with a valve being pointed to by the arrow in the lower left. The plastic supply line leaving the valve passes through a rubber grommet in the lid of the water reservoir pointed to by the other arrow.

[Joseph] figures the whole project came in at under $30 and shows how he did it in the clip after the break.

Continue reading “Keurig Hack Runs A Water Supply Line To Your Coffee Maker”

Bending And Printing A Curved Camera Dolly Track

How lucky is [Transistor Man] that he found the materials for the tracks of this curved camera dolly just lying around the shop? The three rails making up the system are quarter-inch diameter and he was able to bend them by hand with the help of a 55 gallon drum. But to hold them in place so that the camera dolly would run smoothly he had to find a way to precisely space the tracks.

The robot arm you see in the picture above is a 3D printer which ended up being the easiest solution to the problem. With a bit of trial and error he found a design that holds the tracks in place without interfering with the camera sled’s progress. From there he devised a mounting system which uses three camera tripods to hold the track. You can see a test video shot from the dolly track embedded after the jump. It’s the opposite of the bullet time rigs [Caleb’s] been working on lately.

We figure the spacers would work for any track shape, but if you’re going for a complicated route you need some type of pipe bender to help out.

Continue reading “Bending And Printing A Curved Camera Dolly Track”

Hacking A Sigma Lens To Work With A Canon Camera

sigma-lens-canon-camera

[Martin Melchior] wanted to use an older Sigma lens with his Canon camera. The problem in trying to do so is that the camera uses a different communications protocol than the lens is expecting. But if you don’t mind cracking it open and doing a little microcontroller work you’ll be using the lens in no time.

The hack uses an ATtiny24 chip, two resistors, and a capacitor. You won’t need to do any coding, but you do need to burn the firmware to the chip (you can use an Arduino if you don’t have a proper AVR programmer). There’s plenty of room for the add-on hardware inside the lens so after reassembling the enclosure you won’t even be able to tell that the unit was altered. Unfortunately it doesn’t look like [Martin] took any pictures of the lens with his added electronics, but the schematic he posted should be enough for you to get the job done yourself.

If you’re into these types of DSLR hacks you should try something extreme, like using view camera parts with your modern camera.

This GPS Logger Is So Small…

small-gps-logger

How small is it? Two things should give you a good sense of scale, the SD card slot on the lower right, and the slide switch on the upper left. This minuscule module is an all-in-one GPS logger which [J3tstream] built.

Main system control is provided by a Teens 2.0 board. If you look really closely you’ll see the SD card slot is actually a breakout board which mounts on top of the Teensy’s pinheaders. Also on the board is a PA6B GPS module with a few passive components to support it. The back side of the board hosts a Lithium Ion battery from an old phone. Note the mangled pin header which works as connectors for the battery. [J3tstream] even built a charger into the project. He’s using an LTC4054 chip to handle the charging. We were a bit confused at first because we didn’t see a way to connect external power. But he goes on to explain that the USB port on the Teensy board is used for charging. Just plug in USB and press the button to get things started.

Acrobatic Tricopter Inspired By The Oblivion Movie Trailer

tricopter

There have been a ton of commercials for the new [Tom Cruise] movie called Oblivion. One of the main points in every clip we remember seeing is the Top Gun meets Star Trek vehicle he does some tricks in. [James Cotton] loved that footage and ended up building his own RC version of the vehicle.

Three propellers give it lift, with directional control facilitated by servo motors which can pivot the motors attached to the two orange propellers. This design produces remarkably responsive controls as shown in the video after the break. That being said it’s still not immune to operator error. At the end of the clip [James] crashes it hard, stripping out the gears on the servo motors.

He has a few things in mind for the future of the device (and he’ll have plenty of time to plan while he waits for replacement servos to arrive). The aircraft should be able to carry a camera long with it. He discusses the issues involved with where the camera ends up pointing based on what the tilting motors are doing. But we figure he could always build a base that lets the camera pan and tilt separately from the chassis.

You can find a few tricopter projects around here but we’ve always like the one made of cardboard.

Continue reading “Acrobatic Tricopter Inspired By The Oblivion Movie Trailer”

Rattle Generator Is A New Type Of Dynamo For A Bicycle

rattle-generator-bicycle-spokes

This project is in one of our favorite categories; the kind where asking “why?” is the wrong question. [Berto A.] built the device after observing some power generation by placing a large magnet next to a mechanical relay coil and quickly clicking the relay’s lever. From this humble beginning he built up the RattleGen, a bicycle spoke driven generator.

To get the most power possible he searched around for a massive relay and found one which was originally meant for telephone exchanges. He cut the case open and strapped a big bar magnet to the side of the coil. Next he fabricated an arm which will press against the relay’s lever. To that he added a small wheel which is pressed each time a spoke from the bicycle passes by it. This repeated clicking of the relay lever generates a current (and a rattling sound) that is harvested by the joule thief circuit built on some protoboard. An LED is illuminated, with excess current stored in the capacitor bank. Don’t miss the build and demonstration video after the break.

Continue reading “Rattle Generator Is A New Type Of Dynamo For A Bicycle”

OTM-02 Is A 3D Printed Wristwatch

3d-printed-wristwatch

We love looking at roll-your-own wristwatch projects. Getting a project small enough to carry around on your wrist is a real challenge. But we think the OTM-02 wristwatch really hit the form factor right on the mark.

OTM stands for Open source Time Machine. It’s the work of [Hairy Kiwi] and he managed to bring the guts of the watch in at a thickness between 6.5 and 7mm. That includes the LCD, PCB, piezo diaphragm, and the battery. The PCB itself is a four-layer board built on 1mm thick substrate. It’s running an EFM32 (ARM) microcontroller which comes with hardware USB support. The little door sitting open on the side of the 3D printed enclosure provides access to the micro USB connector which can be used to charge the 150 mAh battery inside. That may not sound like much juice, but if you set the display to show minutes only [Hairy] calculates a battery life approaching 175 days. If you just have to have the seconds displayed you can expect about two weeks between charges.

Like the name says, this project is Open Source.

[Thanks Liam]