TV Show Inspires This Smaller Pong Paddles Hardware Hack

smaller-pong-paddles

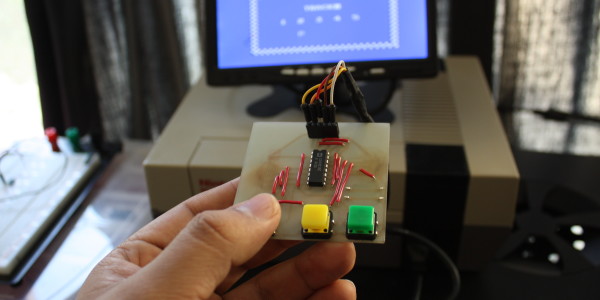
When we read “smaller paddles” we immediately thought of the physical controllers that you hold in your hands. But this hack alters the size of the virtual Pong paddles displayed on the TV screen.

We remember quite well the episode of That 70’s Show where Red and Kelso take apart their Pong machine to hack it. The video after the break which [Blues Image] put together shuffles scenes from that episode in with images of his hack. The characters are adamant that the game is too easy and reducing the size of the virtual paddles is the only thing that will make it fun again. After building his own hardware from the original schematics, [Blue Image] figured this challenge was worth a try.

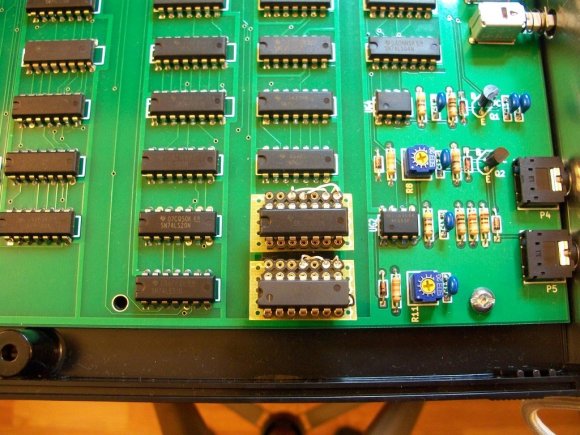
His solution is in the form of two man-in-the-middle boards which insert a way to reroute the pins without altering the main board. One of the chips is used to draw the paddles, the other checks for collisions with the ball. By changing the pin-out the paddles are reduced from fifteen pixels down to seven.

Continue reading “TV Show Inspires This Smaller Pong Paddles Hardware Hack”

Mobile Chicken Coop Includes Wireless Sensors

mobile-chicken-coop-build

In and of itself this mobile chicken coop is a pretty nice build. There are some additional features lurking inside which you don’t find on most coops. [Neuromancer2701] built-in a set of sensors which can be accessed wirelessly. It makes it a snap to check up on the comfort of the hens without leaving the couch.

At the heart of the sensor system is an Arduino along with an Xbee module. The build isn’t quite finished yet, but so far three sensors have been implemented. A thermistor is used to read the temperature inside the coop. To make sure there’s enough water, two sheets of foil tape were applied to the water reservoir. The CapSense library measures the capacitance between these plates which correlates to the water lever (we’ve seen this type of water level sensor before). And finally, there’s a sensor that can tell if the door to the coop is open or shut.

He’s having trouble automating the door itself. This can be pretty tricky, especially if you go for a super complicated locking mechanism like this one.

DIY NES Controller Makes No Changes To The Design

We like this project for its sheer simplicity. After all, recreating the hardware in the controller for a modern gaming system is next to impossible. [Guillermo A. Amaral B.] had a bunch of parts sitting around and decided to try his hand at recreating an original Nintendo Entertainment System controller.

If you’re not familiar with the electronics inside this brand of retro gaming hardware you might be surprised to find that there’s barely any logic hardware at all. The chip in the middle of the board is a 4021 parallel to serial shift register. It connects to the buttons and uses the clock signal coming through the cable to pulse out the button states over a serial wire. So all that [Guillermo] did was lay out the chip with connects for each button.

In the image above his thumb is obscuring the 5-way switch used for directional control and select (center click). The yellow and green buttons serve as A and B, with the start button on the opposite side of the board due to a mistake in his board layout. He does have some future plans for this. He’s working on a Raspberry Pi project that will monitor and record the controller serial data so that you can play it back. It sounds like a player piano for video games.

Want to see a really small version of this? The same hardware in a smaller package was put together a couple of months ago to build the world’s smallest NES controller.

[via Adafruit]

How The 8085 ALU Is Structured

8085-alu-reverse-engineering

This is a microscopic photograph of an 8085 processor die. [Ken Shirriff] uses the image in his explanation of how the ALU works. It is only capable of five basic operations: ADD, OR, XOR, AND, and SHIFT-RIGHT. [Ken] mentions that the lack of SHIFT-LEFT is made up for by adding the number to itself which has the effect of multiplying a number by two; the same mathematical function performed by a shift operation.

His post details the gate arrangement for each ALU operation. This is clear and easy to follow, and was based on reverse engineering work already done by a team who meticulously decapped and photographed the dies.

Not long ago this explanation would have been voodoo to us. But we worked our way through The Elements of Computing Systems text-book by following the online Nand to Tetris course. It really demystifies the inner working of a chip like the 8085.

Now if you really want to understand this ALU you’ll build it for yourself inside of Minecraft.

[Thanks Ed]

Improved Hourglass Entropy

improved-hour-glass-entropy

[Wardy] built himself a high quality entropy source with parts he had lying around. It’s based on the hourglass entropy project we saw in a links post earlier this month. Just like that project, he is bouncing a laser off of the falling sand and reading the result. But he brings a few innovations to the party, and has test results to back up his work.

The first change is an obvious one; motorize the hourglass so that you don’t need to flip it by hand. We thought this might mess with the laser alignment but the clip after the break proved us wrong. He changed up the sensor, using an LED connected to the base of an NPN transistor. The next change was to mount the light sensor at an angle to the laser rather than straight on. This picks up reflections of the laser and not the direct beam itself, resulting in a wider range of readings.

He used an Ethernet shield to get the system on the network. It’s pushing 420k random numbers per second and was tested with the DieHarder suite. It didn’t get a very high score, but it did pass the test.

Continue reading “Improved Hourglass Entropy”

Raspberry Pi Used As A Beacon Transmitter

rpi-beacon-transmitter

[m0xpd] got his hands on an inexpensive AD9850 DDS Module from eBay but needed a way to control it. He took inspiration from the projects that used a PIC microcontroller, but decided to add his own twist by using a Raspberry Pi to build a multi-mode beacon transmitter.

At the center of this breadboarded circuit lies the green AD9850 module. To its left is a level converter he built to get the 3.3V levels from the RPi board to work with the rest of the 5V hardware. The signal then feeds into a QRP amplifier and a low pass filter.

He didn’t start from square one when it came time to write the code for the RPi. Instead he grabbed an Arduino sketch for the very same DDS and ported it over to Python. The first test signal was his call sign sent in Morse code at QRSS speeds. But he also managed to get Hellschreiber messages working, making it a multiple-mode device.

[via Solder Smoke]

$20 Vacuum Pen Build On Of The Best We’ve Seen

20-dollar-vacuum-pen-build

Everything you need to build a vacuum tweezers is laid out in this image. The parts should run you about $20 and when you’re done you’ll have the perfect tool for placing very small surface mount parts for reflow soldering.

This project uses the same concept as other fish pump tweezers projects but builds upon them with some interesting additions. The first step in the conversion process is to tear down the aquarium pump to reverse its flow. There are several steps but all-in-all it’s not very difficult. With the source of vacuum established [Technically Artistic] begins work on the business end of the tool. This is where the array of different pens see some action. The large blue one is the outer assembly, with the others combining to help connect it to the plastic tubing. The business end is made from a needle adapter for an air compressor, with an alligator clip cleverly modified to serve as a valve to release the parts from the tip.