Hacking Grandfather Clock Accuracy While It’s Still Ticking

grandfather-clock-tweaking

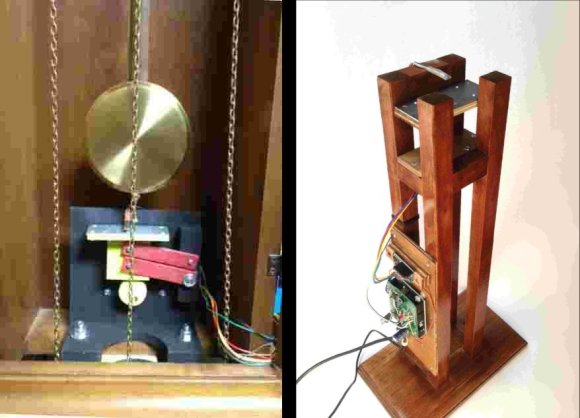
[Keith] got his hands on a few grandfather clocks. Apparently the price tag is greatly reduced if you are able to get them second-hand. The mechanical timepieces require weekly winding, which is a good thing since you’ll also need to correct the time at least that often. But this drift got [Keith] thinking about improving the accuracy of these clocks. He figured out a high-tech way to adjust the timepiece while it’s ticking.

The first thing he needed was a source of super-accurate time. He could have used a temperature compensated RTC chip, but instead went the more traditional route of using the frequency of mains power as a reference. The next part of the puzzle is to figure out how to both monitor the grandfather clock and make small tweaks to its pendulum.

The answer is magnets. By adding a magnet to the bottom of the pendulum, and adjusting the proximity of a metal plate positioned below it, he can speed up or slow down the ticking. The addition of a hall effect sensor lets the Arduino measure the rate of each swing and calculate the accuracy compared to the high voltage frequency reference.

Little Sister’s Turn For Hobby Electronic Party Favors

little-sisiters-turn-for-hobby-electronic-party-favors

[Ian Lee, Sr.] made something special for his daughter’s birthday party. It’s pretty common for girls of this age (this was her 5th birthday) to be enthralled with stories of princesses so he made a blinky princess wand for each party guest. The motivation came when she asked what special thing he was going to do for her celebration. You may remember seeing the LED badge kits that were featured at her brother’s party earlier this year. From the look of the party guests he surely satisfied her desire for a memorable party.

The project is very inexpensive, extremely easy to assemble, and might make a perfect kit for supervised Kindergarteners. It’s basically an LED throwie with a stick and a feather added. [Ian] used CR2032 batteries along with an LED and current limiting resistor to light things up. He clipped off one leg of the LED and replaced it by soldering the LED in place. The remaining leads were then pressed to either side of the coin cell and the whole thing was shoved into a slit cut in the end of a balloon rod. The whole thing was wrapped tightly in with a rubber band before being crowned with a ping pong ball. To trim it out he hot glued a feather at the base of the ball.

The only think that has us worried is what he’s going to do next year to top these parties.

Type4me Is A Hardware Clipboard For Your Digital Copy And Paste Needs

type4me-hardware-clipboard

It doesn’t happen often, but every now and again we find ourselves wanting for a more extensible cut and paste experience. Most notably we’ve searched for something that makes is very easy to keep multiple things in the clipboard and paste them as needed. Although we’ve tried several software offerings nothing really made it up to grade, but this hardware clipboard looks very promising. [Luca Dentella] calls it Type4me as it functions as a USB keyboard.

The PIC 18F14K50 enumerates as a USB keyboard, allowing it to send characters anywhere the cursor is located. It sends whatever string is stored inside, with an optional return character at the end. In addition to its keyboard properties it also establishes a serial connection, which allows you to push new strings to the device. This setup does require you to do copy or type your strings into a serial terminal, along with one of four special commands which are parsed by the microcontroller. One of these commands allows you to save the string to EEPROM so that it will be persistent through a power cycle.

The pasting back to the computer takes a mere push of the button. We’ve embedded the video demo after the break. It’s in Italian but there are English subtitles. Near the end [Luca] shows off the device as a macro button for gaming.

Continue reading “Type4me Is A Hardware Clipboard For Your Digital Copy And Paste Needs”

Unwrapping Images Of Cylindrical Objects

unwrapping-images-of-cylindrical-objects

Here’s an automated setup that lets you create flat images of cylindrical objects. The example shown above takes a creamer and lets you see what the painted pattern looks like when viewed continuously.

The image capture rig is similar to turntable photography setups that allow you to construct animated GIF files or 3D models of objects. The subject is places on a stepper motor which allows precise control when rotating the object between frames. The EiBotBoard (which we’ve seen in at least one other project) is designed for the EggBot printer. But it is used here to interface the motor and capture equipment with the Raspberry Pi.

We’re a little uncertain if the RPi actually handles the image manipulation. The project uses ImageMagick, which will certainly run on the RPi. There is a mention of the Raspberry Pi camera joing the rig as a future improvement so we do expect to see a fully-automatic revision at some point.

[via Adafruit via EMSL]

Papercraft Dial Is The Slide-ruler Of Current Limiting Resistors

led_resistor_dial_39

This paper dial makes selecting current limiting resistors a snap. [Giorgos Lazaridis] came up with the tool, which he describes in detail in the Worklog tab of his writeup. If you want one of your own he also posted a PDF which you can print, cut, and tack together.

At this point we can calculate resistor values for LED circuits without looking at reference material. But it wasn’t always like that. This wheel will be a fantastic tool for those just starting out in hobby electronics who are trying to grasp the theory behind lighting up a simple project. The outer wheel references the source voltage, with the inner being a gauge of forward voltage across the LED(s). Line those two values up and you can read the optimal resistor value in the window seen to the right. But wait, there’s more! As you can see in the video after the break the opposite face of the dial also includes a window which will tell you the power dissipation so that you may choose a properly rated resistor. Slick!

Continue reading “Papercraft Dial Is The Slide-ruler Of Current Limiting Resistors”

Microcontroller Statistics With A Small SRAM Footprint

statistics-library-for-microcontrollers

You may know your way around the registers of that favorite microcontroller, but at some point you’ll also need to wield some ninja-level math skills to manage arrays of data on a small device. [Scott Daniels] has some help for you in this arena. He explains how to manage statistical calculations on your collected data without eating up all the RAM. The library which he made available is targeted for the Arduino. But the concepts, which he explains quite well, should be easy to port to your preferred hardware.

The situation he outlines in the beginning his post is data collected from a sensor, but acted upon by the collection device (as opposed to a data logger where you dump the saved numbers and use a computer for the heavy lifting). This can take the form of a touch sensor, which are known for having a lot of noise when looking at individual readings. But since [Scott] is using the Mean and Standard Deviation to keep running totals of collected data over time it is also very useful for applications like building your own home heating thermostat.

Deathly Hallows Mark The Passing Of Time

deathly-hallows-clock

Whether you’re a Harry Potter fan or not we think you’ll enjoy this Deathly Hallows clock. The body is modeled after the triangle, circle, and line that make up the symbol that played a prominent role when concluding the fantasy novel series. A bit of motion and a couple handfuls of LEDs are what allow it to display the time of day.

[Yeenasty] started by building the triangular surround out of wood. In the center he added a circular veneer which was partitioned into twelve chambers. These indicate the hour and are illuminated one at a time from midnight until noon. Once all of the LEDs are switched on (as seen above) they are then extinguish one at a time from noon until midnight. [Yeenasty] mentions that this means the clock isn’t overly bright during the night-time hours.

Minutes are displayed by the wooden slat in the middle of the ring of LEDs. Here it’s showing 30 minutes after the hour because it is vertical and the bottom red LED is lit. The hand is mounted on a 180 degree servo so when it has made half of a rotation the hand backtracks 29 minutes and the LED at the other end is illuminated to continue progress around the face of the clock.

[via Reddit]