Another Great Backyard Observatory Build

With a little help from their friends [Jeff Fisher] and his dad built this observatory in their back yard. Their use of simple building materials and techniques show that you can create a respectable home observatory without breaking the bank.

It starts with a footing for the telescope mount. This is completely separated from the building that surrounds it so there will be no issue with vibrations affecting the images it is capturing. From there a foundation made of cinder blocks was laid before placing joists and installing a sub floor. It was during this process that they trenched and placed conduit to run power to the building. With the floor in place the walls were stick built and a carefully crafted dome was assembled and hefted in place by this septet of gentlemen.

Four months was all it took to get to this point, but [Jeff] and his dad are still working on a deck to go around the observatory. They’re using a very nice telescope that they purchased, but it is also possible to build one of those yourself.

[via Reddit]

This Diy Fume Extractor Will Be A Showpiece For Your Workbench

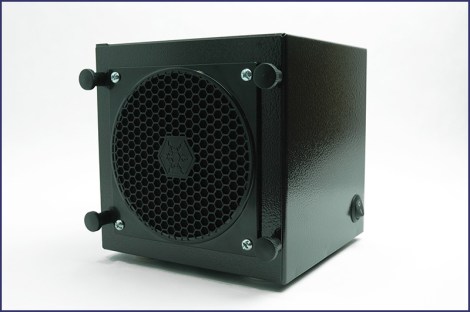
We have no idea how well this diy fume extractor works, but it sure does look great! We’ve been thinking that it’s time to stop trying to blow away the solder fumes while working on project and this might be just the kind of motivation we need. The 6″ cube doesn’t get in the way of your work, and since it includes a carbon filter it should keep the smell of burning flux to a minimum.

[Jeff’s] project basically brings together a 120mm PC cooling fan with a power source. The fan mounts inside of a steel enclosure he picked up from Digikey. The face plates that come with it were modified to accept the fan, as well as the grill hardware that goes with it. Before assembling he painted the box with some Rustoleum “Hammered” black spray paint. This gives it a texture that will hide any imperfections in your application.

We’re a bit hazy on how this is being powered. It sounds like he’s plugging the cord into mains but we don’t see any type of regulator to feed what must be a 12V DC fan. There are build instruction available but they didn’t clear up our confusion.

Tutorial Explains The Concepts Behind An IMU

[Anilm3] wrote in to share the IMU tutorial series he is working on. An Inertial Measurement Unit is most often found in self-balancing robots and quadcopters, providing enough high-speed sensor data to keep up with the effects of gravity.  He previously used some all-in-one IMU devices in school which did most of the work for him. But he wanted to grind down and look at what each sensor spits out and how those measurements are used. The first installment deals with the accelerometer, using its data to calculate pitch and roll. For these demonstrations [Anilm3] is using this ADXL345 sensor board, an Arduino, and some processing sketches for testing.

Whenever working with sensors you need to take noise into consideration. The post shows how to implement a low-pass filter in the code which will help smooth out the readings. The filtered data is then fed to a couple of mostly-painless formulas which calculate the movement of the accelerometer in degrees. The demonstration sketch is mapped to a 3D cube to give you an idea of how accurate the accelerometer is. There’s a little bit of lag which would let a self-balancing robot have a nasty fall. The solution to this issue will be discussed in upcoming parts of the series. The next installment tackles the gyroscope sensor.

Making Your Anime Papercraft Move To The Music

This anime character is dancing to the music thanks to some animatronic tricks which [Scott Harden] put together. She dances perfectly, exhibiting different arm and head movements at just the right time. The secret to the synchronization is actually in the right channel of the audio being played.

The character in question is from an Internet meme called the Leekspin song. [Scott] reproduced it on some foam board, adding a servo to one arm to do the leek spinning, and another to move the head. These are both driven by an ATtiny44. All of the movements have been preprogrammed to go along with the audio track. But he needed a way to synchronize the beginning of each action set. The solution was to re-encode the audio with one track devoted to a set of sine wave pulses. The right audio channel feeds to the AVR chip via an LM741 opamp. Each sine wave triggers the AVR to execute the next dance move in the sequence. You can see the demo video for the project after the break.

Continue reading “Making Your Anime Papercraft Move To The Music”

BaceMaker Weds Organ Foot Pedals With Guitar Whammy Effects

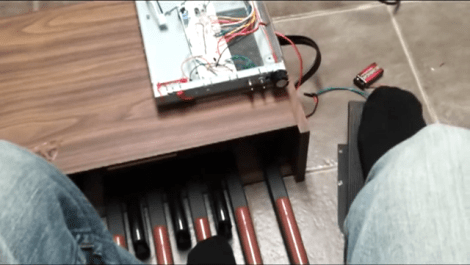
[Jon Ferwerda] managed to fry the analog electronics on an old electric organ while conducting some circuit bending experiments. It’s a loss, but he’s still left with some cool equipment to play with. Recently he got to work generating tones using the organ’s foot pedals.

There were two types of foot pedal included with this organ, the set that is arranged like a keyboard, and a rocker pedal similar to what you might use with an electric sewing machine. Since the music generation was handled by those fried bits of organ [Jon] got to work interfacing the foot keyboard with a 555 timer. He used a fairly large capacitor to get the frequency into the bass range and wired individual pedals to different parts of a resistor network. But he didn’t stop with that. The rocker pedal has its own variable resistor hardware which lets him bend the pitches are they are being generated which sounds  alike like a guitar whammy effect. He shows his work in the clip after the break. We think he nailed it! This is a perfect supplement to any type of electronic music setup.

Continue reading “BaceMaker Weds Organ Foot Pedals With Guitar Whammy Effects”

Kayak To Sailboat Conversion Shows How To Weld Plastics

This kayak to sailboat conversion is well done and makes for an interesting project. But even if you’re not going to be hitting the water on one of your own, the construction techniques are a useful resource to keep in mind. Many of the alterations were done with a plastic welding iron.

[RLZerr] shows off the materials that went into the build right at the beginning of the video which you’ll find after the break. His kayak is made of High Density Polyethylene and he uses other HDPE scraps, PCV parts, and even some aluminum to make everything. To weld HDPE together he uses a plastic welding iron that is like a cross between a soldering iron and a hot glue gun. It has a pad tip that gets hot enough to melt the plastic, but also includes a channel through which additional HDPE filament can be fed to bulk up the connections.

Additions to the kayak include a centerboard, rudder, and mast. The sail is a plastic tarp attached to the PVC mast which has been stiffened with a wooden shovel handle in its core. The rudder and centerboard are aluminum attached to PVC pipes using JB weld. The boat catches the wind easily, but without outriggers [RLZerr] must be careful not to let a big gust swamp him.

Continue reading “Kayak To Sailboat Conversion Shows How To Weld Plastics”

Building An Electric-powered Longboard For Under $100

[Alan] doesn’t have to kick to get around town because he added a removable electric motor to his longboard. It looks great, and works just as well because he didn’t reinvent the wheel. The idea is a mashup of an electric Razor scooter and his long board.

The majority of the project revolved around mounting everything he needed to the board. When it comes to the drive wheel he designed a tension system. When a rider is not on the board the back wheels of the long board are off the ground by about an inch. The springs in the suspension system make it so when you do mount the board all wheels are touching, with the main drive wheel held tight to the pavement even while turning.

Unlike some electric skateboard builds [Alan] didn’t need to raise the board off the ground as the battery compartment is mounted on top of the deck. He added cooling fans for the hot summer days, and even used velcro to attach the charger so that he can juice it up when away from home. Check out his three minute show and tell embedded after the break.

Continue reading “Building An Electric-powered Longboard For Under $100”