Sandbox Topographical Play Gets A Big Resolution Boost

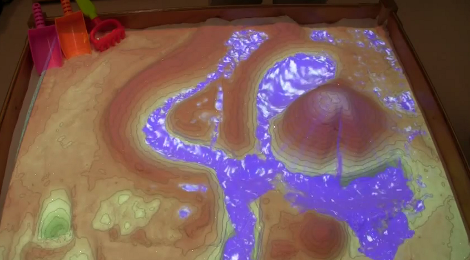
Here’s another virtual sandbox meets real sandbox project. A team at UC Davis is behind this depth-mapped and digitally projected sandbox environment. The physical sandbox uses fine-grained sand which serves nicely as a projection surface as well as a building medium. It includes a Kinect depth camera over head, and an offset digital projector to add the virtual layer. As you dig or build elevation in parts of the box, the depth camera changes the projected view to match in real-time. As you can see after the break, this starts with topographical data, but can also include enhancements like the water feature seen above.

It’s a big step forward in resolution compared to the project from which the team took inspiration. We have already seen this concept used as an interactive game. But we wonder about the potential of using this to quickly generate natural environments for digital gameplay. Just build up your topography in sand, jump into the video game and make sure it’s got the attributes you want, then start adding in trees and structures.

Don’t miss the video demo embedded after the break.

Continue reading “Sandbox Topographical Play Gets A Big Resolution Boost”

16FUSB — It’s Like V-USB For The PIC 16F628

If you have an idea for a fairly simple USB device but don’t want to invest in the more expensive microcontrollers, this library will be of interest to you. It’s a software implementation of the low-speed USB protocol for PIC 16F628. You can pick these up for around $2, and it just takes a few other components to complete the circuit. And hey, you don’t even need a proper PIC programmer to flash the code. This is the same chip for which we just saw an Arduino act as the programmer.

The circuit design looks exactly the same as the V-USB stack, which provides USB functionality to lower-end AVR microcontrollers. In addition to the chip you need a crystal oscillator, a couple of 3.6V zener diodes, and a handful of passive components. There are a couple of LEDs in the design, but we assume these are for feedback and are not crucial to the functionality of the circuit.

There’s no shortage of data included in the project post so you may want to bookmark this one for later reference.

Fancy Telemetry Control Display For A Quadcopter

Most of the quadcopter projects that we’ve seen use a joystick-based control system. This lets you fly the thing around like any RC vehicle. But [Saulius] is augmenting his control system by pulling and displaying telemetry data. It doesn’t really change the way the vehicle is controller, but it lets the craft roam much further away because the operator can watch the computer screen and forego the need for the quadcopter to be within sight.

A Carambola board (also used in this weather station project) is used to provide connectivity. This is WiFi based, which helps us understand the range it can travel. The quadcopter carries a camera, which is shown in the lower right box of the image above. There is also an artificial horizon, and feedback dials which display the telemetry data.

It looks like there’s a satellite view in between those two dashboard widgets. We don’t see anything coming up right now, but it’s possible this is meant to overlay a virtual marker for the aircraft’s position based on GPS data. That last part is really just conjecture though. Catch the 80-second test flight after the jump.

Continue reading “Fancy Telemetry Control Display For A Quadcopter”

Converting A Manual Camera Lens To Use Motorized Zoom And Focus

[Guy] wrote in to share this motorized camera lens project he recently finished. He really loved the zoom lens, but since both zoom and focus are manually controlled, he sometimes had trouble getting both set to the right place in time to take the shot. With modern DSLR cameras which allow video capture, he also wants to have the option of a smooth zoom that is always in focus. The solution was to add motors to the rings and control them with a Wii classic controller.

This hack really shines when it comes to the add-on hardware. He has some beautifully made rings which wrap around the focus and zoom rings on the lens. They are then held in place by a timing belt. These belts have teeth which key into the gears on a pair of servo motors. From there it’s a snap to drive the motors with an Arduino, connecting to the Wii controller with a breakout connector. You can see [Guy] showing off the build in the clip after the break.

Continue reading “Converting A Manual Camera Lens To Use Motorized Zoom And Focus”

Arduino Uno BIOS Flasher

We’ve seen the Arduino used to flash BIOS chips several times now. But these hacks are almost always the result of a bad flash. This time around [GNUtoo] is interested in putting a tool in your hands which can be used to flash Coreboot to your motherboard. His offering uses the Arduino Uno, but there are several other hardware options covered as well.

The firmware makes use of the serprog-duino library which was crafted at writing to flash memory chips. On the computer side of things the flashrom package pushes the BIOS image to the Arduino. The nice thing is the flashrom is a common packge in Linux repositories so it’s probably just an apt-get away.

The process isn’t fast, taking about ten minutes to program a 1 Mb chip. But if you’re just interested in loading an open source BIOS alternative this is easy to set up.

Sign And Speak Glove

This wire covered glove is capable of turning your hand gestures to speech, and it does so wirelessly. The wide range of sensors include nine flex sensors, four contact sensors, and an accelerometer. The flex sensors do most of the work, monitoring the alignment of the wearer’s finger joints. The contact sensors augment the flex sensor data, helping to differentiate between letters that have similar finger positions. The accelerometer is responsible for decoding movements that go along with the hand positions. They combine to detect all of the letters in the American Sign Language alphabet.

An ATmega644 monitors all of the sensors, and pushes data out through a wireless transmitter. MATLAB is responsible for collecting the data which is coming in over the wireless link. It saves it for later analysis using a Java program. Once the motions have been decoded into letters, they are assembled into sentences and fed into a text-to-speech program.

You’ve probably already guess that there’s a demo video after the break.

Continue reading “Sign And Speak Glove”

Chocolate Extrusion Printer Is Halfway To Making S’mores

Chocolate has got to be one of the worst choices as a printing medium. It’s extremely fussy when it comes to melting point, and even in the right state the flow of the material is not going to play nicely with high-resolution designs. With this in mind, we applaud the progress the student team from Carnegie Mellon University has made with WonkaBot,  their chocolate extrusion printer.

Unlike the syringe-based paste extruder from last month, this offering uses an auger to push chocolate through a heated printer head. They’re using it to print designs on graham crackers. We love the UI they came up with for the task. It uses a virtual graham cracker as a canvas on your laptop and allows you to use the touchpad or mouse to draw your design. That input is then converted to g-code and sent to the CNC machine for printing. See it in action after the break.

Continue reading “Chocolate Extrusion Printer Is Halfway To Making S’mores”