Custom Flat Cables To Suit Your Needs

[Cosimo Orlando] has a Motorola Xoom tablet. It’s an Android device that works great as a tablet, but can double as a Laptop when you need it to by adding a keyboard. The problem he was having is that the USB On-The-Go cables that he tried were never the right size or orientation. So he scavenged them for parts and built his own flat cable for a custom fit.

The final product pictured here actually uses protoboard to give the body some strength. [Cosimo] first laid out the dimensions on the substrate using a felt-tipped pen. He then took connectors from his mis-sized commercial cables and affixed them to the board with a combination of hot glue and solder. From there, just connect the five data lines and ground with some jumper wire and test for continuity. He finished this off with what he calls ‘adhesive plastic glossy black’ shaped to make a decent looking case. If you have any idea what product was used here, let us know by leaving a comment.

Tilt Compensation When Reading A Digital Compass

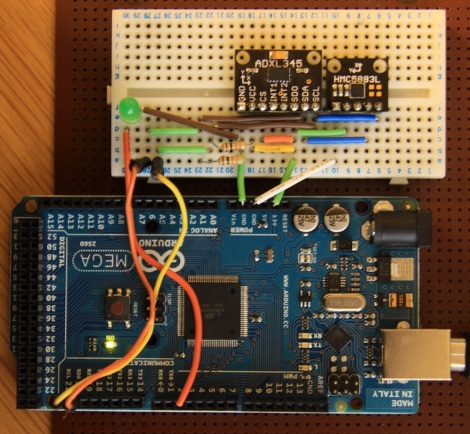
If you’re familiar with using a compass (the tool that points to magnetic north, not the one that makes circles) the concept of holding the device level makes sense. It must be level for the needle to balance and rotate freely. You just use your eyes to make sure you’re holding the thing right. Now think of a digital compass. They work by measuring the pull of a magnetic field, and have no visual method of showing whether they’re level or not. To ensure accurate readings you might use an accelerometer to compensate for a tilted magnetometer.

The process involves taking measurements from both an accelerometer and a magnetometer, then performing calculations with that data to get a true reading. Luckily the equations have been figured out for us and we don’t need to get too deep into trigonometry. You will, however, need to use sine, cosine, and arctangent in your calculations. These should be available in your programming language of choice. Arduino (used here) makes use of the avr-libc math library to perform the calculations.

Do You Know WHY You’re Supposed To Use Decoupling Capacitors?

[Bertho] really enjoyed pawing through the pile of projects submitted to the 7400 logic contest. But one thing kept hitting him with the vast majority of the entries: decoupling capacitors were missing from the circuits. If you’ve worked with microcontrollers or digital logic chips you probably know that you’re supposed to add a small capacitor in between the voltage and ground pins for decoupling purposes. But do you know why? [Bertho] put together a great post that looks that the benefits of using decoupling capacitors in your circuits.

He set up a circuit using a 74HC04 inverter and put it to the test. The image above shows current measurments with the inverter under load. Images on the right show a decoupled circuit and the ones on the left shows a circuit without that capacitor. You can see that the decoupled circuit has much smoother signals when driven high. But it’s not just the smoothness that counts here. [Bertho] goes on to discuss the problem of slow rise-time caused by a dip in current flowing into a chip’s VCC pin. It can take a long time to get above the threshold where a chip would recognize a digital 1. Throwing a capacitor in there adds a little reservoir of current, just waiting to fill in when the power rail dips. This feeds the chip in times of need, keeping those logic transitions nice and snappy.

Singing House Lights Up Halloween Again This Year

[KJ92508] is flooding the neighborhood with light again this year. Everyone knows of that one house in town that really goes all out, but few put on a show anything like this one. The four Jack-o’-lantern faces lead the way with the opening sequence from A Nightmare Before Christmas. Each has at least four different mouth poses, and two eye orientations which are surprisingly well synchronized with the audio. The image above shows mostly orange lighting, but the home is outfitted with addressable RGB LEDs for a full color performance. In fact, it has seen an upgrade this year, increasing the channels by eight-fold to 1144! Don’t miss the performance which we’ve embedded after the break.

We had considered not featuring this, since we looked in on the same home last year. But the number of tips that rolled in made us think that a lot of you missed it, or are just delighted by the multitude of blinky lights. Either way, it’s worth the four minutes out of your day– it will either put a smile on your face, or make you glad not to live across the street from this guy.

Continue reading “Singing House Lights Up Halloween Again This Year”

Wicked Use Of HTML5 To Display Sensor Data

This project shows you one possible way to use HTML5 to fully integrate sensor data from a microcontroller into our technological lives. Now, when we saw this tip come through our inbox we thought it would be an interesting example to learn from but we weren’t ready for how truly cool the setup is. Take a look at the video after the break and you’ll see that scanning the QR code on the project box will immediately start a 10ms resolution live stream of the accelerometer data. Furthermore, the browser page that the phone loads allows you to send what you’re currently viewing to the main frame of a browser running on a different computer with the touch of a button. In this way you can build a dashboard of streaming sensor data. Talk about the future of home automation. Imagine a QR code on your thermostat that allows you gain access to your home’s heating, air conditioning, humidifier, and water heater performance and controls just by snapping a pic? The sky’s the limit on this one so let us know what you’d use it for by leaving a comment.

In this case an mbed microcontroller is handling the data acquisition and pushing that to a server via a WiFly module using the WebSockets library. This data is pushed in the form of a JSON packet which is distributed by the server as a data stream. Clients can access it via a browser through a page that makes use of JavaScript.

Continue reading “Wicked Use Of HTML5 To Display Sensor Data”

Giving Siri The Keys To Your House

We haven’t really covered many hacks having to do with Apple’s newest iPhone feature Siri. We’d bet you’ve already heard a bunch about the voice-activated AI assistant and here’s your chance to give it the keys to your house. This project uses Siri to actuate the deadbolt on an entry door in a roundabout sort of way.

This is really just a Siri frontend for an SMS entry system seen in several other hacks. The inside of the door (pictured above) has a servo motor mounted next to, and attached via connecting rod with, the lever-style deadbolt. An Arduino equipped with a WiFly shield controls that servo and is waiting for instructions from the Google app engine. But wait, they’re not done yet. The app engine connects to a Twilio account which gives it the ability to receive SMS messages. Long story short; Siri is sending a text message that opens the door… eventually. You can seen in the demo after the break that the whole process takes over twenty seconds from the time you first access Siri to the point the bolt is unlocked. Still, it’s a fine first prototype.

There’s a fair amount of expensive hardware on that door which we’d like to see converted to extra feaures. [CC Laan] has already added one other entry method, using a piezo element to listen for a secret knock. But we think there’s room for improvement. Since it’s Internet connected we’d love to see a sensor to monitor how often the door is opened, and perhaps a PIR sensor that would act as a motion-sensing burglar alert system.

Don’t need something this complicated? How about implementing just the secret knock portion of the hack?

Continue reading “Giving Siri The Keys To Your House”

Washing Machine Powered Bike

[Ameres Valentin] was looking for a less expensive way to get around after spending in excess of 100 Euros a month on public transportation in Munich. His solution is an electric bicycle powered by a washing machine motor. It’s a 300 Watt motor that runs on 24 Volts, capable of around 3000 RPM. We’re used to seeing hub motors or chain drives on electric vehicle hacks, but it looks like [Ameres] is using a flywheel on the motor shaft to drive the rear wheel of the bike through direct contact.

Inside the saddle bag you’ll find two 12 volt 12 amp hour sealed lead acid batteries which are used in series. It looks like he charges these with a wall wart (that we think might use a switching power supply) modified with a couple of large alligator clamps. A push button mounted on the handlebars makes it go.We wonder if he’s still able to pedal when the batteries are running low? We don’t see a way to disengage the motor from the rear wheel so we’d bet this is something of an issue. Then again, if that charge actually works you’re never far from an opportunity to top off the batteries.

Check out a quick clip of the motor spinning the wheel embedded after the break.

Continue reading “Washing Machine Powered Bike”