Taser Gloves Are A Bad Idea

In a project that you’re sure to read about in police blotter someday, [Jair2k4] built a pair of Taser gloves that will shock your victim with they laying-on of hands.

Not surprisingly, this project was spawned from a conversation at work about what tech would best suit a vigilante crime fighter. [Jair2k4] suggested taser gloves, which drew a laugh, but also stuck in his mind. His prototype takes advantage of the flash circuitry from a disposable camera to step up battery voltage all the way up to 300 volts.

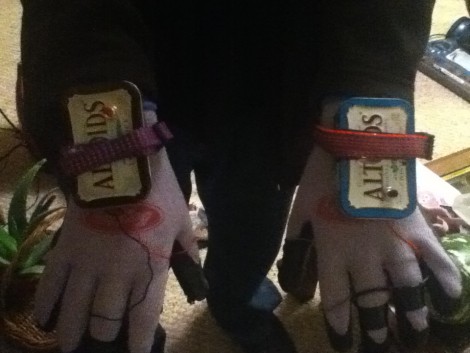
The gloves he’s using are rubberized fishing gloves which help ensure that he doesn’t shock himself. Wire travels from the capacitor to conductors sewn into the fingers and thumb of the gloves He’s got video embedded on his post that shows the bright spark and loud zap of a discharge when the conductors get close to one another. Altoids tins lined with electrical tape house the hardware, with a momentary push button used to charge the devices.

Hopefully criminals will not mind waiting for you to charge your weapons before they attack. But then again, [Jack Buffington’s] own version of a taser glove had the same issue. That one used conductors on the knuckle side of the glove, and involved long wires tethering the glove to a belt pack. Locating that back as a bracelet is a nice improvement on the idea.

RAM Upgrade For WRT300N Router

[Heli] had a WRT300N wireless router sitting around collecting dust. He decided to squeeze at bit more entertainment value out of it by seeing if he could pull off a RAM upgrade. He managed to double the router’s RAM and posted a walk through (translated) to help you do the same.

Swapping out surface mount RAM chips isn’t the easiest thing in the world and you must wondering what prompted this. It seems he wanted to run the LuCI package on the router but it was slow (or even incapable) of booting with the stock hardware’s 16 Mb. He first sourced some pin-compatible replacement chips from an old Pentium III computer. While his soldering iron was hot, he also wired up a JTAG header, which connects via the red wires just visible to the left. When he first fired up the unit he was happy that it was able to boot, but it still only detected 16 Mb.

It turns out you’re going to need to roll your own kernel to get it to take advantage of the upgrade. Source code for OpenWRT is easy to find and there’s plenty of guides for compiling it. If you try this, make sure to read [Heli’s] post carefully as he’s got some important configuration information that will help you to avoid bricking your router.

Animatronics In A Box

[Knife141] built an impressive animatronic head. He uses it mostly for volunteer activities, like getting school children excited about technology. He built a carrying trunk that fits the puppet just right, making it easy to store and to transport.

He started by making the parts for the head out of cardboard to make sure they would fit together and operate properly. These were then used as templates to cut the pieces out of half-inch plywood. A series of servos, connected either directly or with linking rods, move the mouth, eyes, eyelids, eyebrows and neck via a servo controller board.

Sound is played by a single-board computer called a RAPU via a pair of computer speakers. This board is also what sends commands to the servo controller. When [Knife141] wants to create a new act for the animatronics, he starts by writing the dialog and having a text-to-speech program turn it into an MP3. He then goes through the tedious process of choreographing the puppet to the dialog, a process that generally takes him an hour for each minute of run-time. It’s worth it though, see for yourself by watching one of his acts in the video after the break.

Looking for something a little bit more your speed? Check out this animatronic head which you can build in no time.

Continue reading “Animatronics In A Box”

Analog Test Interface For Your Computer

Wanting to test the response curves on some analog parts, [Don Sauer] devised a way of using simple tools to graph analog tests on a computer. Here you can see the results of testing NPN, PNP, NMOS and PMOS transistors, but modifying the input circuitry would let you test just about anything you want.

[Don] is using an Arduino as the hardware interface. He needed some additional parts, like an op-amp and some passives. Instead of building this on a breadboard, he printed the circuit out on a piece of cardboard, hot glued the components in place, then wired them up. This will let him reuse the interface in the future, but is quicker than designing and etching a PCB.

He uses a Processing sketch to capture the test data streaming in from the Arduino. Once recorded, he uses SciLab to create the graphs. He also covers a method of sifting through the data using Octave, another open source program that feels somewhat like MATLAB.

Cellphone Microscope For About $20

Medical-grade microscope photography for $20 might be a game changer in areas where medical services are unavailable. This particular hack uses an iPhone’s 2 megapixel camera, as well as a tiny glass marble, to magnify a sample to about 350 times its actual size. The two images seen on the left are red blood cells photographed with the improvised microscope. The main issue with this magnification method is a very thin plane of focus that is overcome with processing in software.

This makes us think of the microscope hack that shined a laser through a droplet of water, to project the image on a wall. The concept was later refined to work with samples on glass slides. There are a couple of distinct advantages to using this cellphone-based method. First, the sample can be seen with its true colors. Second, you not only magnify the sample, but you have a digitized image already on a device that connects to the Internet. If you’re trying to make a medical diagnosis this can easily be sent to a qualified professional for analysis.

The team that came up with this technique also figured out how to build a cellphone-based spectrometer for just a few bucks. The image in the upper right is the result of that hack. Both have a step-by-step build guide on the page linked at the top. The microscope is just a glass bead in a piece of rubber, as seen here. The spectrometer is a bit more involved.

[Thanks Fabien]

Halloween Props: Pumpkin Battery

This one would make a nice centerpiece for your Halloween party. It’s a battery with tiny pumpkins serving as the cells. [EM Daniels] shows us how to clear out the pumpkins, fill them with some freshly mixed electrolyte, and he even throws in the directions for baking the pumpkin seeds.

Each pumpkin will need a pair of conductors made of dissimilar metals to serve as the anode and cathode. Copper wire is used for one, aluminum for the other, and both wires have a spiral pattern bent on one end to increase the surface area that contacts the electrolytic solution. Now just boil up a slurry of vinegar, gelatin, and salt, then let it sit in the fridge over night. [EM Daniels] was able get 1.5V out of this project (enough to light one LED) for two hours, and 1.4V for six hours by using seven of the pumpkin cells in series.

[Thanks Karen]

Can You Develop Film With Coffee And Vitamin C?

Are you feeling a little MacGyver-ish and have access to a film camera? Perhaps you want to try developing your pictures using coffee and vitamin C instead of a traditional developing solution. [Danish Puthan Valiyandi] does a great job of walking us through the steps he took, including precise measurements, temperatures, and timings involved in achieving great results. This is probably not for the first-timers, as he does use special equipment associated with traditional developing methods.

The process uses a couple of easily obtainable materials: instant coffee, vitamin C powder, and washing soda (sodium carbonate). Once the roll of film has been exposed, it’s put onto a jig for developing (Danish does this with the lights on to make the video after the break worth watching, but you’ll need to do it in the dark). Once nestled inside of the development container, he mixes up a batch of his diy developer and agitates according to a times schedule. When the development is finished, a chemical fixer–no diy alternative used here–is added to set the film. Dry out the strips and use a scanner to digitize your work. We’re surprised by the quality of the finished product, but we shouldn’t be… he certainly knows what he’s doing.

Continue reading “Can You Develop Film With Coffee And Vitamin C?”