Logisim: Open Source Digital Logic Simulator

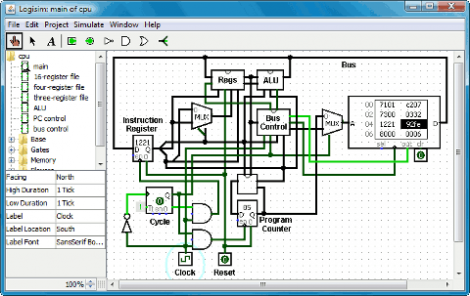
[Spi Waterwing] wrote in to make sure that we were aware of Logisim, a Java-based open source digital logic simulator. We’ve used Atanua quite a bit in the past but hadn’t heard of this program. It seems to have a pretty big educational following and right off the bat it’s got a feature we’ve always wanted, the ability to build your own ‘black box’ logic devices. That is to say you can build your own circuit out of logic gates and then package it into a part to be plopped into your next design. What it doesn’t have is the series logic chips that we’re used to with Atanua, but you can build your own with the black box feature if you really need that kind of functionality.

So grab a copy and try building that binary calculator project from last month.

Pong Clocks Using LED Matrix Modules

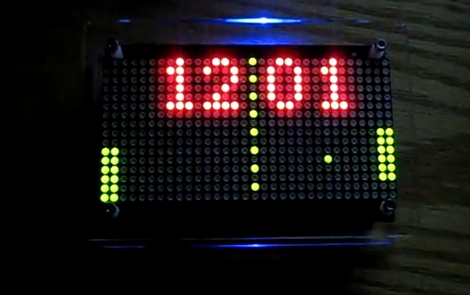
We love Pong clocks because they’re showpieces. This particular offering, called the Wise Clock, is the third hardware revision of the project. The LED display is dead simple since they’re using a 32×16 bi-color module from Sure Electronics. If you don’t want to design and build your own multiplexing display this is a somewhat inexpensive and high-performance alternative.

After the break you can see that the paddle movements look very realistic. They move like a human player might, which is quite often not the case with these clocks. If you want to see how that’s done, check out the code which was originally developed by [123led] for a different project.

Continue reading “Pong Clocks Using LED Matrix Modules”

Animating An LED Matrix Without A Microcontroller

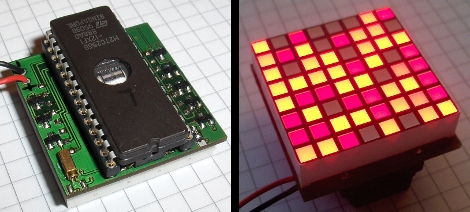
[Konstantin] had some extra 27C256 EPROMS lying around and decided to use them to animate an 8×8 LED matrix. He’s not only using them to store data, but driving the display with them as well. The chip holds 32 kilobytes of data which equates to 4096 frames of animation. A 32 kHz clock circuit works with some ripple counters to scroll through each byte of stored data, turning on the columns while sinking the proper row. Of course current protection is a must so there is a ULN2308A darlington driver and some 2N2907 transistors at work, but you won’t find a programmable microcontroller. Neat!

Yep, you read that right. The picture above shows an EPROM chip that requires a UV light source to erase the data.

[Thanks Kopfkopfkopfaffe]

Grinding Down Your Computer To Just 8.5 Watts

What can you do to make sure your system is running as efficiently as possible? Take a page out of [Mux’s] book, who went to great lengths to measure and adjust his system for ultimate efficiency (translated). What he ended up with is 8.5 Watts of consumption at idle and about 50 Watts under load. Luckily he posted a six-part series with all of the details.

Some of the changes he made were in software, like reducing voltage to certain hardware by adjusting BIOS settings, and installing display drivers that put the screen into the proper sleep mode. Others were hardware changes like swapping out the power supply with a hacked PicoPSU and removing unnecessary parts from the motherboard like the MAX232 com-port chip. Looks like we need to audit our always-on MythTV box and see if we can apply any of these power-saving techniques.

[Thanks Gijs]

Update: Open Source Pick-and-place

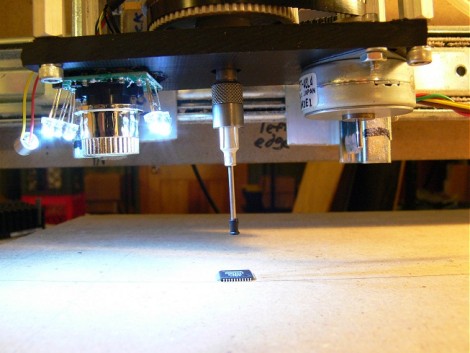
[Tim’s] been busy moving his pick-and-place build toward completion. We looked in on the first version of the vacuum head back in October. Since then he’s ditched the camera enclosure which allows for more light and better mounting. The tip has been replaced by one from a pair of vacuum tweezers, and the whole thing is now mounted on a diy CNC machine. The video after the break shows it picking up that IC and moving it around the table. Looks like the part rotation feature is very accurate.

He mentions that the CNC he’s using is quite slow. We hope he checks out this printable Delta robot; hardware that is often used with pick and place machines.

Continue reading “Update: Open Source Pick-and-place”

Mixed I/O Testing Module

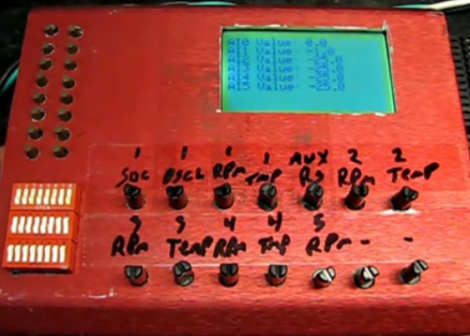
Needing to test the display interface for a multitude of different sensors [Fileark] built himself this analog and digital input/output simulator. Along the bottom is a double row of trimpots that adjust analog voltages. Each voltage is measured by the Arduino inside and its value is displayed on the graphic LCD screen to confirm that the hardware you’re testing is making correct measurements. There’s also digital I/O in two different forms. To the upper left are momentary push buttons but the DIP switch bank below that allows the same connections to be toggled on and off. It’s not an automated test bed, but if you’ve got a lot of I/O, or a lot of hardware to test this will save you some real time.

Don’t miss the demonstration video after the break.

Continue reading “Mixed I/O Testing Module”

Theremin Midi Board Is Like Using Autotune

[Steve Hobley] built a Theremin interface board that tracks pitch and volume. Using this setup he’s able to pass data over a midi interface which effectively converts the instrument into a non-contact midi controller. As we joked in the headline, this does allow for the use of autotune, by snapping notes that are sharp or flat to the center of the nearest pitch. But you should watch the video after the break to see [Steve] show off the other features as well. A keyboard can be used to seed a starting pitch, with arpeggios of several different tonalities built on top of it based on the input from the Theremin.

Want the details? Unfortunately you’ll have to pay for the schematics. But the concept is still just as interesting to read about, even if you don’t know what went into the system. Continue reading “Theremin Midi Board Is Like Using Autotune”