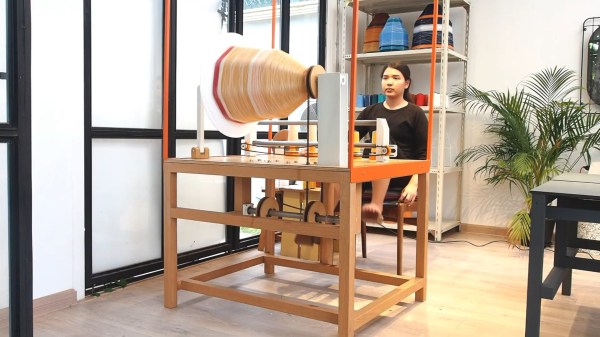
A cartoon vehicle is connected to two wires. One is connected to an illustrated Li anode and the other to a γ-sulfur/carbon nanofiber electrode. Lithium ions and organic carbonate representations float between the two electrodes below the car. A red dotted line between the electrodes symbolizes the separator.

Lithium Sulfur Battery Cycle Life Gets A Boost

Lithium sulfur batteries are often touted as the next major chemistry for electric vehicle applications, if only their cycle life wasn’t so short. But that might be changing soon, as a group of researchers at Drexel University has developed a sulfur cathode capable of more than 4000 cycles.

Most research into the Li-S couple has used volatile ether electrolytes which severely limit the possible commercialization of the technology. The team at Drexel was able to use a carbonate electrolyte like those already well-explored for more traditional Li-ion cells by using a stabilized monoclinic γ-sulfur deposited on carbon nanofibers.

The process to create these cathodes appears less finicky than previous methods that required tight control of the porosity of the carbon host and also increases the amount of active material in the cathode by a significant margin. Analysis shows that this phase of sulfur avoids the formation of intermediate fouling polysulfides which accounts for it’s impressive cycle life. As the authors state, this is far from a commercial-ready system, but it is a major step toward the next generation of batteries.

We’ve covered the elements lithium and sulfur in depth before as well as an aluminum sulfur battery that could be big for grid storage.

A white clock with a house profile sits on a variegated grey background. A yellow skein of yarn sits on the top left side of the clock feeding into a circular loom that takes up the bulk of the center. A yellow scarf extends out the back of the clock and out of frame below the image.

Knitting Clock Makes You A Scarf For Next Year

Time got a little wibbly wobbly during these pandemic years. Perhaps we would’ve had a more tangible connection to it if [Siren Elise Wilhelmsen]’s knitting clock had been in our living rooms.

Over the course of a year, [Wilhelmsen]’s clock can stitch a two meter scarf by performing a stitch every half hour. She says, “Time is an ever forward-moving force and I wanted to make a clock based on times true nature, more than the numbers we have attached to it.” Making the invisible visible isn’t always an easy feat, but seeing a clock grow a scarf is reminiscent of cartoon characters growing a beard to organically communicate the passage of time.

We’d love some more details about the knitting machine itself, but that seems like it wasn’t the focus of the project. A very small run of these along with a couple prototypes were built, with a knitting grandfather clock now occupying the lobby of The Thief hotel in Oslo.

If you’re looking for more knitting machines, checkout this Knitting Machine Rebuild or Knitting 3D Models Into Stuffies.

Continue reading “Knitting Clock Makes You A Scarf For Next Year”

A four-fingered partial hand prosthesis in fuschia with black fingerpads is attached to a man's left hand (palm and thumb are original). He holds the left hand + prosthetic with his right hand and an aluminum hand prosthetic sits on the table to the left of his hands.

Designing A Simpler Prosthetic Finger

Prosthetic limb design is an area where desktop manufacturing has made huge strides, but there’s always room for improvement. For example, take a look at [Ian Davis] and his attempts to design a simpler prosthetic finger.

[Davis] favors his aluminum partial hand prosthetic for its strength, but because it was scratch built for his particular situation, it isn’t easy to recreate for someone else. To this end, he has started working on a simpler design that might be applicable in the future for people who want to build their own prosthetics. With less than ten major components per finger including the replaceable TPU fingerpads, this is a major step toward that end.

According to [Davis], one of the more exciting parts of the build is that while this hand has a more limited feature set, he was able to get it closer to the size of his natural hand. Because of the durability problems he’s experienced for day-to-day use of plastic prosthetics, he is having the next iteration 3D printed in stainless steel for further testing.

If you want to see some more interesting prosthetic designs, checkout the Kid Who Designed His Own Prosthetic Arm or this Skull Lamp Prosthetic Eye.

An illustration of a key sitting on an ID card. The key is light grey and the ID card is a darker grey gradient. The ID card says ID-1 Card 85.60 by 53.98 mm

All Your Keys Are Belong To KeyDecoder

Physical security is often considered simpler than digital security since safes are heavy and physical keys take more effort to duplicate than those of the digital persuasion. [Maxime Beasse and Quentin Clement] have developed a smartphone app that can duplicate a key from a photo making key copying much easier.

KeyDecoder is an open source Android app that can generate all the necessary bitting info to duplicate a key from just an image. Luckily for the paranoid among us, the image must be taken with the key laying flat without a keyring on an ISO/CEI 7810 ID-1 ID or credit card. A passerby can’t just snap a photo of your keys across the room and go liberate your home furnishings, but it still would be wise to keep a closer eye on your keys now that this particular cat hack is out of the bag.

The project’s GitHub page is awash in warnings that this tool is designed solely for “pentesters and security enthusiasts” to warn their friends and clients about the dangers of leaving their keys exposed. After learning about this tool, we wouldn’t be surprised if some in the audience start rethinking how they carry and store their physical keys from now on.

If you want to see some more hacks to duplicate keys, checkout Copying High Security Keys With OpenSCAD And Light and Methods Of Copying High Security Keys.

A wooden table with walnut squares and a maple grid. The table has a large barrel-shaped curve on one end and the other is a representation of a wormhole with what look like two stretched cones connected through a narrow cylinder. The wooden grid looks stretch to follow the curvature of spacetime.

Wormhole Coffee Table Takes Woodworking To Another Dimension

While some people are happy with a simple coffee table to hold their snacks while watching Star Trek reruns, others want their furniture to go where no furniture has gone before. [Olivier Gomis] has definitely satisfied this need with his Wormhole Coffee Table. [YouTube]

The complicated shape and curvature of a (3D representation of a) wormhole isn’t easy to create, but [Gomis] managed to carve one without the aid of a CNC or 3D printer. Starting with walnut planks and maple veneer laminated together, he created a grid stackup to replicate the common representation of spacetime as a 2D grid. Using various arrangements of these grids, he built up the central section of the wormhole which looked like a low poly vase before he put it on the lathe for turning.

The lathe work on this build is simultaneously impressive and terrifying. Turning down the central portion of the wormhole required working between two large spinning squares of walnut, which [Gomis] admits was “scary.” Multiple custom jigs were required to keep parts flat and deal with the extreme curvature of the inside of the wormhole’s opening. If that weren’t enough, if you look down the wormhole, he has installed a set of LED lights that show the spacetime grid continuing on to parts unknown.

If you’d like to see another impressive wormhole, check out this Amazing STARGᐰTE With DHD And Infinity Mirror Wormhole.

Continue reading “Wormhole Coffee Table Takes Woodworking To Another Dimension”

A man sits in a chair atop a hexagonal platform. From the platform there are six hydraulically-actuated legs supporting the hexapod above a grassy field. The field is filled with fog, giving the shot a mysterious, otherworldly look.

Megahex Will Give You Robo-Arachnophobia

Some projects start with a relatively simple idea that quickly turns into a bit of a nightmare when you get to the actual implementation. [Hacksmith Industries] found this to be the case when they decided to build a giant rideable hexapod, Megahex. [YouTube]

After seeing a video of a small excavator that could move itself small distances with its bucket, the team thought they could simply weld six of them together and hook them to a controller. What started as a three month project quickly spiraled into a year and a half of incremental improvements that gave them just enough hope to keep going forward. Given how many parts had to be swapped out before they got the mech walking, one might be tempted to call this Theseus’ Hexapod.

Despite all the issues getting to the final product, the Megahex is an impressive build. Forward motion and rotation on something with legs this massive is a truly impressive feat. Does the machine last long in this workable, epic state? Spoilers: no. But, the crew learned a lot and sometimes that’s still a good outcome from a project.

If you’re looking for more hexapod fun, checkout Stompy, another rideable hexapod, or Megapod, a significantly smaller 3D-printed machine.

Continue reading “Megahex Will Give You Robo-Arachnophobia”

A white stairwell ceiling with a rack holding clothes. The rack follows the slope of the ceiling and is attached to a series of ropes and pulleys to let it got up and down.

Stairway Drying Rack Rises Above The Rest

Finding space to dry clothes can be challenging in smaller spaces. [Tom Parker] solved this conundrum in his one bedroom apartment by putting a drying rack in his stairwell.

By making the laundry rack fold up above the stairwell, [Parker] can dry his clothes without them taking up a lot of precious floor space. A pole is used to is raise and lower a dowel rod attached to two lines of paracord running over pulleys and to the end of the rack. Each moving corner of the rack also has a set length of cord attached to prevent the rack from rotating too far down as well as providing a safety mechanism should one of the other lines of cord snap.

The rack is bolted-together, laser cut 1.5mm thick mild steel with 15 mm dowels attached to the sides via threaded inserts. Spacing is set for the raised rack to put clothes at 75 mm apart. Plywood pieces interface the rack with the wall to avoid damaging the drywall.

If you’re looking for more laundry hacks, check out this Smart Clothes Dryer or How Robots Suck at Folding Laundry.