Accurately Measuring Electrical Conductivity

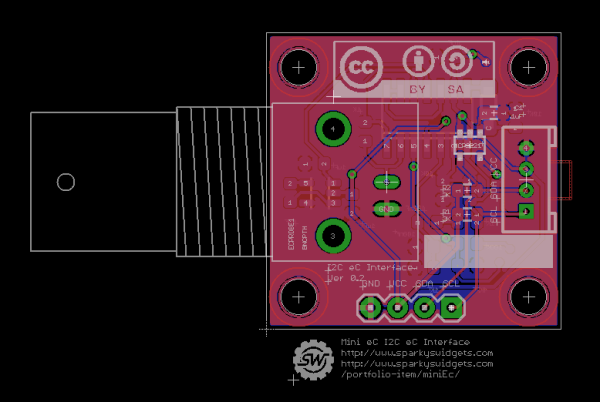
[Ryan] designed a PCB that lets you easily take readings from a commercial electrical conductivity probe over I2C. Conductivity measurements are great for measuring the salinity of a solution, which is useful for applications like hydroponics. While the probes themselves are a bit pricey (on the order of $50 from eBay), they are very accurate and last a long time.

Commercial conductivity probes contain platinum electrodes to prevent corrosion. The electrodes are excited with an AC signal, which prevents polarization of the solution and avoids chemical reactions at the electrodes. The voltage across the two electrodes is measured while the electrodes are being excited, which is proportional to the conductivity of the solution

[Ryan]’s board generates +/-5v and uses a Wien bridge oscillator to generate a sine wave which excites the outermost electrodes. The voltage across the electrodes is amplified and fed into a MCP3221, an inexpensive 12-bit ADC with an I2C interface. [Ryan] also wrote an Arduino library for the MCP3221 so you can easily get your probe up and running.

 

Ultra-powerful Pneumatic Hand Dryer

Have you been let down by the inadequate performance of a hand dryer? We know that feel. [tesla500] recently installed a centralized compressed air system and decided he might as well do something interesting it, so he built an ultra-powerful hand dryer that rivals the performance of any hand dryer on the market.

[tesla500] set out to make a clone of the Dyson Airblade. He started out with a simple prototype out of milled aluminum with one nozzle. Even with just one nozzle the hand dryer performed incredibly well. Next he designed a Solidworks model with a smaller nozzle gap (50um) and 4 total nozzles which has even better performance and emulates the airflow of the Airblade.

The dryer was originally controlled with a foot-activated pneumatic valve, but it severely restricted airflow. [tesla500] decided to use a 3/8″ solenoid valve instead, which solved the airflow restriction. According to [tesla500], the dryer works even better than the Airblade when running at full pressure, although he notes that you might need to watch out if you have any open wounds on your hands.

A Custom Control Surface For Audio/Video Editing

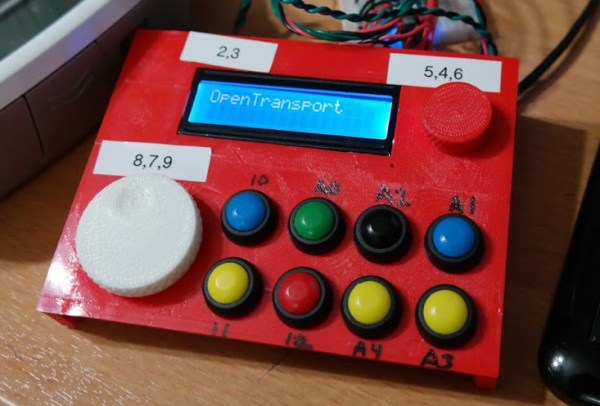
Control surfaces (input devices with sliders, encoders, buttons, etc) are often used in audio and video editing, where they provide an easy way to control editing software. Unfortunately even small control surfaces are fairly expensive. To avoid shelling out for a commercial control surface, [Victor] developed his own custom control surface that sends standard MIDI commands which can be interpreted by nearly any DAW software.

[Victor]’s control surface includes several buttons, a display, and a rotary encoder. His firmware sends MIDI commands whenever a button is pressed or the rotary encoder is turned. [Victor] plans on adding menu functionality to the currently unused LCD display which will allow the user to change the scrubbing speed and other various settings.

One advantage of making your own control surface is that you can customize it to your own needs. [Victor] has posted a model of his 3d-printed enclosure and his source code on the project page so you can easily modify his design with any button configuration you might want.

Low-Voltage Tube Amp Is Great For Beginners

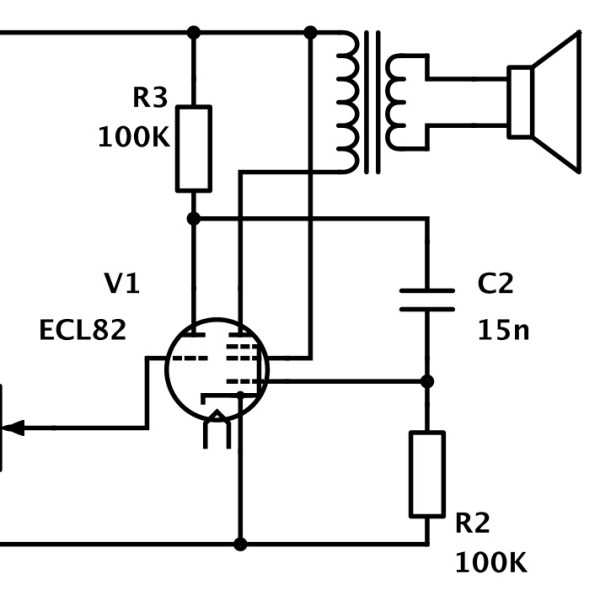
If you ever wanted to build your own tube amplifier but you were intimidated by working with high voltages, [Marcel]’s low-voltage tube amp design might spark your interest. The design operates with a B+ (plate) voltage of only 40v, making it less intimidating and dangerous than many other amps that operate over 300V. It’s also incredibly easy to build—the whole design uses only 11 components.

The amplifier is designed around the ECL82 tube, which includes both a triode and a pentode in one package. The ECL82 is practically an amplifier in a tube: it was designed for low-cost electronics like record players that needed to be as simple as possible. The triode in the ECL82 is used as a pre-amplifier for the incoming signal. The pentode is controlled with the pre-amplified signal and acts as a power amplifier.

[Marcel]’s amplifier also uses a PY88 tube rectifier instead of semiconductor diodes, making it an entirely silicon-free design. Although [Marcel] hasn’t posted up detailed build instructions yet, his simple schematic should be all you need to get started. If you want some more background information about tube amps but you don’t know where to start, check out our post on basic tube amp design from earlier this year.

Dual-mode Avalanche And RF Random Number Generator

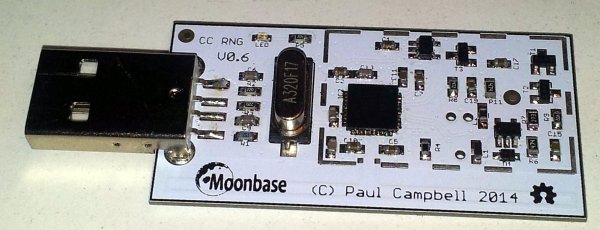
[Paul] designed a new open-hardware RNG (random number generator) that includes two sources of entropy in a small package. The first source of entropy is a typical avalanche diode circuit, which is formed by a pair of transistors. This circuit creates high-speed random pulses which are sampled by the onboard microcontroller.

What makes this design unique is a second entropy source: a CC2531 RF receiver. The RF receiver continuously skips around channels in the 2.5Ghz band and measures the RF signal level. The least-significant bit of the signal level is captured and used as a source of entropy. The firmware can be configured to use either source of entropy individually, or to combine both. The firmware also supports optionally whitening the entropy byte stream, which evens out the number of 1’s and 0’s without reducing entropy.

The OneRNG uses the USB-CDC profile, so it shows up as a virtual serial port in most modern operating systems. With the rngd daemon and a bit of configuration, the OneRNG can feed the system entropy source in Linux. [Paul] also has a good writeup about the theory behind the entropy generator which includes images of his schematic. Firmware, drivers, and hardware design files are open-source and are available for download.

Bike Persistance of Vision

Simple POV Bike Effects With WS2811 Strips

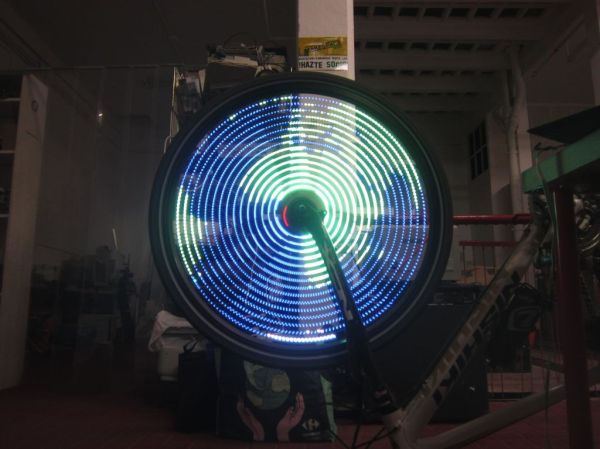
[Andrew] wrote in with a new take on the classic persistence of vision bike spoke hack. While many of these POV setups use custom PCBs and discrete LEDs, [Andrew]’s design uses readily available off-the-shelf components: WS2811 LED strips, an Arduino, an Invensense IMU breakout board, and some small LiPo batteries.

[Andrew] also implemented a clever method of controlling his lights. His code detects when the rider taps the brakes in certain patterns, which allows changing between different light patterns. He does note that this method isn’t incredibly reliable due to some issues with his IMU, so now he senses when the rider taps on the handlebars as well.

If you want to build your own bike POV setup, you’re in luck. [Andrew] wrote up detailed instructions that outline the entire build process. He also provides links to sources for each part to make building your own setup even easier. His design is pretty affordable too, coming in at just under $50 per wheel. Check out a video of [Andrew]’s setup in action after the break.

Continue reading “Simple POV Bike Effects With WS2811 Strips”

A Compact Underwater Vehicle: The Nanoseeker

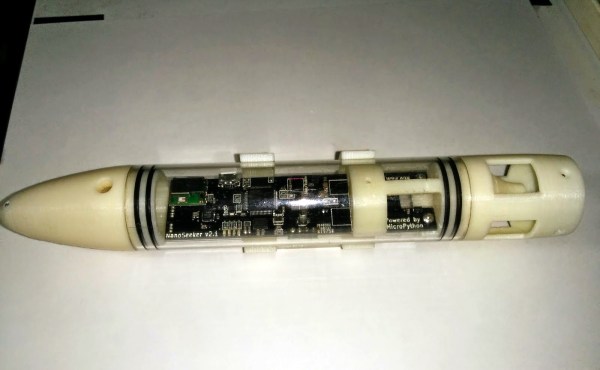
The Nanoseeker is a compact underwater vehicle in a torpedo-like form factor. [John] designed the Nanoseeker as completely enclosed vehicle: both the thruster and the control fins are all housed within the diameter of the tube. The thruster is ducted with vents on the sides and control fins integrated into the back of the duct assembly.

[John] designed a compact PCB to drive the vehicle, which includes an STM32F4 alongside several sensors. An MPU-9150 provides IMU functionality and two dual motor driver ICs from TI control the throttle and the control fins. [John] also added a Bluetooth radio for remote control functionality. For those who want a closer look, an image of the schematic is up on his blog.

The board is running MicroPython, which is a small Python implementation optimized for microcontrollers. Although [John]’s hardware platform looks great, he’s still getting started on his software. We look forward to seeing how his project develops, as his project is one of the smallest underwater vehicles we’ve seen.

[via Dangerous Prototypes]