Count Your Zombies! A Left4Dead 2 Stat Tracker

Sure, you’re getting further and further into the game and finishing missions, but the true progress for a zombie shooter is how many zombies you’ve killed, right? [Evan Juras] agreed, so he set off to build a hardware stat tracker for Left4Dead 2!

Left4Dead 2 tracks a bunch of stats and at the end of each level, those stats are updated on your Steam page. [Evan] used a Python script running on a Raspberry Pi to connect to the internet and grab four different stats from your Steam profile. Those stats are displayed on an RGB 16×2 display. To house the project, a case for it was designed and [Evan] had it 3D printed. There are two buttons on the case: one to update the stats and another to cycle through them. If no buttons are pressed then the display cycles through the stats every minute and updates the stats every 24 hours.

The video below shows a summary of the build process and describes the hardware and software used. [Evan] has plans for tracking stats from other games through Steam and his python code is available on Github. Python is becoming the go-to tool for interacting with video game bots and now, stats — see this list of Pokemon Go bots. Also, check out this feature about running MicroPython on an ESP8266 if you wanted to build something similar to this without the Raspberry Pi.

Continue reading “Count Your Zombies! A Left4Dead 2 Stat Tracker”

Wake Up! The Cat Came Back!

In order to get the most out of the batteries connected to your microcontroller, you’ll probably need to put it to sleep, the deeper the better. [Rgrokett] was curious about the nighttime habits of his cat, and came up with a nice little hack to get more battery life out of the ESP8266 that he was using.

[rgrokett]’s cat enters and leaves through a cat-door. He figured a PIR sensor would let him know when there was movement around the door. He could then tell if the cat was around. Leaving the PIR sensor and the ESP8266 microcontroller (an Adafruit Huzzah) on all the time drained the batteries pretty quickly, so [rgrokett] decided to try putting the Huzzah to sleep.

The trick in this build is that the PIR sensor is used to reset the Huzzah when it triggers. The Huzzah requires the reset switch to go from high to low, but the PIR trigger goes from low to high, so a transistor is used to invert the PIR sensor’s trigger signal. When the Huzzah wakes up, it connects to the WiFi network and sends [rgrokett] an email via IFTTT ([rgrokett]’s description goes over the steps to set up a secure connection to IFTTT.)

It’s a pretty simple hack, but it increases [rgrokett] system’s battery life from a couple of days to more than a month (he’s still waiting to see how long they’ll last) and all that was needed was the microcontroller, the sensor and a couple of parts. We have a couple of older hacks about putting the ESP modules into deep sleep, such as this one, and check out this tutorial on PIR sensors.

Enter The Space Tunnel

What’s better than 1 string of LED lights? 96. That’s how many. Each string of the 96 has 60 ws2812b LEDs, for a total of 5760 individually addressable RGB LEDs.  That’s not the cool part of [jaymeekae]’s Space Tunnel installation, the cool part is that they’re interactive.

Starting out with some PVC piping, dark cloth was used as a backdrop and the LED strips were attached to it. Several power supplies are used to supply the voltage necessary and each strip controlled by FadeCandy chips which connect to, in this case, a Windows PC via USB. Initially, computer power supplies were used, but they couldn’t supply the current necessary. [jaymeekae] used them for the first installation, but switched to better power supplies for further installations.

Once the lights were up and powered, [jaymeekae] started work on the interface to control them. Starting with a used bureau, [jaymeekae] cut out a section for the touchscreen, and installed the controlling computer in the bottom half. Processing is used to interface with the FadeCandy controllers and HTML is used for a user interface. Each mode runs a different Processing program for different effects, including audio visualization, a space tunnel mode (hence the name) and a cool drawing app where the user draws on the touchscreen and sees the results in the lights overhead.

Over several iterations, the Space Tunnel has evolved, with better power supplies and a better interface. It’s a great art installation and [jaymeekae] takes it to festivals, including one in Spain and one in the UK. There are some other LED string projects at Hack-a-Day, including this one with ping-pong balls, and this one that involves drinking a lot of beer first.

[via Reddit]

Continue reading “Enter The Space Tunnel”

Forgot About Valentine’s Day? A Quick IoT Valentine

Did you forget about Valentine’s Day? Do you need a quick project to get ready for Valentine’s Day? [Becky Stern] has you covered. She’s whipped up a neat Internet-enabled Valentine project which should be pretty quick to put together.

At its heart (pun intended) is an ESP8266 microcontroller, in this case an Adafruit Feather Huzzah. Several layers of tissue paper heart are stitched together and cut out into a heart shape and then attached to a spring. A vibrating pager motor is used to shake the it when a signal comes in. Two buttons are used to send the message and a red LED is used to light the heart up. The whole thing is enclosed in a shadow box. [Becky] also put together another controller with a similar setup in a plastic enclosure. When the buttons are pressed on either controller, the other gets a signal and the heart shakes and lights up.

These projects send and receive Valentines, but they could be programmed to send whatever information you’d like. If you’re looking for a quick Valentine’s Day project, this is a great one, and you might have all you need already in your component drawer. Break out the soldering iron and send your Valentine a message! If you’re still looking for a quick Valentine’s Day project, check out this animated heart or this PCB Valentine.

Continue reading “Forgot About Valentine’s Day? A Quick IoT Valentine”

Wood And Rubber Band Pinball

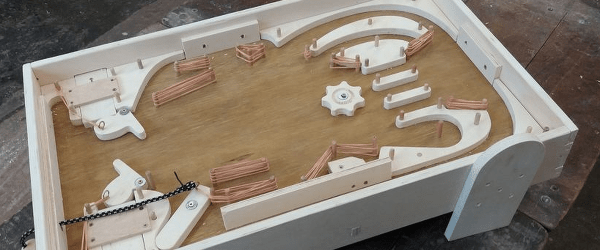
As pinball has evolved, it has gone from a simple gravity based game to an electromechanical one.  As the 20th century came to a close, pinball games added digital elements as well, matrix displays replaced electromechanical scoreboards, and LEDs replaced incandescent bulbs. While the game got more creative as new technologies became available, the basics of the pinball never changed – keep the ball alive using your skill with the flippers (and the occasional nudge.) [Garagem Fab Lab] has taken the basics of the pinball machine and, with some wood and elastic bands, has created a very nice desktop pinball machine.

The plans for the game require getting the wood cut by a CNC mill, but they could probably be easily created using a jigsaw. Instead of electrical buttons and solenoids, pieces of wood push the flippers out and elastics reset them when released. The bumpers, too, are simple dowels with rubber bands wrapped around them. The launching mechanism is a bit of bungee cord tied onto a piece of wood and used like a flipper to speed the ball into the play area.

The build is a throwback to the earliest pinball machines. Sure, there’s no reaction from the bumpers when they’re hit, they’re just passive, but the game looks fun. It would be a great base to add in some sensors, a microcontroller, and a display to keep track of scores if one was so inclined. Other DIY pinball machines we’ve seen are this pinball game built with Meccano and lasers, as well as this completely 3D-printed machine.

Build Your Own P-Brain

I don’t think we’ll call virtual assistants done until we can say, “Make me a sandwich” (without adding “sudo”) and have a sandwich made and delivered to us while sitting in front of our televisions. However, they are not completely without use as they are currently – they can let you know the time, weather and traffic, schedule or remind you of meetings and they can also be used to order things from Amazon. [Pat AI] was interested in building an open source, extensible, virtual assistant, so he built P-Brain.

Think of P-Brain as the base for a more complex virtual assistant. It is designed from the beginning to have more skills added on in order to grow its complexity, the number of things it can do. P-Brain is written in Node.js and using a Node package called Natural, P-Brain parses your request and matches it to a ‘skill.’ At the moment, P-Brain can get the time, date and weather, it can get facts from the internet, find and play music and can flip a virtual coin for you. Currently, P-Brain only runs in Chrome, but [Pat AI] has plans to remove that as a dependency. After the break, [Pat AI] goes into some detail about P-Brain and shows off its capabilities. In an upcoming video, [Pat AI]’s going to go over more details about how to add new skills. Continue reading “Build Your Own P-Brain”

Taking Control Of Your Furby

Furbys have been around for a while and they are an interesting (if annoying) toy that will teach the kids to be okay with their eventual robotic overlords. In the meantime, the latest version of the robotic companion/toy/annoyance uses Bluetooth LE to communicate with the owner and [Jeija] has been listening in on the Bluetooth communication, trying to reverse engineer the protocol in order to run code on Furby.

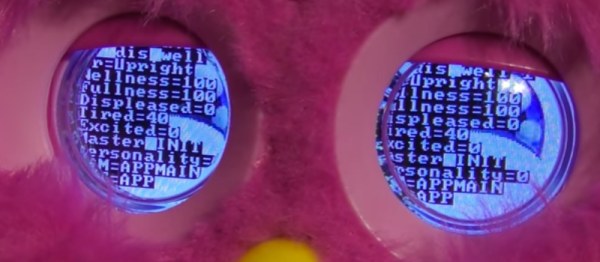
[Jeija] has made a lot of progress and can already control the Furby’s actions, antenna and backlight color, and change the Furby’s emotional state by changing the values of the Furby’s hungriness, tiredness, etc. [Jeija] has created a program that runs on top of Node.js and can communicate with the Furby and change its properties. [Jeija] has also discovered, and can bring up, a secret debug menu that displays in the Furby’s eyes. Yet to be discovered is how to run your own code on the Furby, however, [Jeija] is able to add custom audio to the official DLC files and upload them into the Furby.

[Jeija] points out the all this was done without taking a Furby apart, only by sniffing the Bluetooth communication between the robot and the controlling app (Android/iOS device.) Check out a similar hack on the previous generation of Furbys, as well as a replacement brain for them. We just hope that the designers included a red/green LED so that we will all know when the Furbys switch from good to evil.

Continue reading “Taking Control Of Your Furby”